Hitch knots are fundamental tools in various outdoor activities, designed to secure a rope to an object like a post, pole, or another rope. Some provide a temporary hold that can be quickly released, while others create a firm grip that won’t slip under tension. Mastering these knots ensures safety and efficiency in tasks like climbing, sailing, and camping. Each hitch knot has unique characteristics tailored to specific applications, and understanding how and when to use these knots is a valuable skill for both outdoor enthusiasts and practical problem-solvers alike.
1. Clove Hitch
The Clove Hitch is a simple yet versatile knot used to attach a rope to a post or another rope. Because of its adjustability, it is ideal for situations requiring quick and temporary fastening, such as securing fenders to boat rails or setting up tents. While easy to tie and adjust, it may slip under heavy loads or when tied with certain rope materials. Therefore, it’s essential to ensure proper tension and consider additional securing knots if necessary.
To tie a Clove Hitch Knot, wrap a rope around a pole or tree. Cross the rope over itself, and then wrap it around again. Tuck the end under the second loop before pulling tight to secure it.
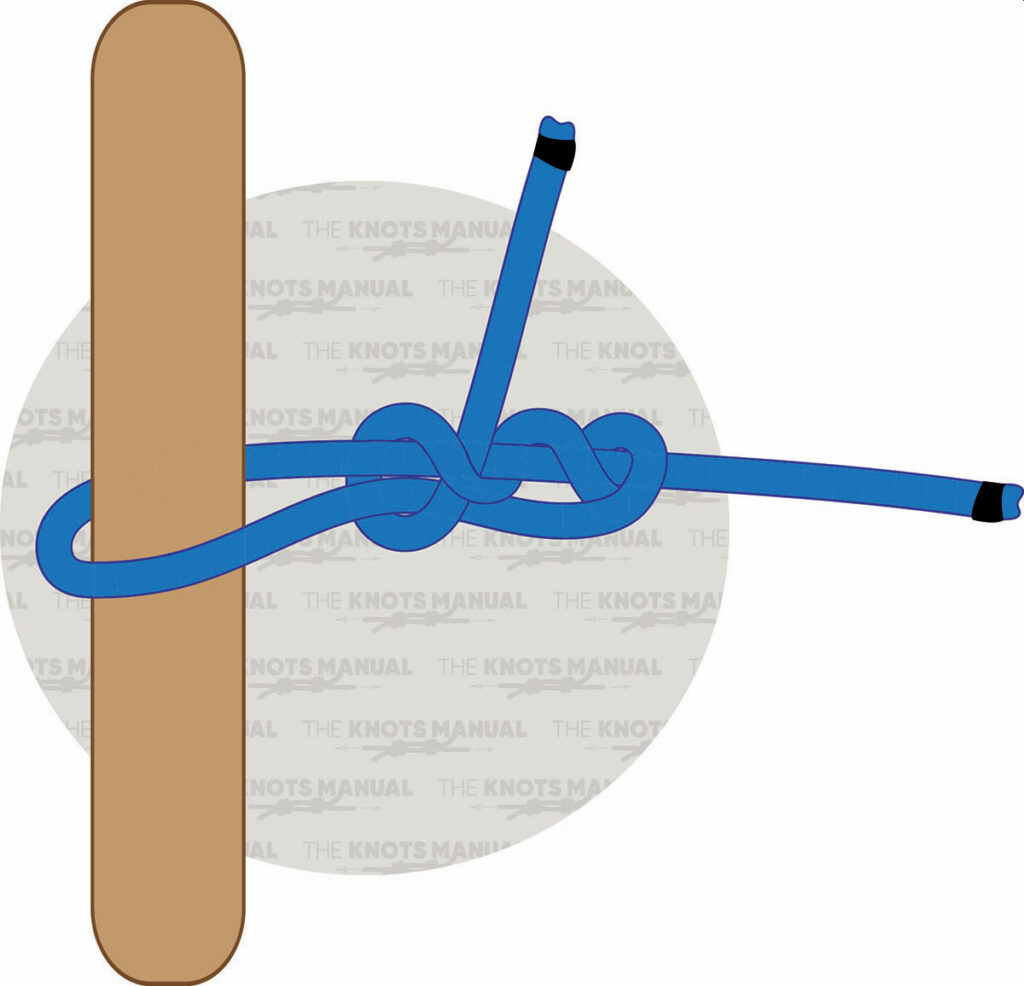
2. Rolling Hitch
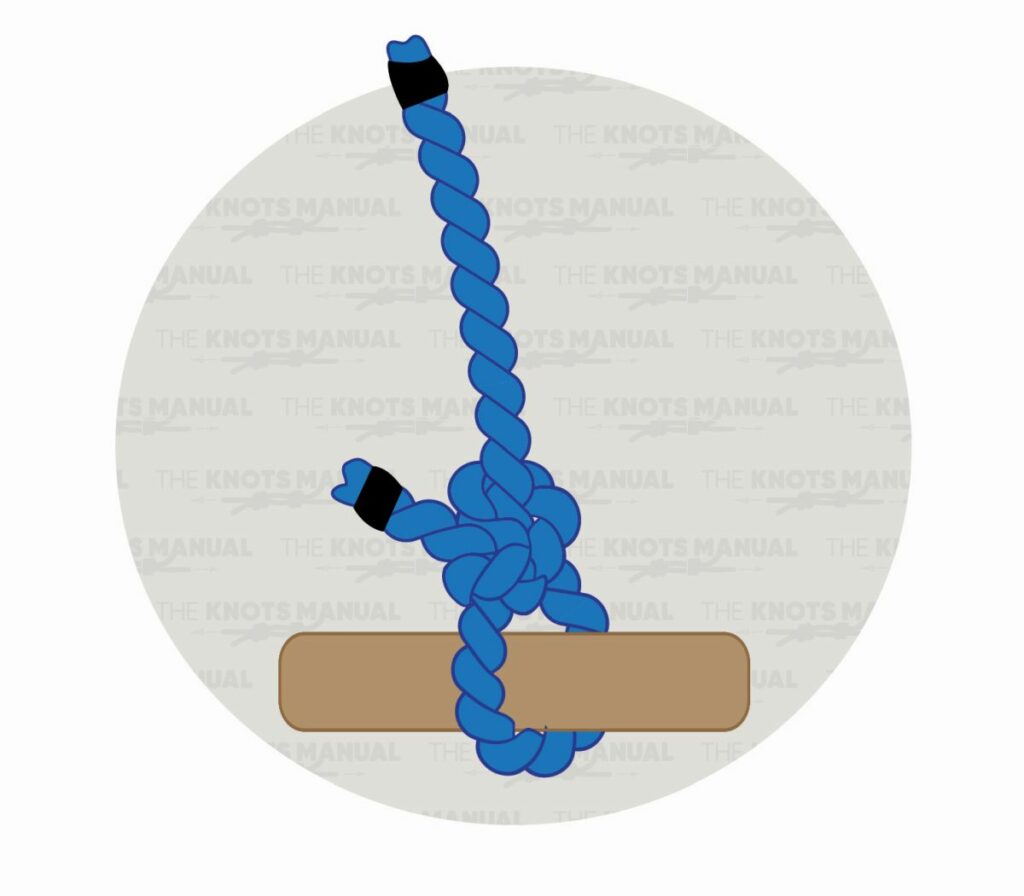
Designed to grip another rope or a pole, the Rolling Hitch is particularly useful for adjusting the tension of a rope or relieving strain from another line. This knot is often used to transfer loads or to secure items on a deck and works best when a lengthwise pull is applied. Its ability to grip firmly without slipping makes it invaluable in dynamic environments.
Tying a Rolling Hitch knot starts by looping the working end of the rope around a post and then bringing it down from behind the post. Bring the working end back up and wrap it around the post. Then, pass the working end under the post and underneath the first wrap, pulling it upwards from between the two wraps. To tighten and secure the knot, pull the working end and standing end simultaneously.
3. Girth Hitch
The Girth Hitch, also known as the Cow Hitch, is a straightforward knot that uses a sling to attach an item to a harness. Common in climbing and arborist activities, it allows for quick connections to harnesses or anchors. However, under certain conditions, it may shift or slip, so it’s crucial to assess its security based on the specific application. Despite this, its ease of use makes it a popular choice for temporary attachments.
In order to tie a Girth Hitch knot, begin by wrapping the pre-tied sling around the support. Pass the bigger loop through the smaller one and take the right loop to the left side. Then pull the bigger loop so that the smaller loop tightens against the support to finish the knot.
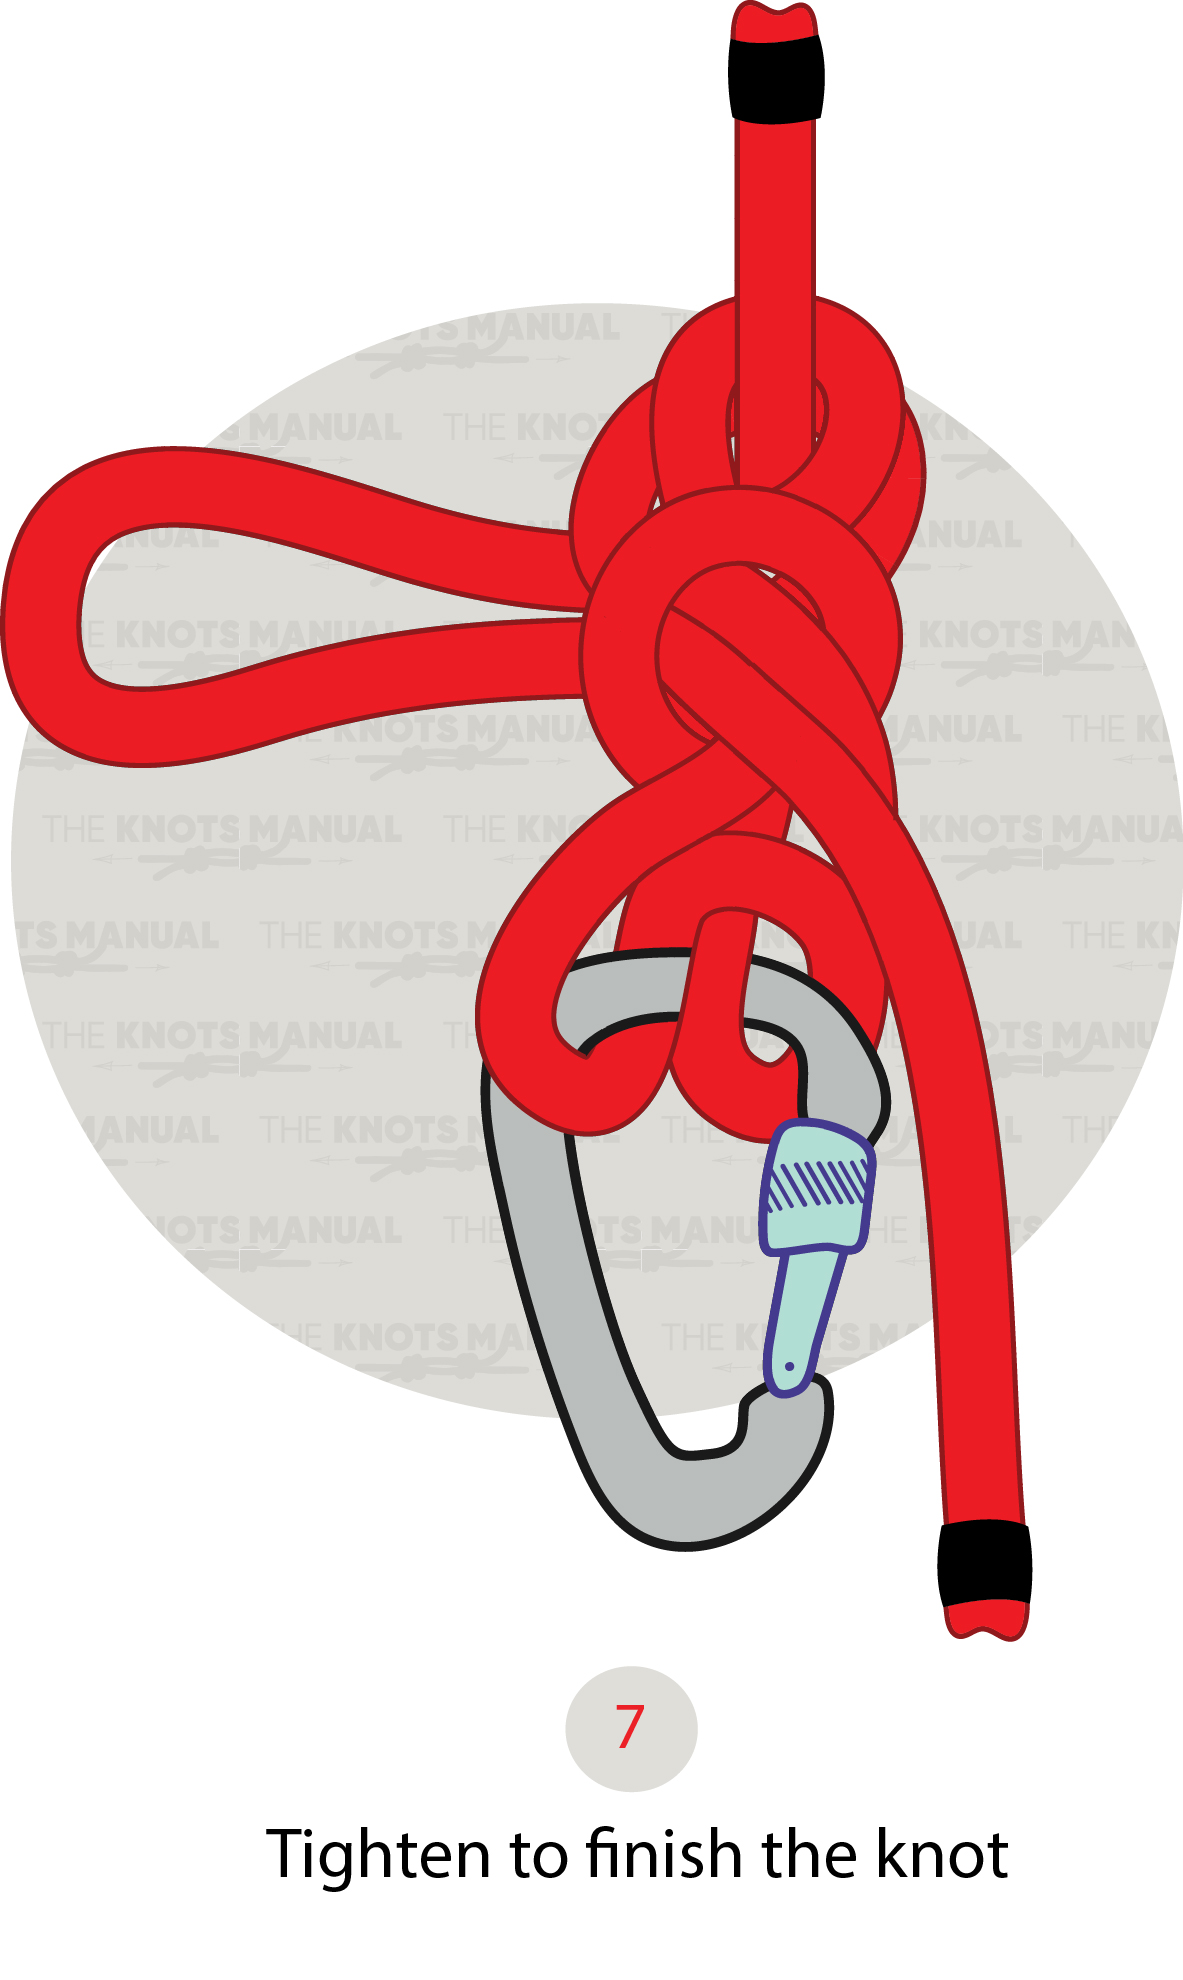
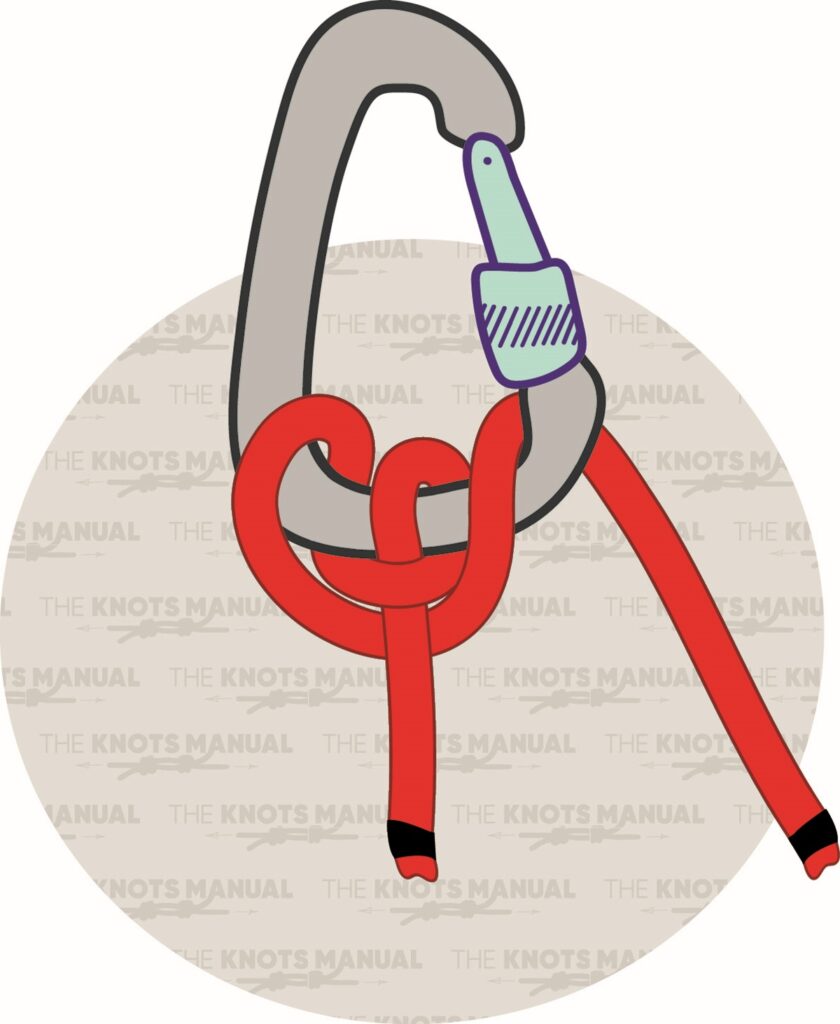
4. Munter Mule
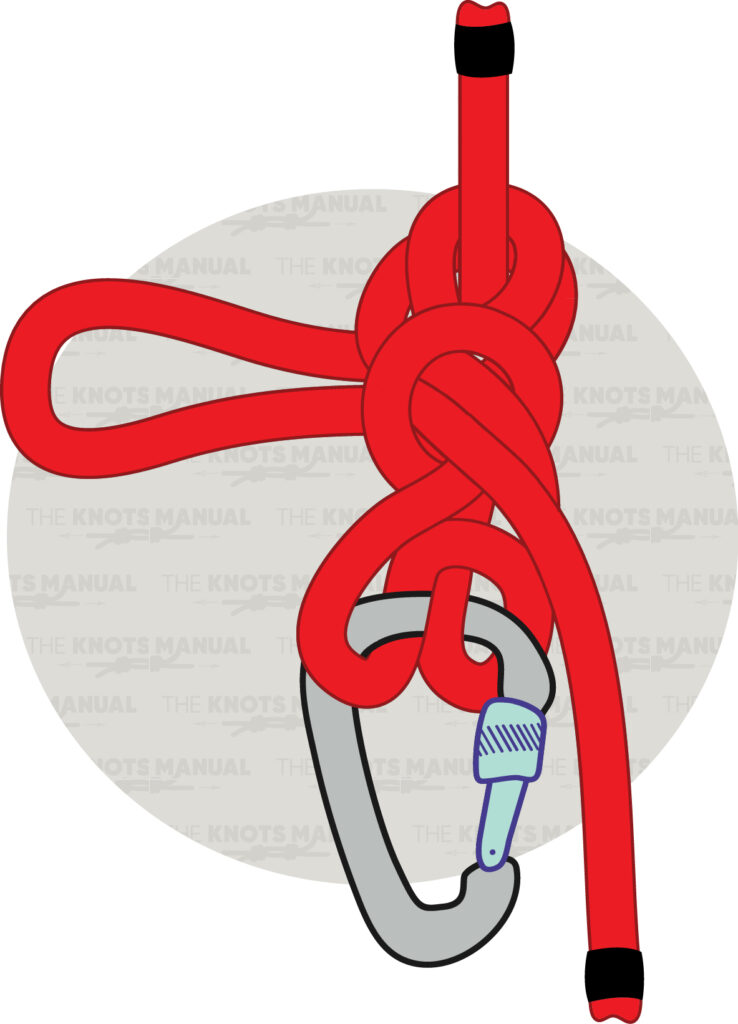
Combining the Munter Hitch with an additional locking mechanism, the Munter Mule provides a secure, adjustable knot. It’s widely used in climbing and rescue operations to create a releasable anchor point. This knot allows for controlled descent or belaying, offering both versatility and safety. Its ability to lock off a load without additional equipment makes it a valuable skill for outdoor professionals.
A Munter Mule Knot is tied by wrapping the rope end around a carabiner two times. Bring the end up and pass it to the right side. Next, form two loops with the rope and bring the right loop through the left loop. Then, take the loop to the right side and bring it through the formed loop. Pull ends to tighten and finish the knot.
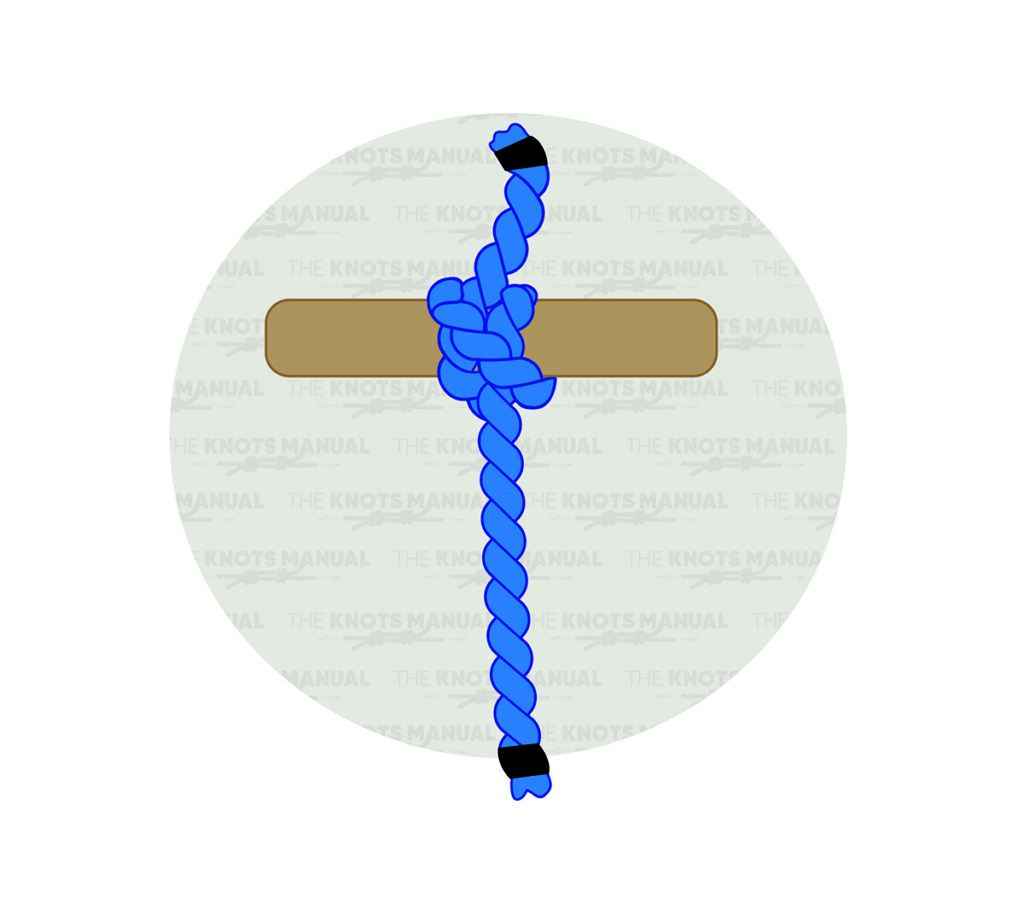
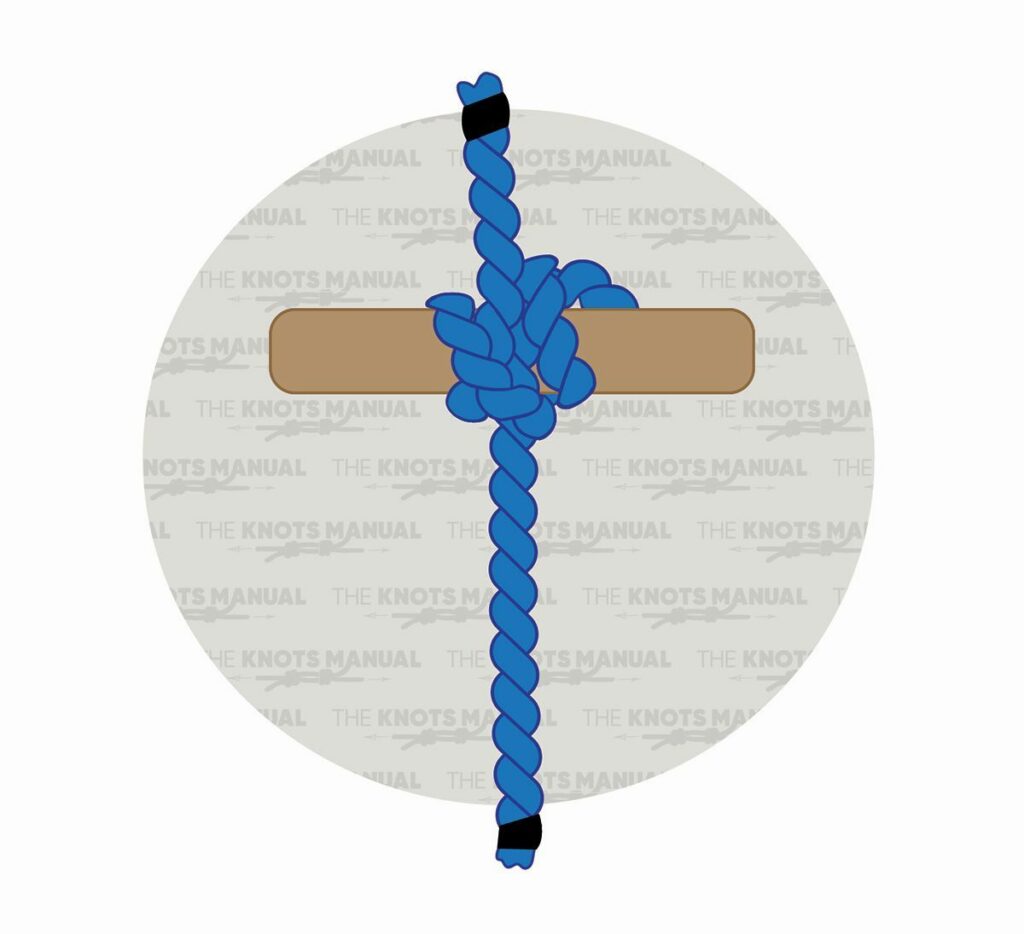
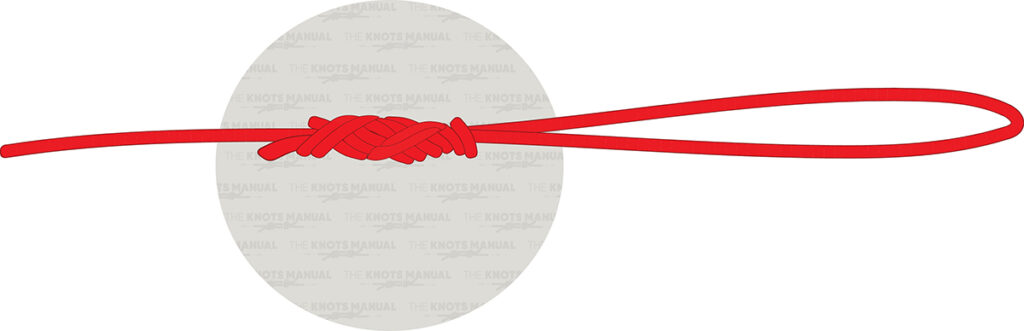
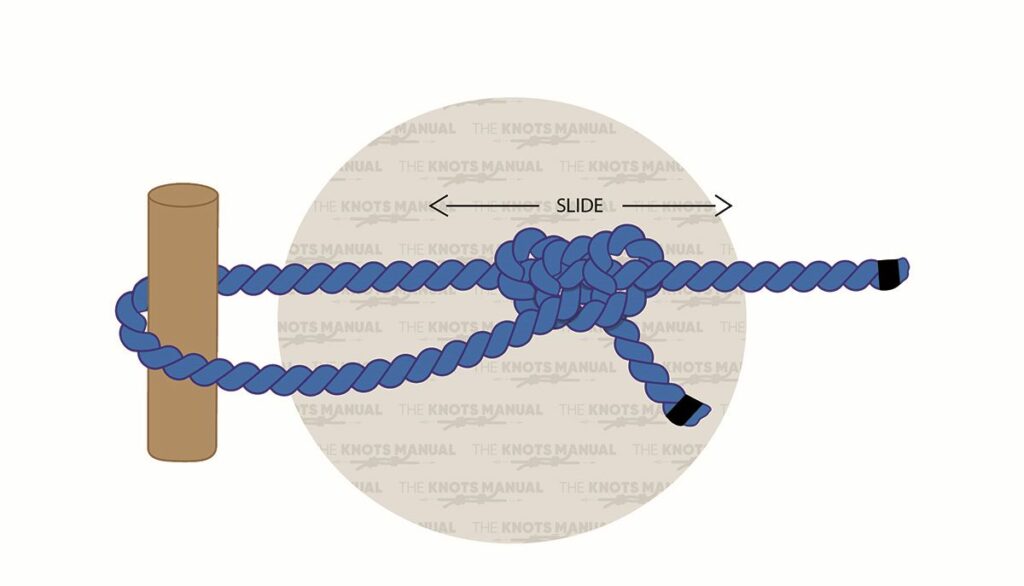
5. Midshipman’s Hitch
The Midshipman’s Hitch is an adjustable knot that maintains tension under load. It’s commonly used for securing tent guy lines or adjusting the height of a tarp. The knot slides easily when not under tension but holds firm when a load is applied. This adjustability makes it ideal for situations requiring frequent tension adjustments.
When tying a Midshipman’s Hitch Knot, wrap the working end of the rope around the object. Pass it through the loop created by the wrap and around the standing line, forming the first Half Hitch. Next, bring it around again, working back away from the object and toward the standing line, and pull tight to form an Awning Hitch. Then, going in the same direction and outside of the loop around the standing line, make a Half Hitch. Pull both ends to tighten the knot so that it is able to slide on the standing line and hold tight when holding a load.
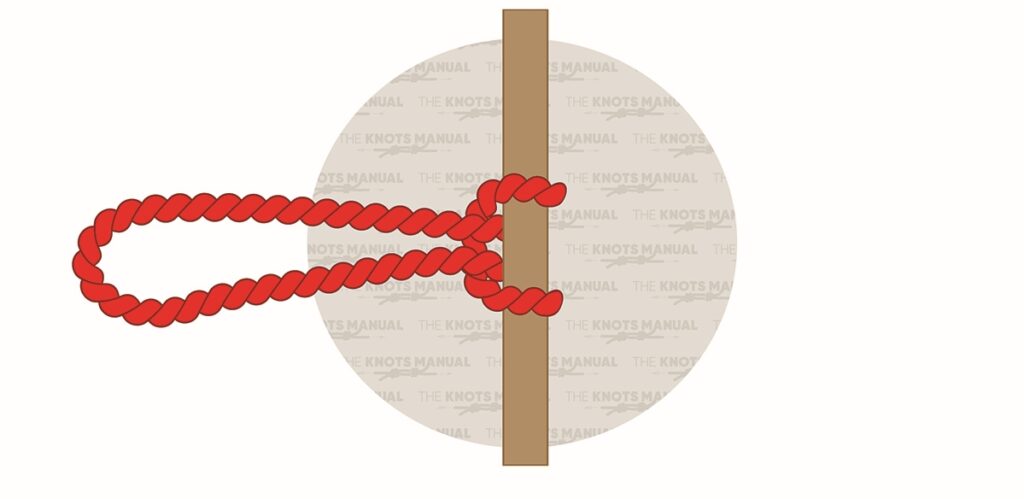
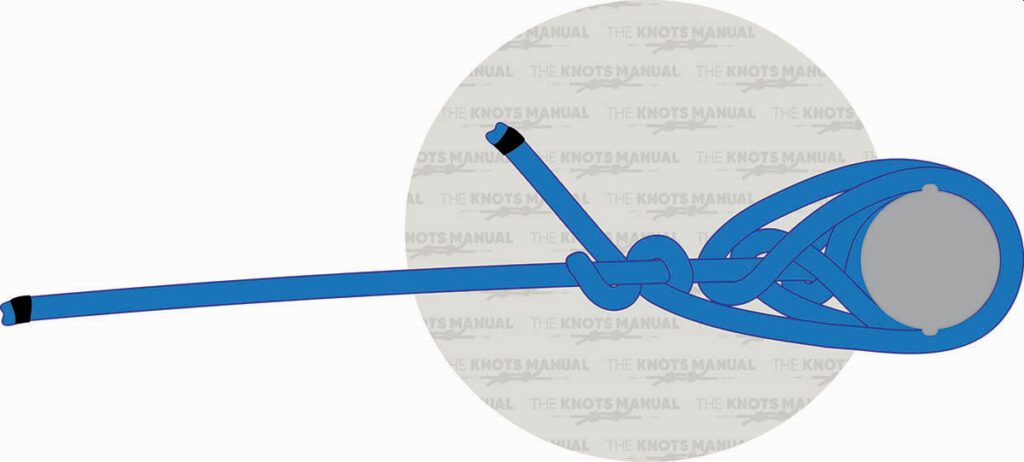
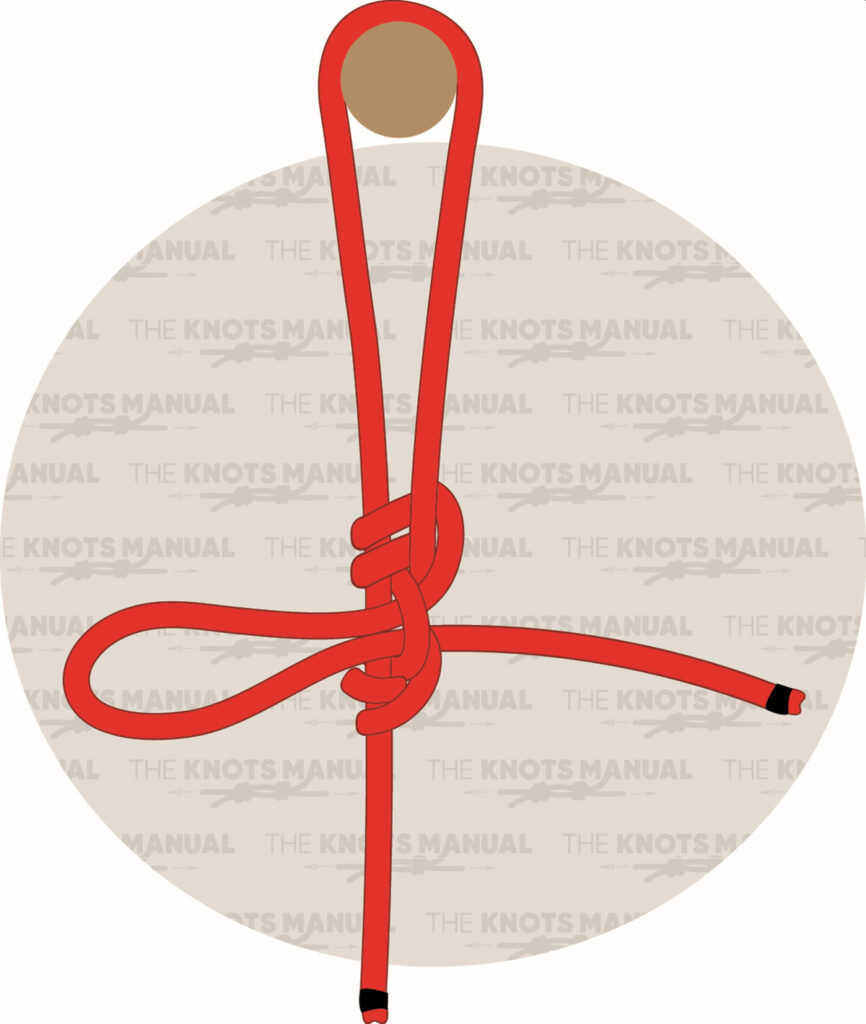
6. Siberian Hitch
The Siberian Hitch is a quick-release knot favored in cold climates where performing tasks with hands may be compromised. It’s particularly useful for tying guy lines to tent stakes or securing loads that require rapid setup and takedown. The knot’s design ensures it remains secure under tension yet can be easily untied with a single pull. Its reliability in harsh conditions makes it a favorite among winter campers and survivalists.
To tie a Siberian Hitch knot, start by wrapping the working end of the rope around a sturdy anchor point, such as a tree or a pole. Create a loop with the working end and pass over both ropes and back under both ropes. Then tuck a bight from the working end of the rope through the loop. Pull the bight until it creates a secure hitch. To quickly release, pull on the tag end of the knot.
7. Slippery Half Hitch
The Slippery Half Hitch is a quick-release knot commonly used when a temporary but secure hold is needed. It’s often employed in situations where the knot will be subjected to tension but must be easily undone, such as securing a load that will be frequently adjusted. By pulling the working end, the knot releases instantly, making it highly efficient for tasks requiring speed and adaptability.
Tying a Slippery Half-Hitch Knot begins by taking the end of a rope or line and wrapping around the object you’re fastening to. Form a loop, leaving a small tail. Pass the tail through the loop to create a second loop, then pull it tight. This slip-loop design holds well but can be undone in a single pull.
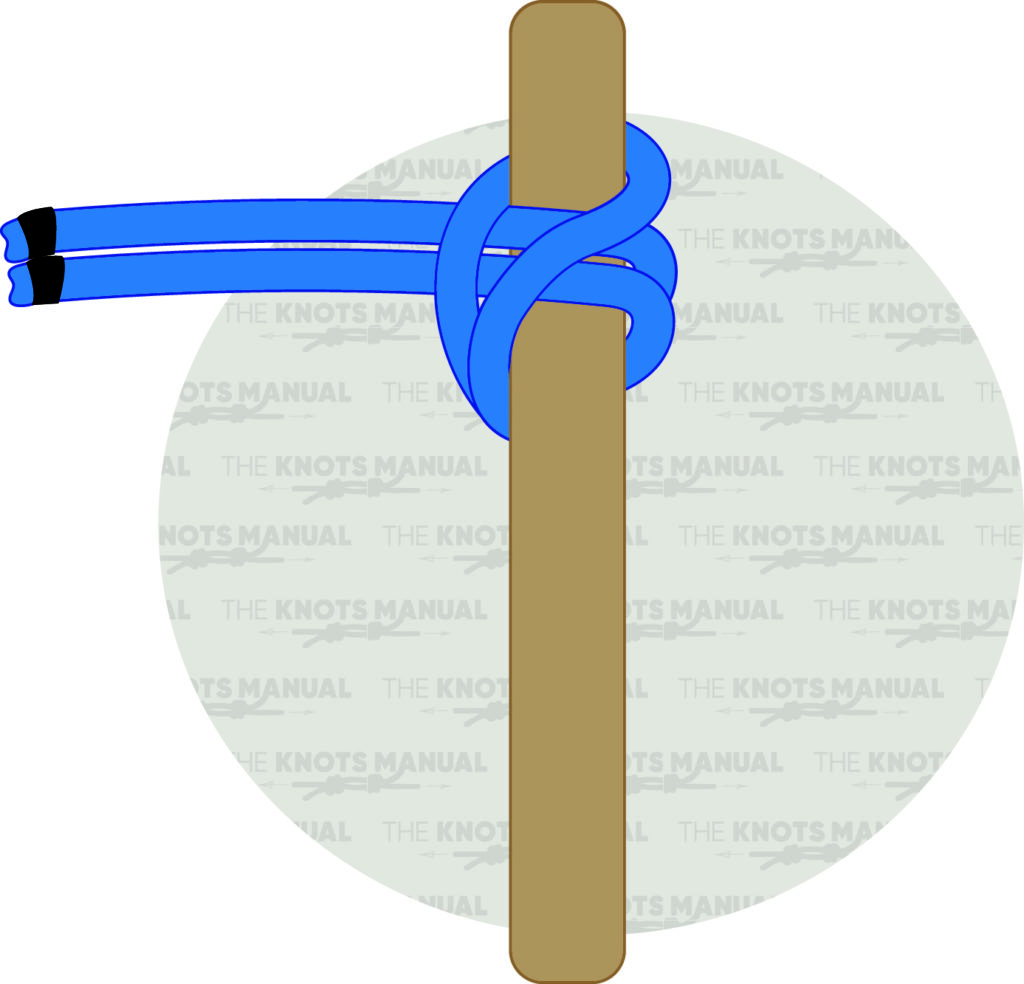
8. Vertical Half Hitch
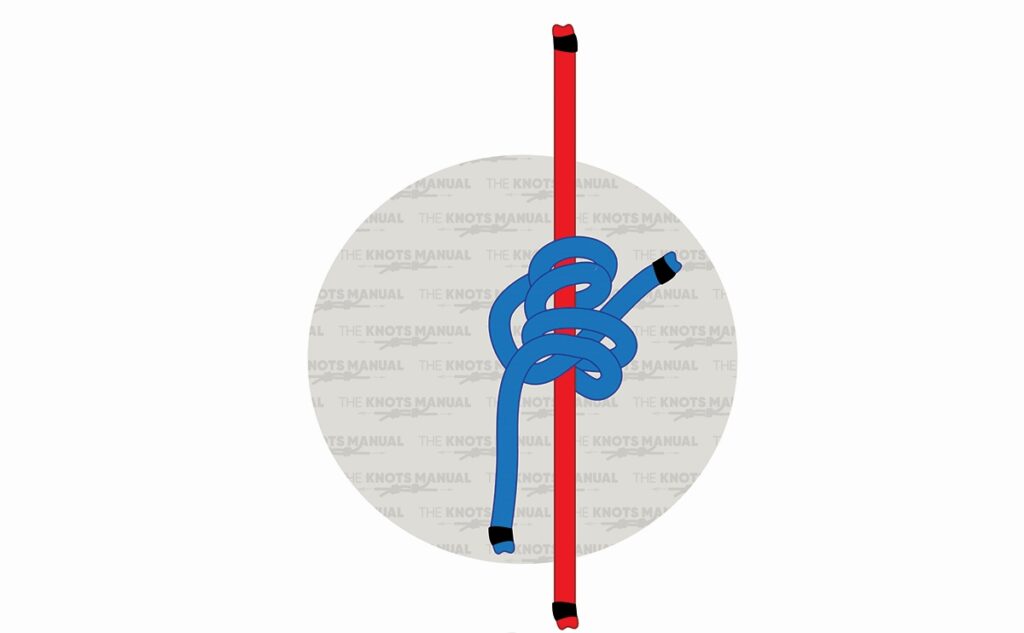
A variation of the Half Hitch, the Vertical Half Hitch is used primarily to secure a rope to a vertical post or object. It’s often used in conjunction with other knots to improve stability and security. While the knot is simple to tie, it is not recommended to solely rely on this knot for critical loads, as it may slip under significant tension. However, when used appropriately, it provides a quick solution for light-duty applications.
In order to tie a Vertical Half-Hitch Knot, start by making a half-hitch knot with the working cord on the holding cord. Bring the end of the working cord under the holding cord, put it up and over the holding cord, and pass it under the working cord, reverse-clockwise. Next, tighten the knot securely by pulling the end to the right a bit. Then make a second half-hitch knot the same way, but working clockwise, by passing the working end over the holding cord, under it, and over the working cord. Finally, pull the end slightly to the left to tighten and secure the knot.
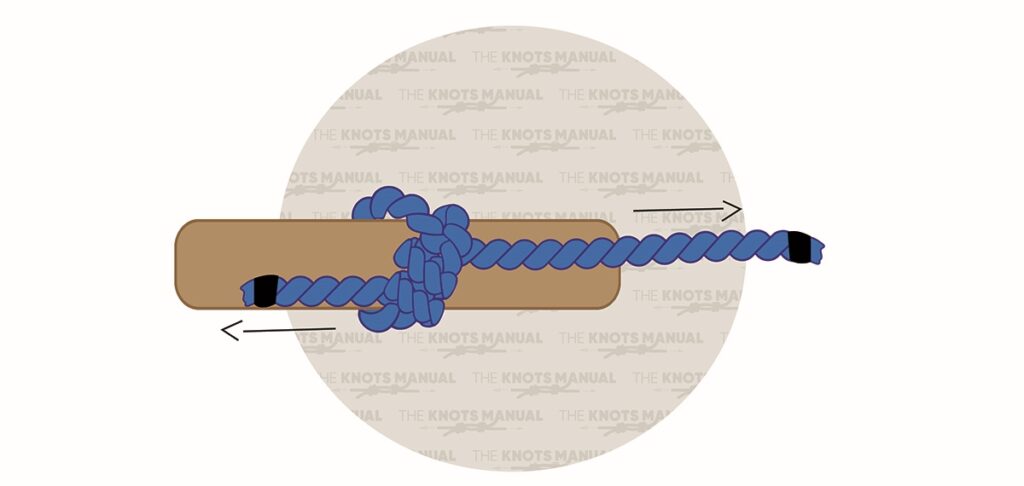
9. Knute Hitch
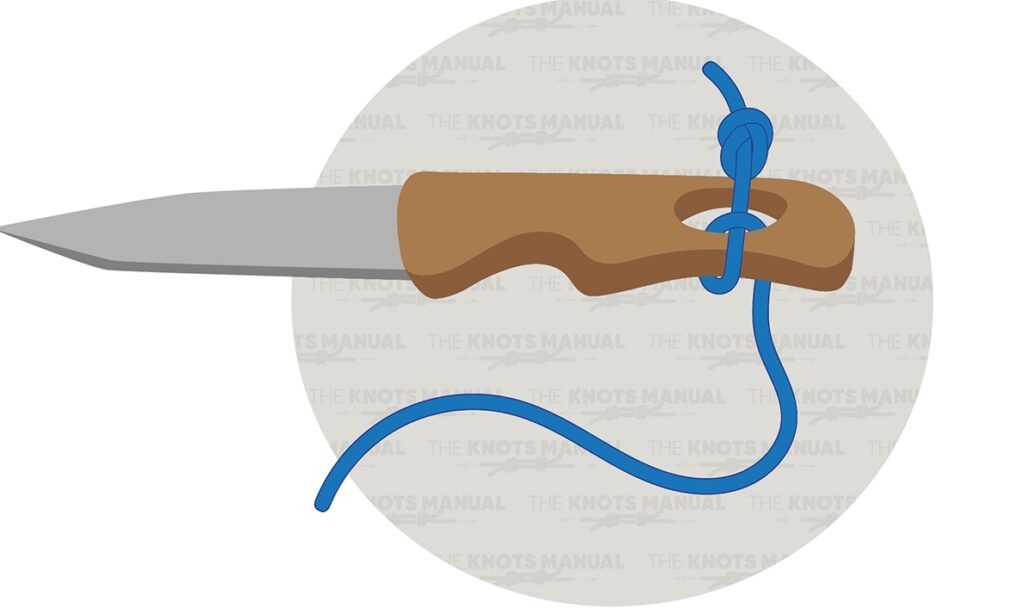
The Knute Hitch is a lesser-known knot designed to grip a rope or line and allow for controlled movement or holding. While not commonly found in mainstream knot-tying guides, this knot offers a reliable alternative for specific scenarios and is suitable for applications where the rope may be pulled in different directions. Its unique structure provides stability, especially when traditional hitches may not work as well.
A Knute Hitch Knot is tied by first making a Figure Eight Knot or another stopper knot at the end of the line. Then form a bight and push it through the hole of the tool. Next, bring the stopper knot through the bight. Finally, tighten the bight down by pulling on the standing line.
10. Ossel Hitch
The Ossel Hitch is a secure knot used to attach a rope to a pole or another rope. Valued for its strength and versatility under varying tension, this knot is suitable for securing loads that may shift during transit. Its reliability under such conditions makes it a practical choice for transport and hauling tasks.
When tying an Ossel Hitch Knot, start by wrapping the working end of a rope around the rope or other anchor point it is being attached to. Create a loop by passing the working end behind the standing line of the rope you’re working with, and then bring it back around the other rope a second time but in the opposite direction as the first time around. Next, pass the working end of the rope back over itself and then push it through the original loop. Pull both ends to tighten and complete the knot.
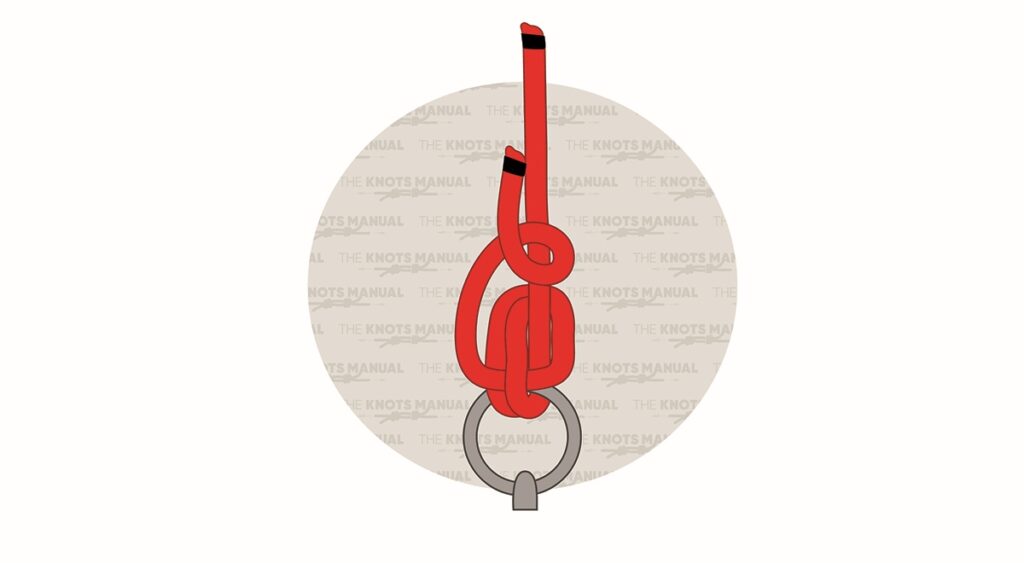
11. Ring Hitch
A staple in both nautical and rescue operations, the Ring Hitch is used to attach a rope to a ring or similar open-ended object. The knot provides a stable and secure connection and is commonly found in maritime settings when securing boats or mooring rings. Its simplicity and effectiveness make it essential for applications where movement and load direction may vary.
To tie a Ring Hitch Knot, create a bight to push through the ring and fold it back on itself. Then, twist the end of the bight to create a loop. Make a bight with the standing end of the line and pull through the loop. After that, lock the knot by pushing a bight of the free end through the original bight and tighten. The knot can be released with ease by pulling the free end.
12. Spider Hitch
The Spider Hitch is primarily used in fishing to create a double line, providing increased strength and shock absorption. Its ability to distribute load effectively makes it a valuable knot in angling. While not a traditional hitch knot used for securing ropes to objects, its application in creating loops classifies it within the hitch family, and anglers use it to enhance the durability of their line when battling larger fish.
Tying a Spider Hitch Knot starts by doubling over the length of a line and forming a loop. Hold the loop between your forefinger and thumb. Then wrap the doubled line around your thumb five times. If using a braided line, wrap it 15 times. Then bring the end of the double line through the loop and pull gently. The wraps around your thumb will unravel as you pull to create the knot. Moisten the knot with saliva and pull from both directions to secure it.
13. Valdotain Tresse Knot
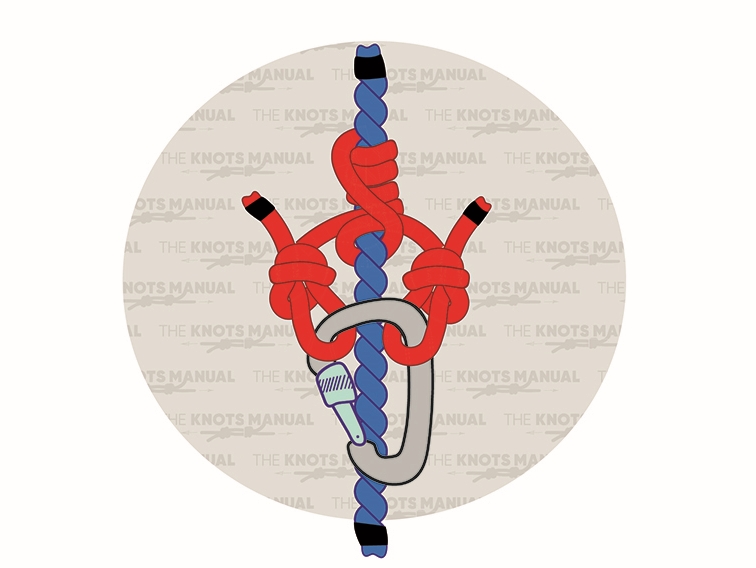
The Valdotain Tresse Knot is a specialized friction hitch valued for its smooth operation and reliability in ascending or descending ropes. Commonly used in arborist and climbing applications, the unique wrapping pattern around the main rope allows this knot to grip firmly while remaining easy to adjust under load. Because of its excellent grip and control, it is a go-to choice for professionals working at height.
In order to tie a Valdotain Tresse knot, begin with two hand-tied loops, or sewn eyes, on a rope, and make four wraps around the main static rope. Next, bring both tails down, ensuring they’re even with each other, and cross the lines in the front and back of the static line for a total of six wraps. Join the eyes of the loops in the front and clip together with a carabiner to secure.
14. Icicle Hitch
The Icicle Hitch is an incredibly strong and reliable knot designed to hold securely, even on smooth, tapered, or cylindrical surfaces. Best used in situations where a rope needs to grip a pole or a post, this knot is particularly useful in rigging, climbing, and rescue scenarios where slipping is not an option. Its ability to maintain tension under extreme loads makes it a crucial hitch for demanding tasks.
An Icicle Hitch knot is tied by wrapping the working end of a rope around the post four times, ensuring that you’re wrapping away from the end. Next, take the working line and pass it behind the wraps and standing line. Then bring it back over the post to create a hanging loop under the wrapped section. Take the hanging loop by the longest part and pull it past the standing line on the front side and over the end of the pole. Tighten the knot by pulling down on both wraps. The wraps will spread when pressure is applied to the load.
15. Round Turn with Two Half Hitches
A dependable knot for securing a rope to a fixed object, the Round Turn with Two Half Hitches is simple and remains one of the most effective hitches for securing loads under constant tension. By making a full turn around the object before tying the half hitches, this knot distributes tension effectively, reducing strain on the rope. It is commonly used in boating, camping, and general utility work where a strong, stable attachment is required.
In order to tie a Round Turn and Two Half Hitches knot, place a rope over the support and feed it around. Bring the rope around the support again to complete the loop. Then, wrap the end of the rope around the main rope. Form the first half hitch by tucking the end of the rope through, and then wrap the end of the rope around the main rope again in the same direction. Tuck the end of the rope through to create the second half hitch, and pull the main end of the rope to tighten the knot.
16. Adjustable Grip Hitch
The Adjustable Grip Hitch is a versatile sliding knot that tightens under load but remains easy to adjust when tension is released. Because it holds well under pressure yet can be repositioned when needed, it is particularly useful for applications requiring frequent length adjustments. This knot is preferred by campers, climbers, and sailors alike for its adaptability.
To tie an Adjustable Grip Hitch, pass the working end of the rope around the post or anchor object and place it over the standing end. Wrap it around the standing end twice toward the post, and then wrap it around both sides of the loop and finish by tucking the end under the last wrap. Hold the loop near the post with one hand and pull the working end with your other hand to tighten. The knot can be released by pulling the working end, even under heavy loads.
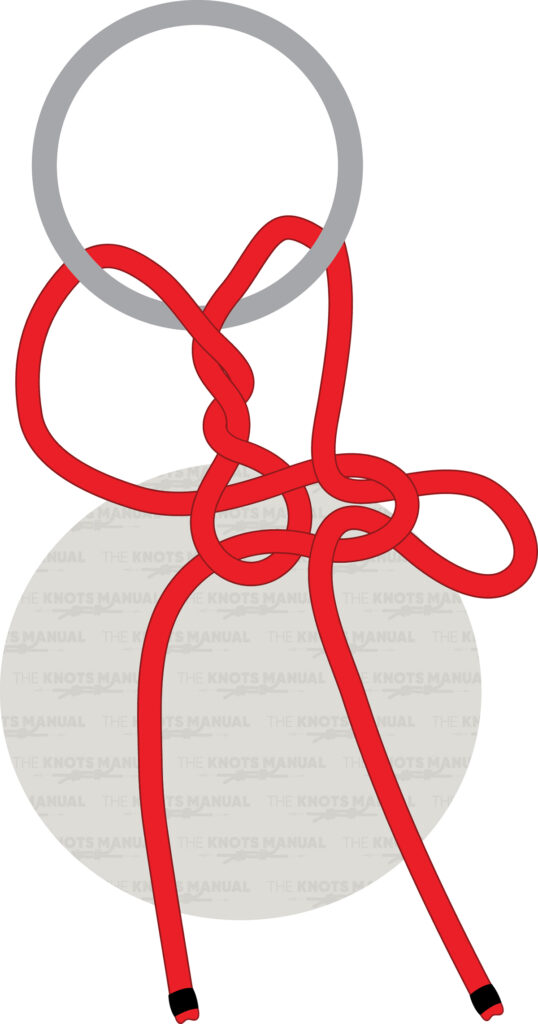
17. Halter Hitch
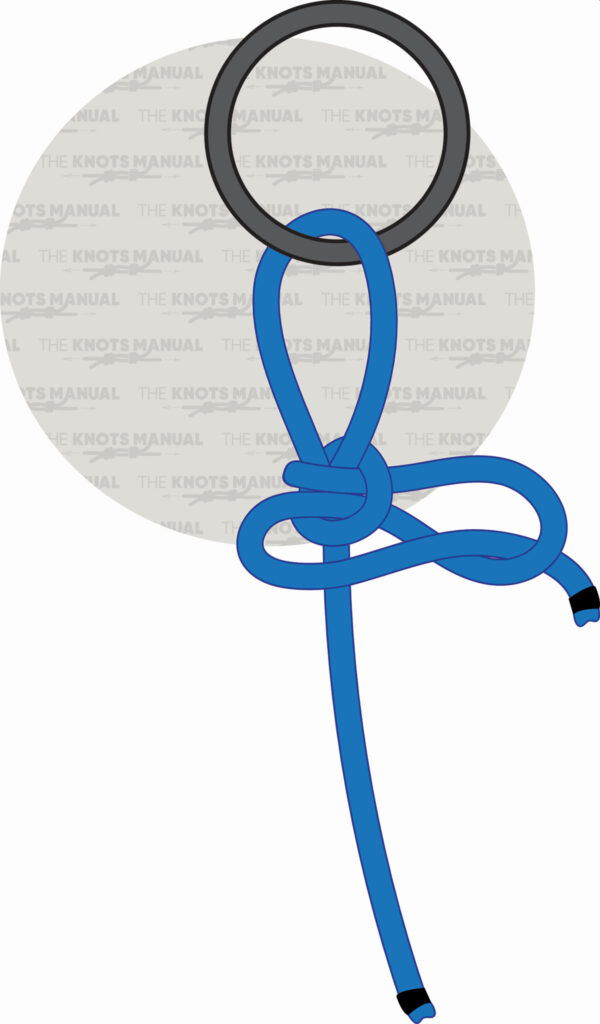
Designed for ease of untying, even under tension, the Halter Hitch is a simple and quick-release knot that allows for quick adjustments or releases in case of an emergency. Often used for tying animals, particularly horses, to posts or rings, this knot is relied on by farmers, equestrians, and ranchers to secure animals safely while ensuring they can be freed with minimal effort.
A Halter Hitch is tied by passing the working end of the rope around a post or through a ring. Then run the working end across the standing part in front, and wrap it around the standing end and behind itself. Form a small bight in the working end and pass it through the looped formed, working across the front of the lines and creating a quick-release function. Pull the slipped loop while holding the knot to tighten. For added security, run the free end through the slipped loop.
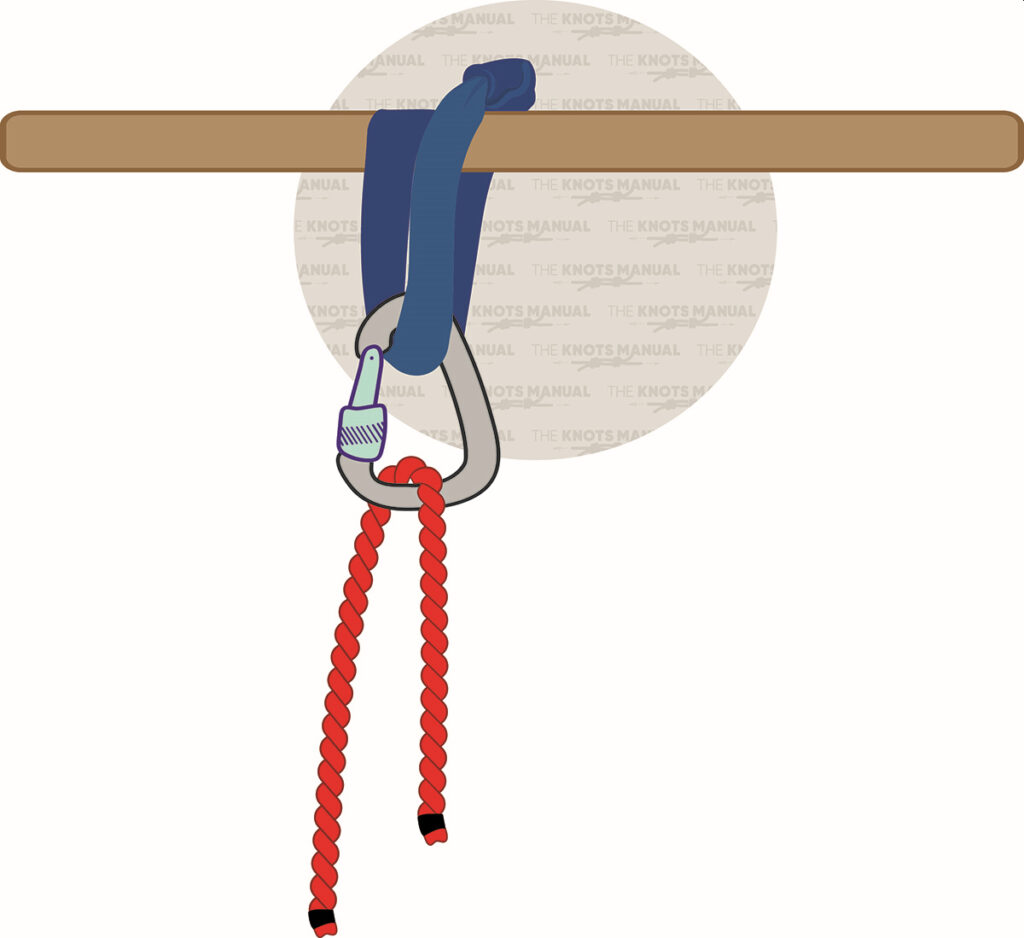
18. Bachmann Hitch
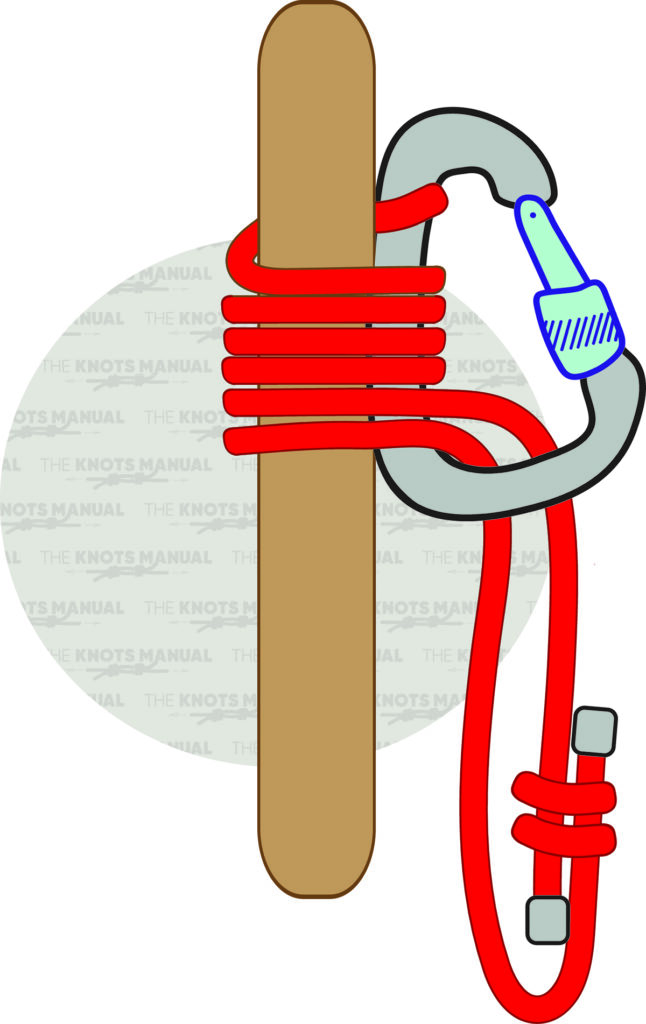
The Bachmann Hitch is a popular slide and grip knot primarily used for its ease of sliding along the main rope. Its design allows for easy sliding when no weight is applied but grips tightly under load, making it ideal for ascending a rope. The use of a carabiner within the hitch enhances its functionality and ensures a secure grip. Because of its reliability, it is a favorite among mountaineers and emergency responders in times when a mechanical ascender may not be available.
Tying a Bachmann Hitch starts by constructing a stop of rope, or using a pre-made strop, and passing one end of it through the carabiner. The knot holding the loop together should be placed a few inches above the bottom of the loop. Next, hold the carabiner against the main rope, and start wrapping the strop around the rope and pass through the carabiner. Do three to five turns in total around the main rope and the carabiner. The more turns will increase the friction and decrease the sliding function. Apply the load to the end of the strop to secure the knot in place.
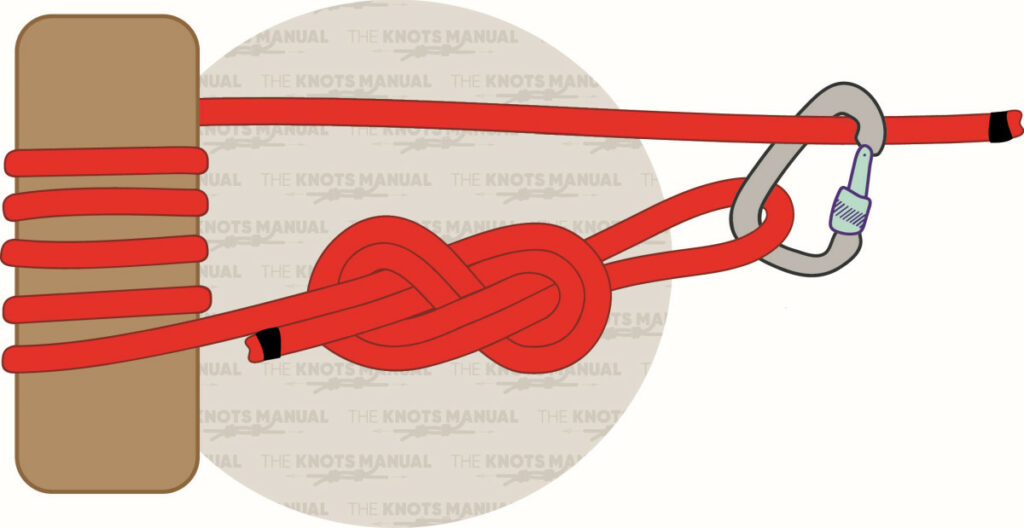
19. Trucker’s Hitch
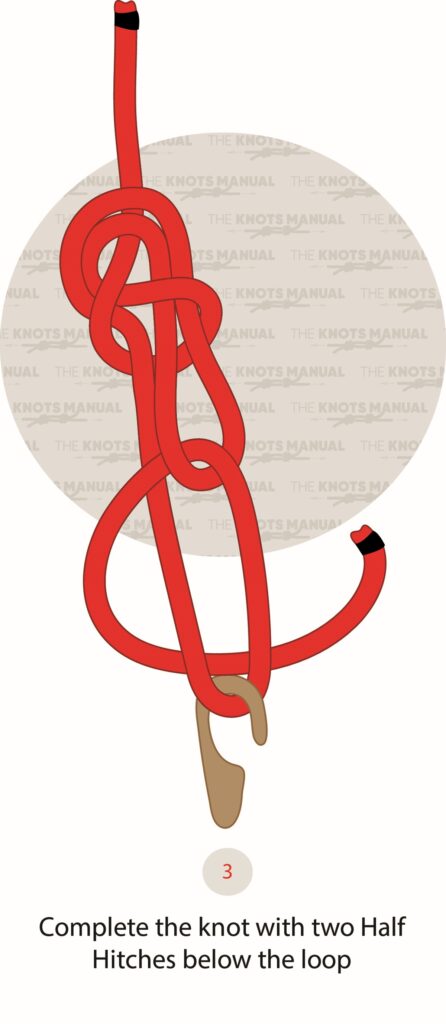
The Trucker’s Hitch is a powerful knot used for securing loads with high tension, making it a staple in transport and cargo operations. By creating a pulley effect, it allows the user to apply significant force to tighten ropes around heavy objects. This knot is frequently used by truck drivers, campers, and sailors to ensure loads remain firmly in place. Its ability to provide mechanical advantage makes it an essential knot for securing bulky or shifting cargo.
When tying a Trucker’s Hitch knot, form a bight in the standing end of the rope. Pass the bight behind the standing end and cross the working end over the bottom loop. Next, bring the bight in front of the standing end and do another half-turn with the bight, and then pass it through the bottom loop, from the back side. Thread the working end through the hook or carabiner and bring it back through the bottom loop. Tighten the newly-formed loop slightly, and pass the working end behind the bottom loop, completing the two half hitches below the loop. After one turn, pass the working end under itself, forming a half hitch in the process, and then go behind the bottom loop once again to create a second half hitch and complete the knot.
20. Macrame Double Half Hitch
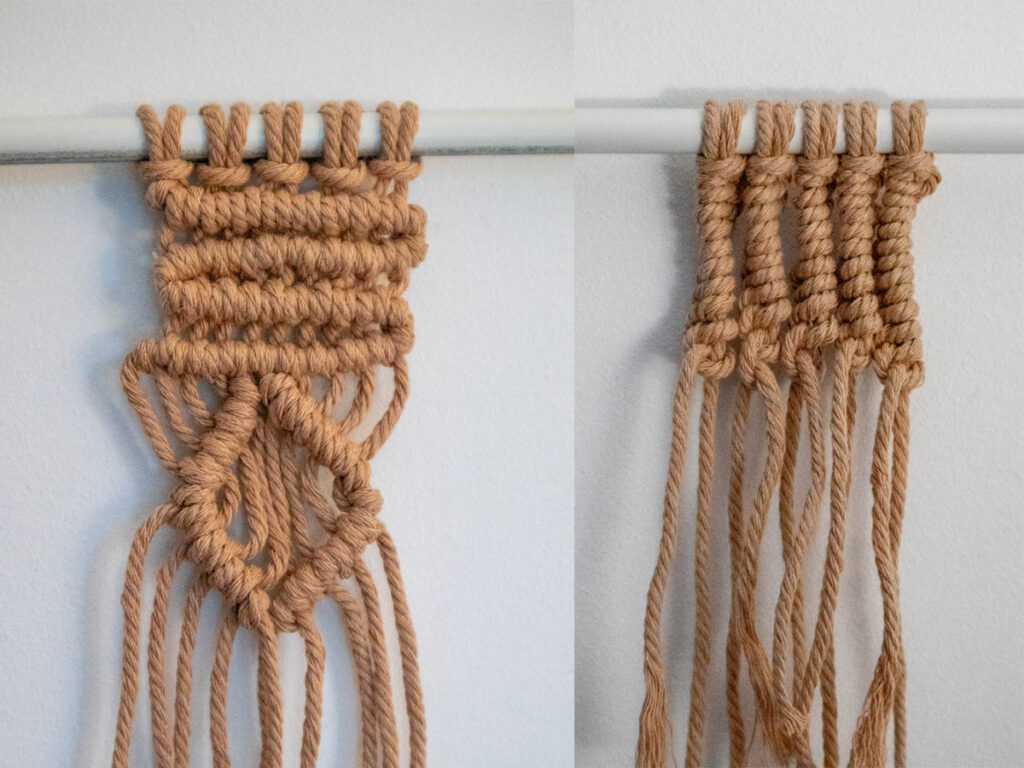
The Macrame Double Half Hitch is a decorative and functional knot often used in crafting and textile work. It consists of two half hitches tied in sequence, creating a strong and visually appealing pattern. While primarily used for artistic purposes, it also provides a secure way to join cords in handmade projects like wall hangings and plant hangers. This knot showcases how hitches can be applied beyond survival and utility, extending into creative designs.
In order to tie a Double Half Hitch knot, you’ll need at least two free strands, but for patterns, there should be a minimum of four to ten strands. Choose the leftmost string and place it horizontally across the other string or strings. Then take the second string and go under the first one and through the formed loop to create a Left Half Hitch knot. Next, tie another identical half hitch with the same strands. Repeat by tying another two half hitches with the second and third strands, and then with the third and fourth until you reach the end of the row. Then select the rightmost string and start tying double hitches around it, this time going from right to left. Stop once you’ve reached the desired number of rows.
21. Lighterman’s Hitch
The Lighterman’s Hitch is a secure and easily adjustable knot used to attach tow and mooring lines to bollards. Often used in maritime settings, this knot features multiple wraps around a post or cleat, ensuring a firm hold while allowing for controlled tightening or loosening. This knot provides a balance between security and adjustability, making it particularly useful for docking and securing vessels in variable conditions and a favorite among sailors and dock workers.
To tie a Lighterman’s Hitch, begin with a very long section near the end of a rope. Wrap the working end around the support and do another full turn, making two wraps around the support. Next, create a bight on the working end and pass it underneath the standing end. Place the bight over the support and dress the knot made so far, making sure all wraps are sitting next to one another. Then, do another wrap around the top of the support. Dress and tighten the knot before creating another bight to go underneath the standing end. Place it over the support and dress and tighten the knot again. Finally, wrap the working end around the standing end and tuck it under itself, making a half hitch in the process. Tighten and then do another half hitch to complete the knot.
22. Taut-Line Hitch
The reliable and adaptable Taut-Line Hitch is a self-tightening knot ideal for securing adjustable lines under tension. Widely used in camping and outdoor activities for anchoring tent guy lines and tarps, it is one of the most popular hitch knots for outdoor enthusiasts. Because it allows the user to tighten or loosen the rope without retying the knot, it is perfect for situations where conditions may change.
Tying a Taut-Line Hitch knot starts by wrapping the working end around the support and then around the rope’s standing part. Next, take the working end and wrap it around the standing end again, starting inside the loop. Then, pull the end of the rope upwards so that it’s outside the loop. Wrap the working end around the standing end again, outside the original loop. Tighten and complete the knot by holding the standing part on either side of the support with one hand and pulling both ends of the rope with the other hand. Slide the knot across the rope to adjust the tension.
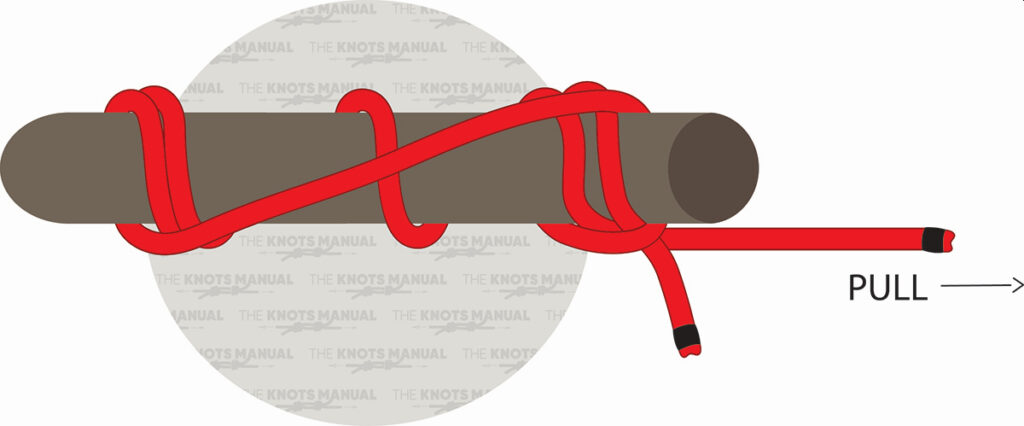
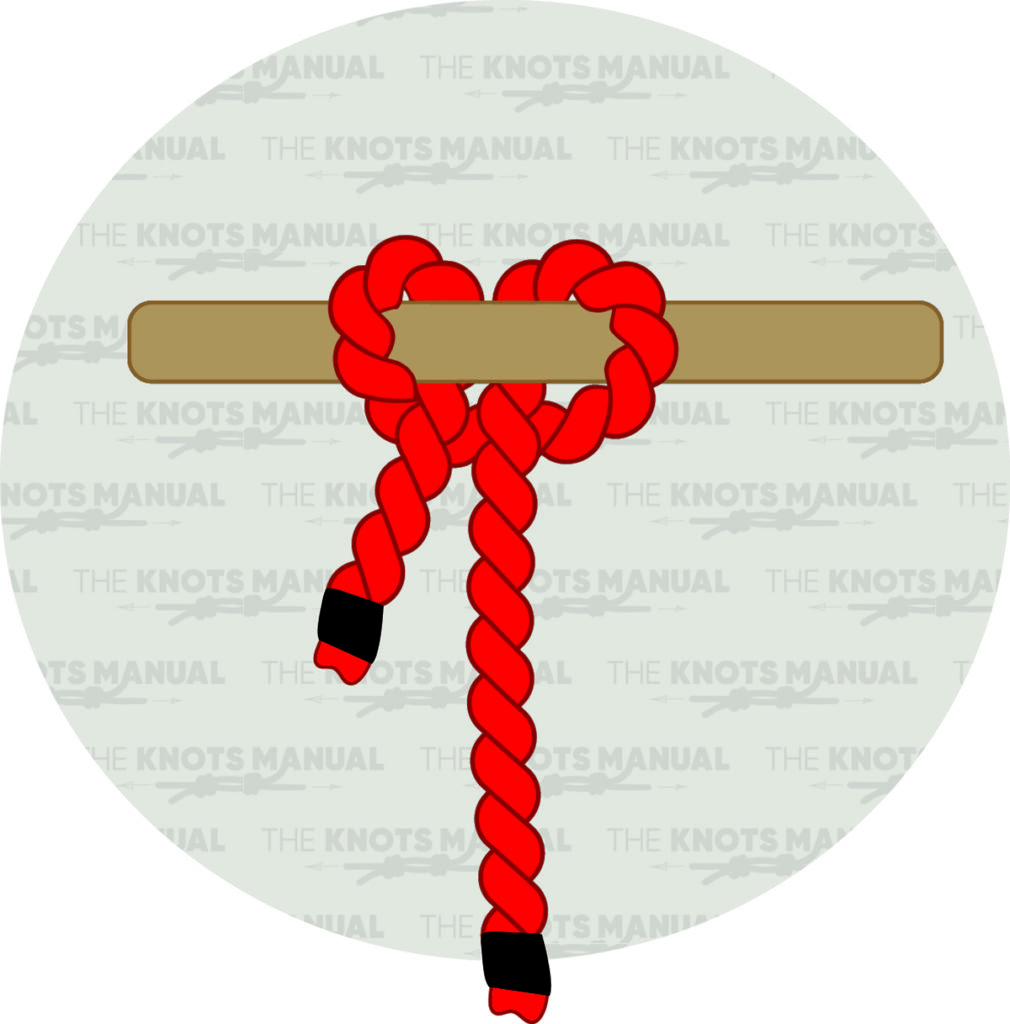
23. Timber Hitch
The Timber Hitch is a strong and simple knot used for securing logs and cylindrical objects during hauling. Designed to tighten under load while remaining easy to untie once the strain is removed, lumberjacks, boaters, and survivalists frequently rely on this knot for moving heavy wood or securing items to trailers. It excels in gripping irregularly shaped objects, making it an invaluable tool in forestry and transport.
A Timber Hitch knot is tied by wrapping the rope’s working end around the support and then passing the working end around the rope’s standing part. Pull the working end to the left from the formed loop, passing it under the standing part. Pass the working end under the standing part two more times, and then pull both the working end and standing end simultaneously to complete the knot. The knot will come undone instantly by unwinding the running loop from around the rope.
24. Two Half Hitches
Two Half Hitches creates a stable and dependable hold by forming two successive hitches around the anchor point. It is a fundamental and widely used knot for securing a rope to a fixed object, and though easy to tie, it remains one of the most reliable hitches for various applications. This knot is commonly used in camping, boating, and general utility tasks where a simple yet effective fastening method is required.
To tie Two Half Hitches, wrap the rope’s working end around a support, like a pole or post, and pass it over the top of the standing end and through the loop. Pull tight to create a half hitch. Then pass the working end through the second loop and pull tight to create a second-half hitch and complete the knot.
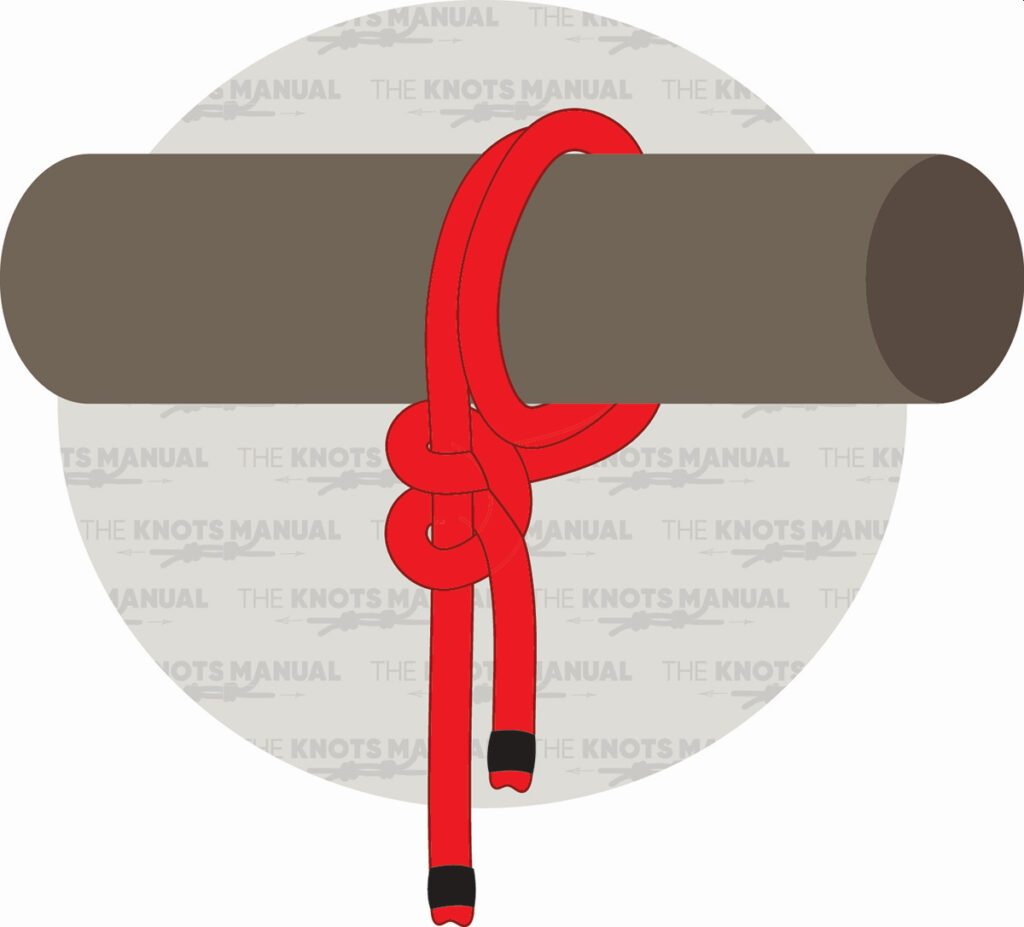
25. Buntline Hitch
The Buntline Hitch is a compact and highly secure knot often used for attaching a rope to a post or ring. Originally developed for securing ship rigging, it remains a go-to knot for maritime and general utility applications. Because of its ability to hold tightly under strain, it is frequently used in situations where slipping is not an option. However, it can be difficult to untie after being heavily loaded, making it best suited for semi-permanent attachments.
Tying a Buntline Hitch begins by passing the working end of a rope under the support and bringing it around and over the standing end to create a figure eight. Then take the working end and push it through the loop formed. Pull the standing end to tighten and complete the knot.
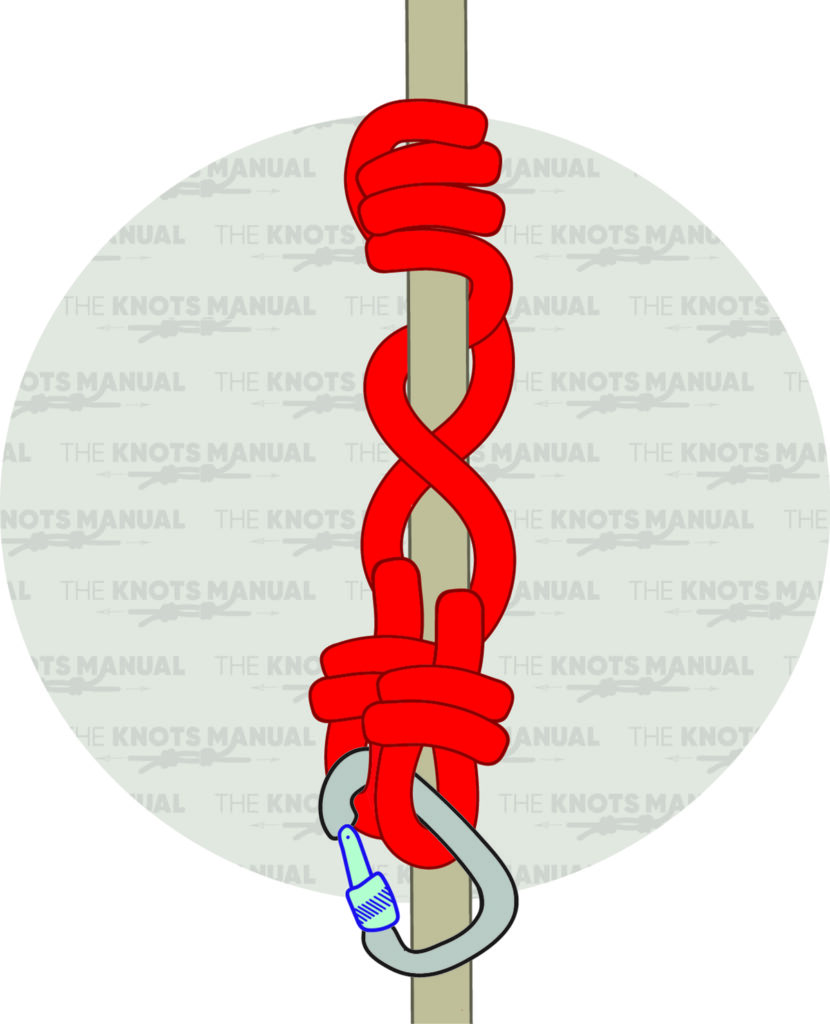
26. Blake’s Hitch
Blake’s Hitch is a friction knot commonly used by climbers and arborists for ascending ropes. It offers a smooth, controlled grip while allowing easy adjustment when needed. Unlike some other friction hitches, it is designed to be tied and untied with ease, even under tension. Its reliability and adjustability make it a preferred knot in tree climbing and rescue operations.
In order to tie a Blake’s Hitch, wrap the rope four times around the standing line a little loosely. Then bring the working end back down and around itself. Next, tuck the working end under the last two wraps so that it comes out of the middle of the four wraps. Tighten the knot by pulling both ends to secure it in place.
27. Distel Hitch
The Distel Hitch is another popular friction hitch that provides a firm hold under load, gripping tightly while still allowing controlled movement when necessary. Often used in climbing and rope access work, this knot maintains grip even in wet conditions, making it a strong choice for outdoor use. It is highly responsive and favored by arborists who need a reliable knot for ascending and descending ropes.
Tying a Distel Hitch knot starts by creating a shorter eye-to-eye piece of rope that will go around the main rope. To tie each eye, make a bight in the end and then go around it twice with the working end. Pass the working end through both loops, and tighten by pulling the eye opposite the rope. Wrap the top eye 3-4 times around the static rope, and then go over the bottom eye and wrap it around another time. Next, go underneath the strand that was just formed and pass a carabiner through both eyes. Lock the carabiner to keep it from opening.
28. Slipped Buntline Hitch
Designed for quick release, the Slipped Buntline Hitch is a variation of the traditional Buntline Hitch that is favored for temporary fastening tasks that still require stability. Its structure provides a firm grip when tension is applied, but it can be easily untied with a single pull on the working end. This makes it a practical knot that is useful in situations where a secure knot is needed but may require rapid release, such as in boating and camping.
When tying a Slipped Buntline Hitch, free up a 20-inch section near the end of the rope and wrap it around the support to reach the starting position. Pass the working end over the standing end and then do one full turn around both top strands. Next, create a small bight near the end of the rope and pass it through the middle opening to form the main structure. Then tighten the knot by pulling the bight while holding the top loop with your free hand. Once the knot is tightened, the hitch can be pulled closer to the support, as needed.
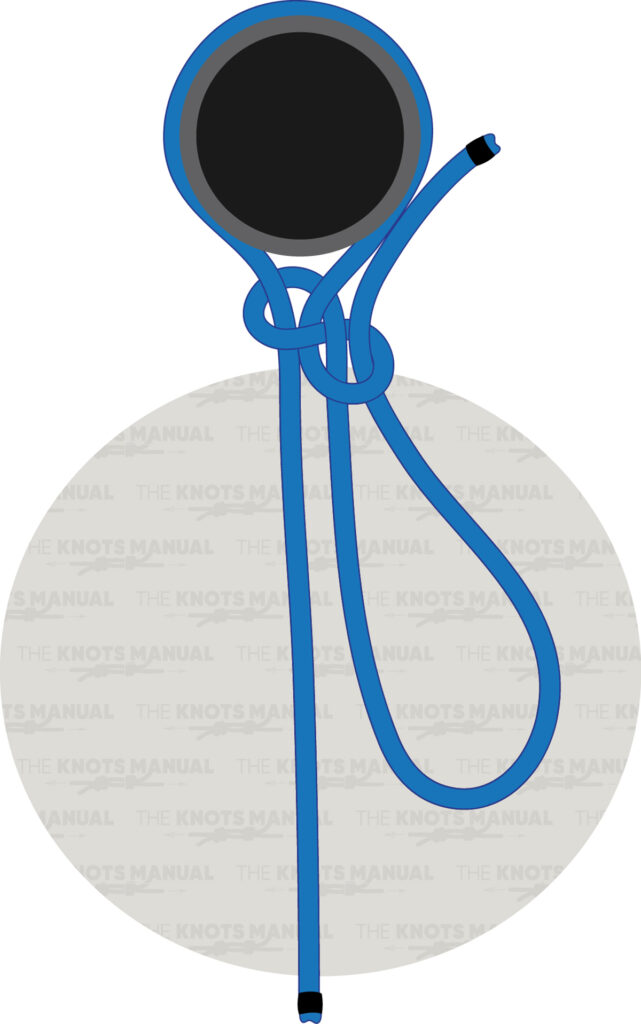
29. Halyard Hitch
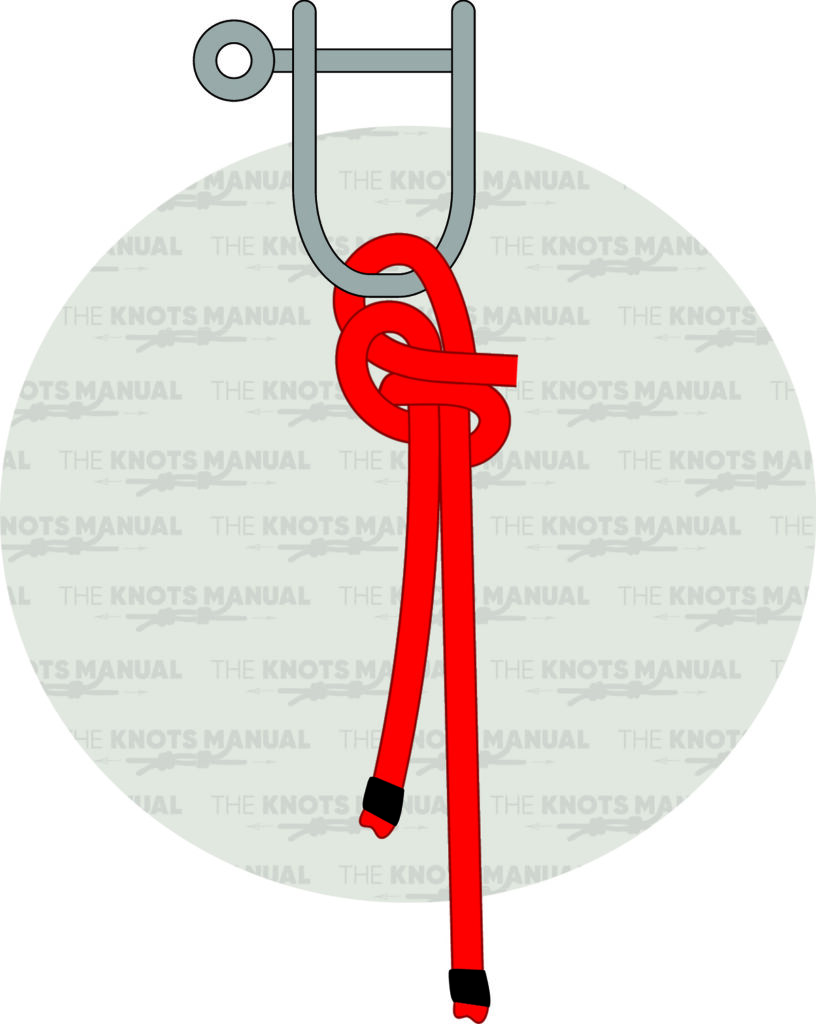
The Halyard Hitch is a simple knot that creates a self-tightening loop at the end of a rope and is specifically designed to secure a halyard to a sail or flagpole. Its dependable grip holds firmly, even under constant tension, while remaining easy to untie when adjustments are necessary. Sailors rely on this knot for keeping sails in place, ensuring efficiency and safety at sea, and the ease of use makes it a crucial knot in nautical settings.
To tie a Halyard Hitch knot, pass the working end of a rope through a shackle and wrap it around the standing end of the line. Make a second turn around the standing end and pass the working end back up to the top of the knot and feed it through both loops, with the working end coming out next to the standing end. Pull the working end to tighten the knot and the standing end to push the knot against the shackle.
30. Gnat Hitch
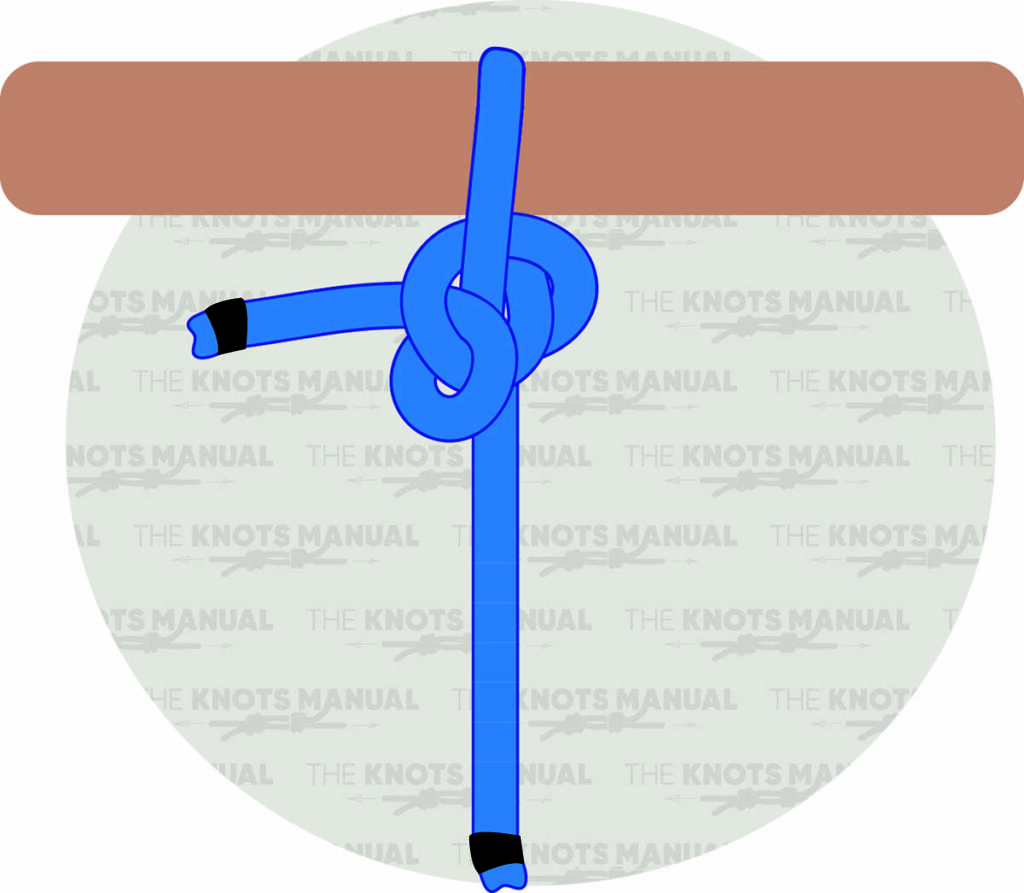
The Gnat Hitch is a lesser-known but useful hitch for securing lightweight loads. Though not designed for heavy-duty applications, it provides a reliable grip when tension is applied. Because of its simple and quick tying method, it is ideal for small securing tasks in camping and outdoor activities. While it may not be as strong as other hitches, it excels in temporary fastening scenarios.
A Gnat Hitch is tied by wrapping the tail end around a pole and putting it in front of the standing end. Then go through the formed loop to tie a half hitch and pass the tail end behind the standing end and then down through the loop of the half hitch. Next, pass it through the formed loop from the front side and tighten the knot against the pole.
31. Boom Hitch
A strong and stable knot used to secure a rope to a cylindrical object, such as a boom or pole, the Boom Hitch holds exceptionally well under load and is particularly useful in sailing and rigging applications. Even when subjected to lateral forces, it remains secure, reducing the risk of slipping. Sailors and riggers often choose this knot for its reliability in dynamic conditions.
In order to tie a Boom Hitch, first, freeing up a long section near the end of the rope is required because the knot requires many turns. Bring the working end of the rope over the top of the boom or post and wrap it behind and then cross over the standing end in the front. Next, wrap across the post in the opposite diagonal, front to back and between the two existing knot parts. Cross the working end over the front of the standing line again and wrap diagonally over the post, this time moving right to left. To finish the knot, bring the working end to the front, cross the post, and feed the working end through the prior wrap at the top of the knot. Tighten the knot by working all the wraps close together, and pull the working end and standing line.
32. Highwayman’s Hitch
The Highwayman’s Hitch is a quick-release knot designed for situations where an immediate untying option is necessary. Traditionally used by horse riders and travelers, it holds well under tension but can be undone instantly with a simple pull on the working end. Because of its ability to release immediately, it is a favored choice for temporary tie-downs and remains valuable today for securing loads that may need rapid removal.
Tying a Highwayman’s Hitch knot starts by forming a bight near the end of the rope and placing it behind the support. Create another bight on the standing end in front of the support, and then pass the newly-formed bight through the first one. Make another bight in front of the support with the working end. Pass it through the last bight created and tighten. Release the knot by pulling on the working end of the rope. This will instantly loosen the knot and allow it to come undone, even when under tension
33. Anchor Hitch
The Anchor Hitch, also known as the Fisherman’s Hitch, is a secure knot for attaching a rope to an anchor or other heavy object. Its double-wrapped design increases grip strength, preventing slippage under heavy loads. Boaters frequently use this knot to ensure anchors remain firmly in place, even in strong currents. Its reliability makes it a staple for maritime and fishing applications.
To tie an Anchor Hitch knot, start by wrapping the working end of a rope around the shackle or swivel two times. Next, pass the working end through the loops created and pull to tighten. Then, wrap the working end around the rope’s standing part. Holding the shackle with one hand and pulling up on the working end with the other will complete the knot.
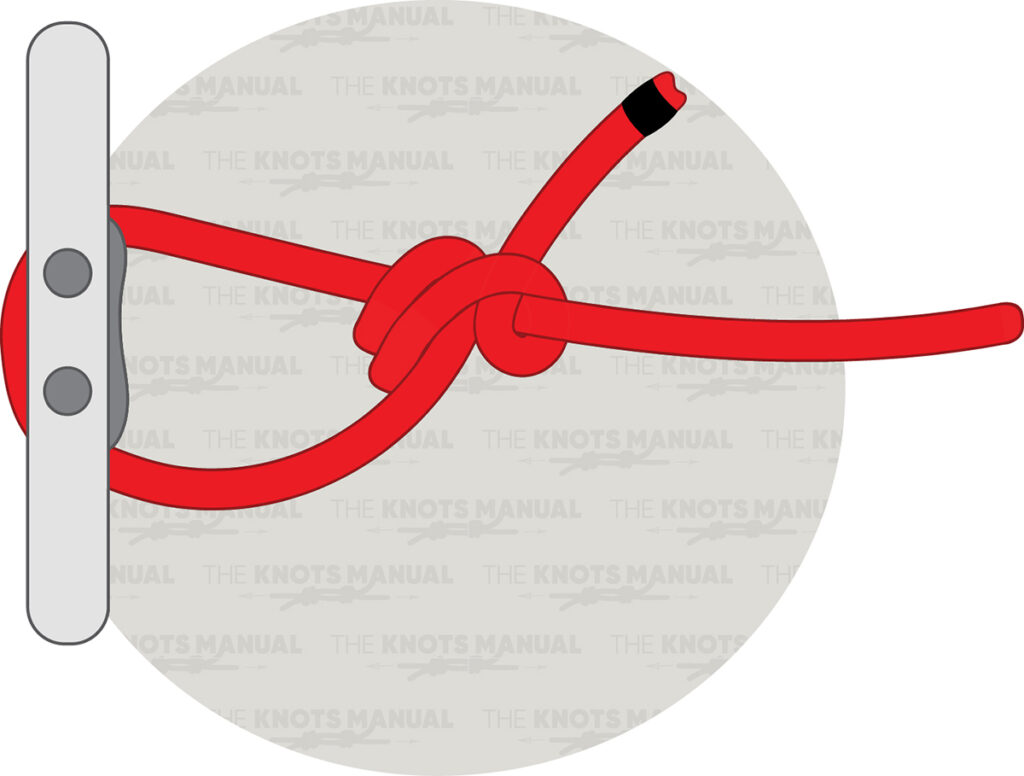
34. Cleat Hitch
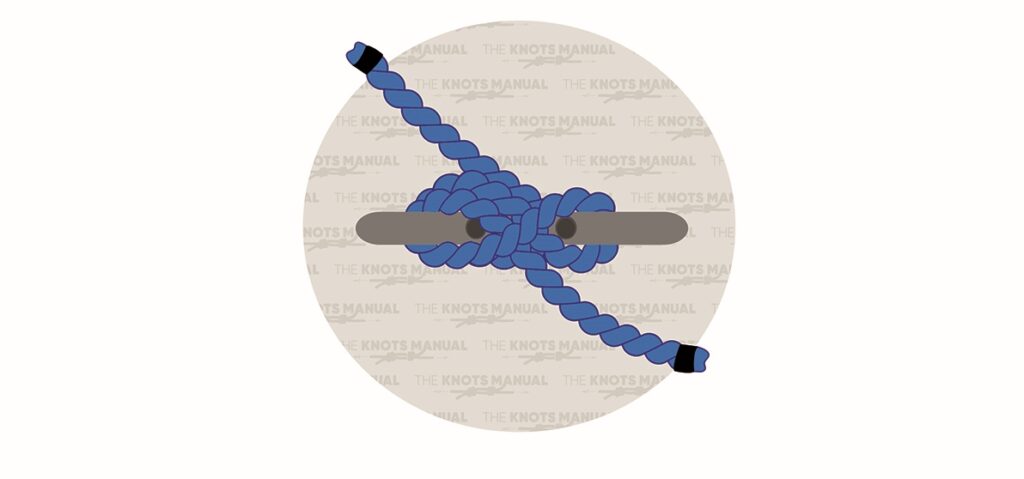
A basic knot every boater should know, the Cleat Hitch is used to secure a rope to a cleat with a series of wraps and loops and ensures stability without the risk of accidental release. Because it provides a firm hold while allowing for quick release when necessary, it is essential for docking and securing vessels. Its ease of tying and untying makes it one of the most commonly used hitches in sailing and marina settings.
A Cleat Hitch is tied by wrapping a rope around the boat’s far horn. Next, wrap the rope’s working end around the near horn and pass it around the back and then around the front of the horn. Create a loop in the working end of the rope, and slide the loop over the near horn. Tighten the knot by pulling on the working end.
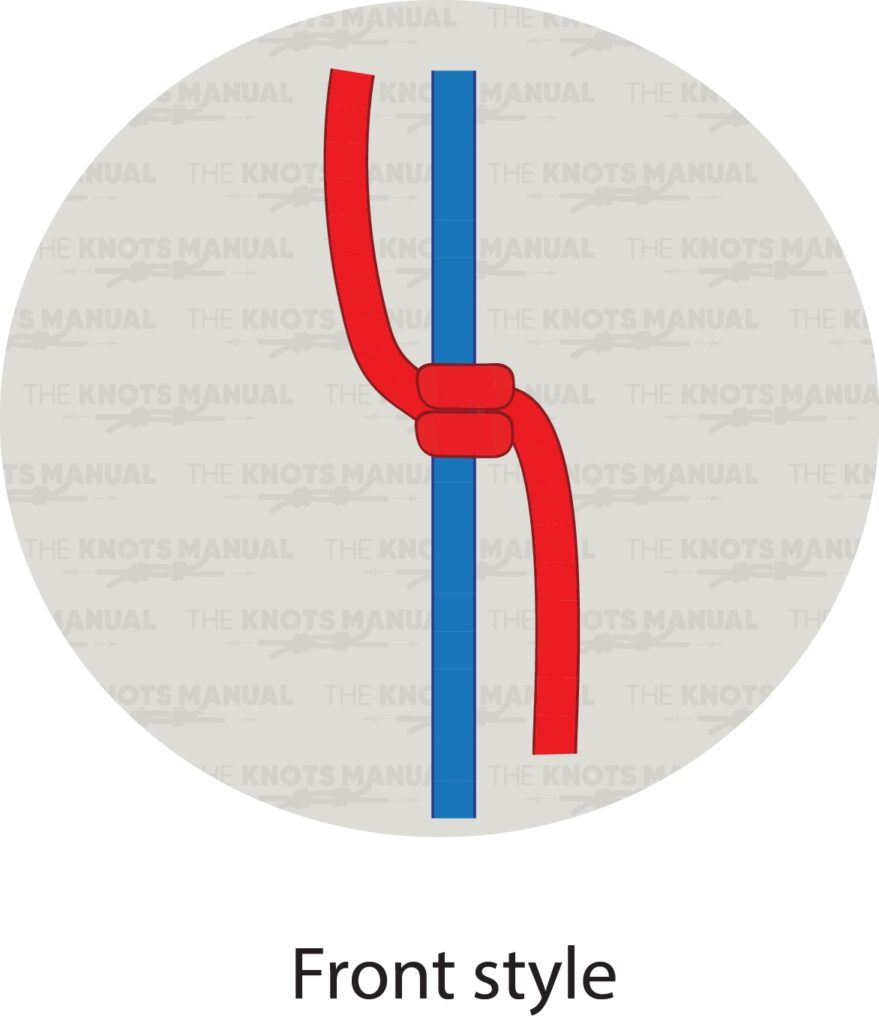
35. Vertical Half Hitch
The Vertical Half Hitch is one of the simplest foundational knots often used as a temporary hold or combined with additional turns for increased security. While it alone is not the most stable hitch, it plays a crucial role in reinforcing other knots. Because of its simplicity, it is widely used in various fastening and binding applications.
When tying a Vertical Half-Hitch Knot, start by making a half-hitch knot with the working cord on the holding cord. Bring the end of the working cord under the holding cord, put it up and over the holding cord, and pass it under the working cord, reverse-clockwise. Next, tighten the knot securely by pulling the end to the right a bit. Then make a second half-hitch knot the same way, but working clockwise, by passing the working end over the holding cord, under it, and over the working cord. Finally, pull the end slightly to the left to tighten and secure the knot.
36. Marlinspike Hitch
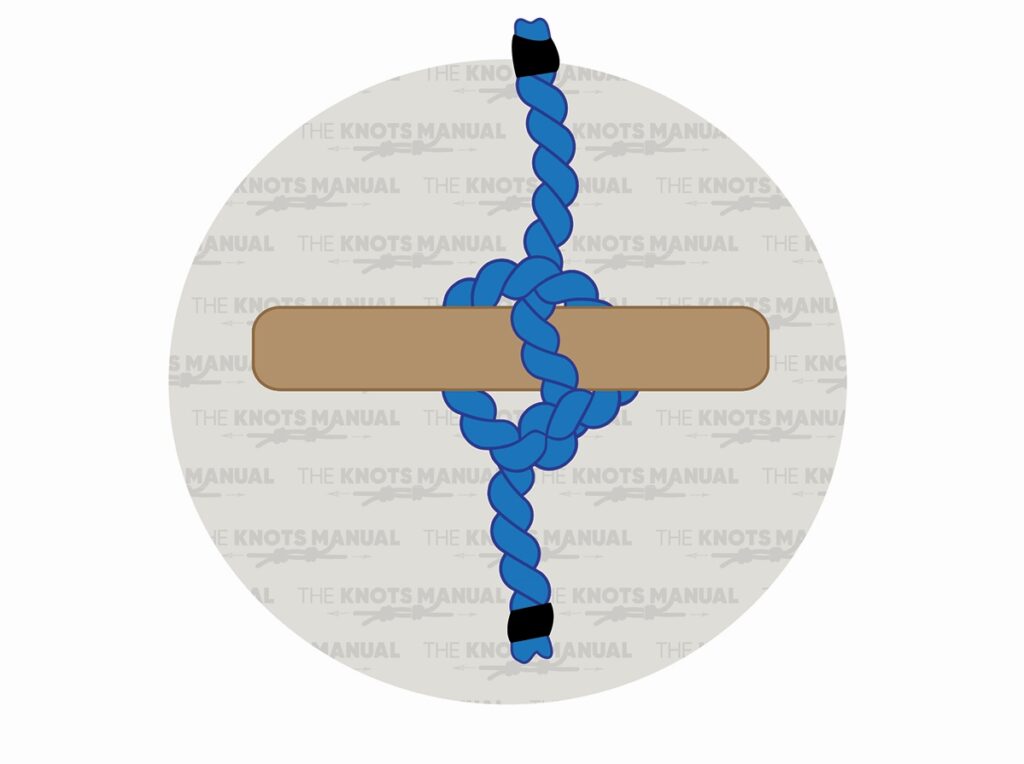
Often employed when additional leverage is needed when tightening or splicing lines, the Marlinspike Hitch is a temporary knot used to create a secure loop in a rope, often with the aid of a marlinspike or similar tool. This knot is particularly useful in nautical and rigging applications, where quick adjustments are necessary. Because it allows for easy manipulation of tension, it is a valuable knot in many hands-on tasks.
To tie a Marlinspike Hitch, create a loop with the working end displaced to the right. Pull the loop to the right across the vertical line created by the rope. Bring the middle line to the left and over the loop. Pass a cylindrical support through the loop formed and pull on the working and standing ends of the rope to tighten the knot.
37. Barrel Hitch
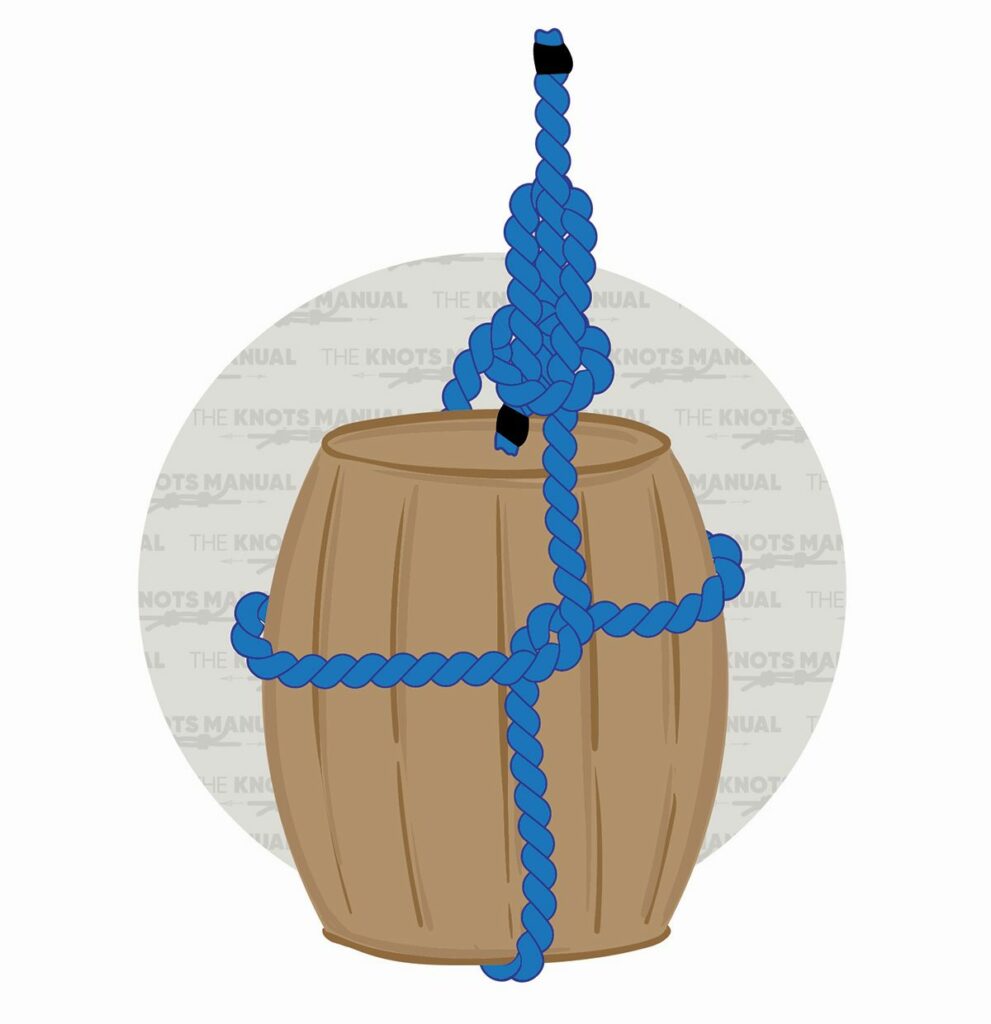
The Barrel Hitch is a practical knot designed for lifting or securing cylindrical objects such as barrels or buckets. By creating a stable sling around the object, it ensures an even distribution of weight, preventing tilting or slipping. Because of its ability to hold heavy loads securely, it is often used in construction, sailing, and rescue operations. This knot is ideal for safely hoisting awkward or bulky items.
Tying a Barrel Hitch knot begins by wrapping a rope around a barrel, lengthwise, creating a loop above the barrel. Ensure that the standing and working ends meet at the same height above the barrel, so the rope is equal, and the standing part of the rope is sitting centered underneath the barrel. If the rope is too close to either side of the barrel’s edges, the rope could slip and be potentially dangerous. Next, pass the working end of the rope through the loop to form an Overhand Knot which creates a large loop above the barrel. Pull the ropes forming the loop apart to create a larger loop that can fit around the width of the barrel. Then slide the barrel through the loop by pulling the loop down over the sides. The loop needs to be situated correctly, far enough from the top and bottom to prevent the barrel from tipping over or slipping off. Form a bight in the standing end of the rope and wrap the working end around the bight and then through it. Finally, pull the working and standing ends simultaneously to tighten and complete the knot.
38. Super Munter Hitch
The Super Munter Hitch is an advanced variation of the Munter Hitch, providing additional friction for controlled descent or belaying. Often used in climbing and rescue operations, this versatile knot enhances braking power, making it useful in high-load situations. Because of its effectiveness in regulating rope movement, it is a valuable knot for rappelling and emergency scenarios.
A Super Munter Hitch knot is tied by making a regular Munter Hitch by slipping a loop into a carabiner, and then forming a second loop with the line crossing opposite the first loop and slipping the second loop into the carabiner. Next, take the standing end and pass it behind and around the working end. Take the loaded end and pass it through the carabiner and lock. The working end should be attached to a climbing harness, and the standing end will be used for lowering.
39. Tensionless Hitch
Considered the strongest anchor hitch knot, the Tensionless Hitch is a secure method for anchoring a rope without relying on knots to bear the load. By wrapping the rope multiple times around a solid object, friction does all the work, preventing slippage. This technique is commonly used in rescue operations, tree climbing, and slacklining, where maintaining high tension is crucial. Because it does not weaken the rope, it is preferred for situations requiring maximum strength retention.
In order to tie a Tensionless Hitch, wrap the end of a rope around the support four times, leaving at least 30 inches of rope after it. Create a bight at the end of the rope and make a loop with it. Then go around the standing line one full turn and back through the end loop to make a figure eight on a bight knot. Tighten the knot and make sure it is dressed correctly with no lines crossing one another. Next, insert a carabiner in the end loop and around the standing line to complete the hitch.
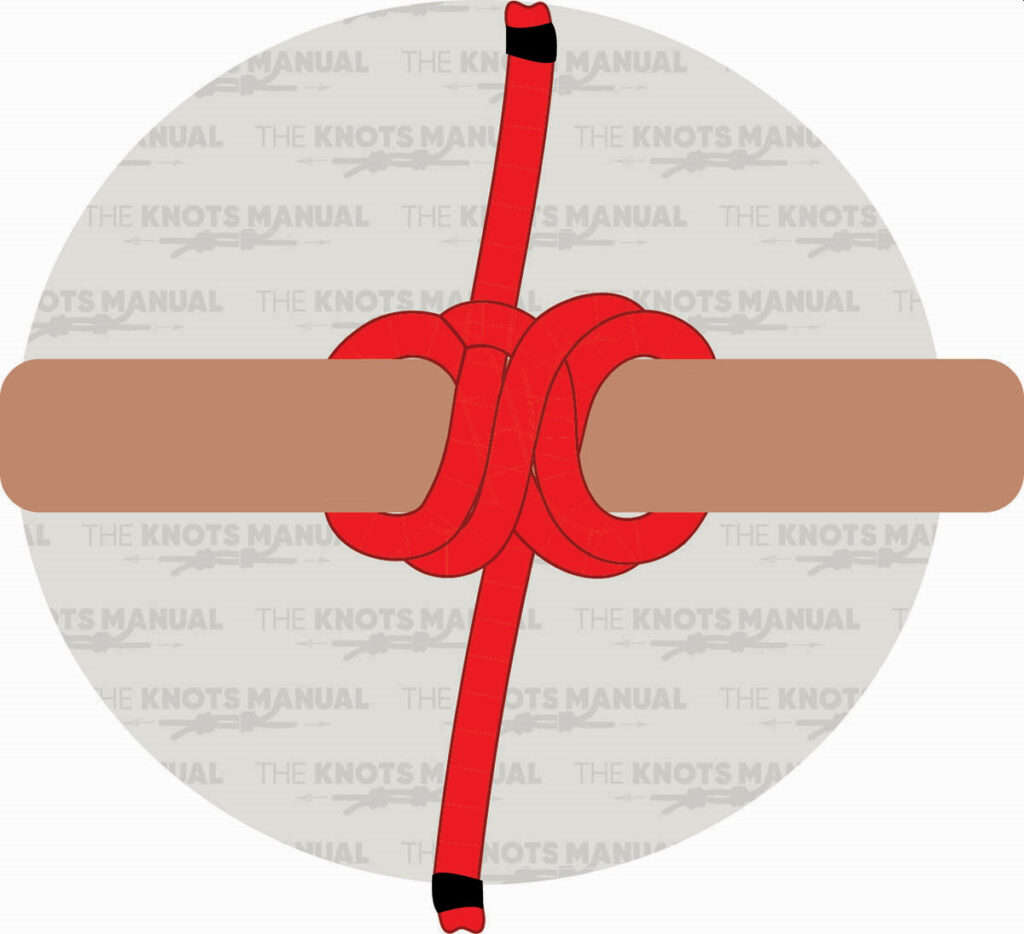
40. Cow Hitch
The Cow Hitch is a simple yet effective knot used to secure a rope to a post, pole, or ring. Although it can slip under extreme load, additional turns can increase its security, holding firmly under tension yet easy to untie when needed. Because of its adaptability, it is widely used in farming, sailing, and general utility applications like securing livestock or tarps.
Tying a Cow Hitch knot starts by wrapping the working end around the support and bringing it behind the standing line. Then wrap the end around the support again from the other side, making sure both ends exit parallel to one another. Pull the standing end of the rope while simultaneously pulling the working end in the opposite direction to untie the knot quickly.
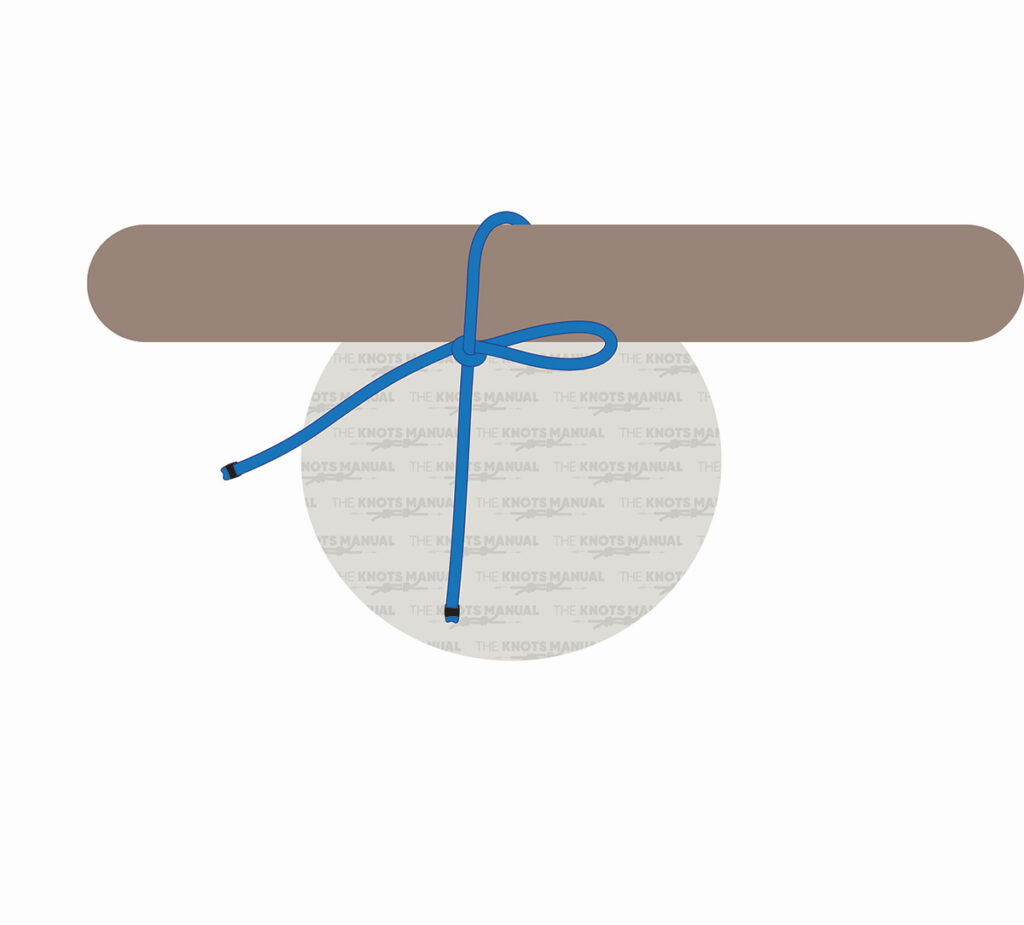
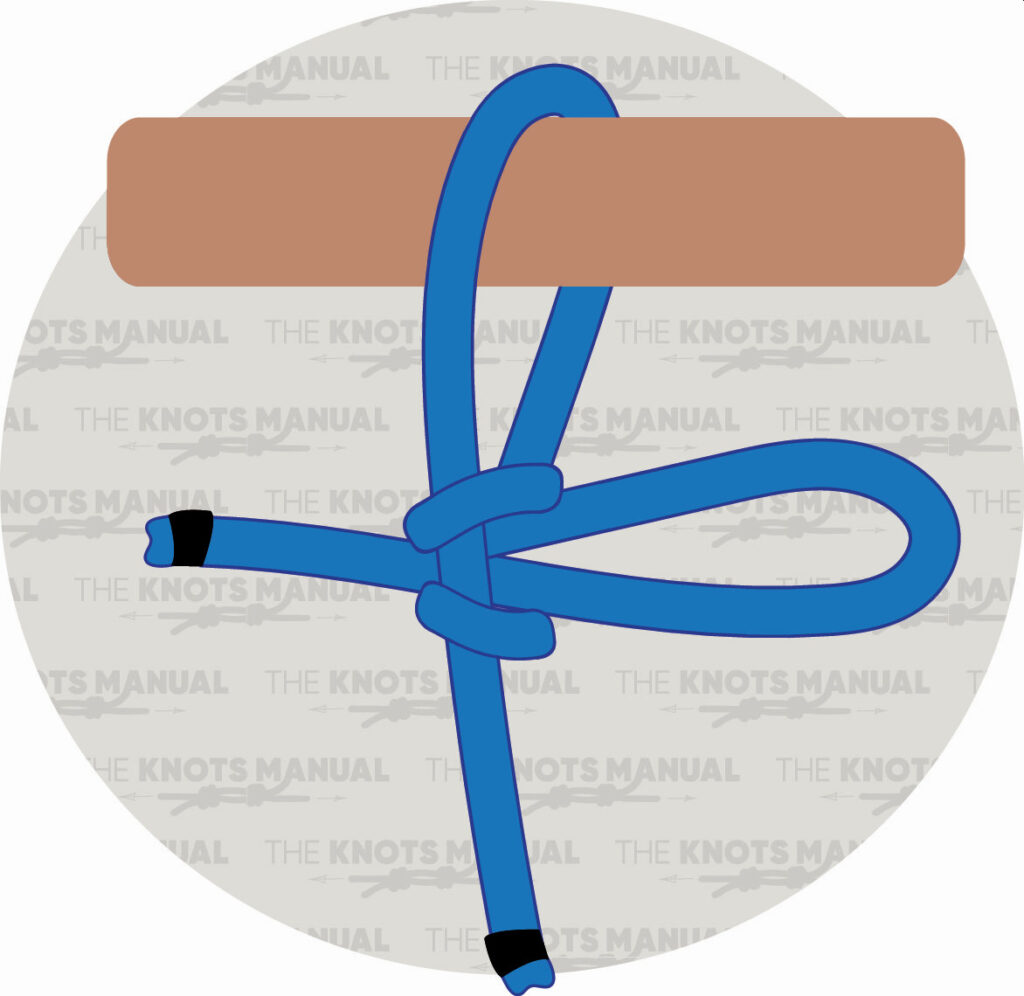
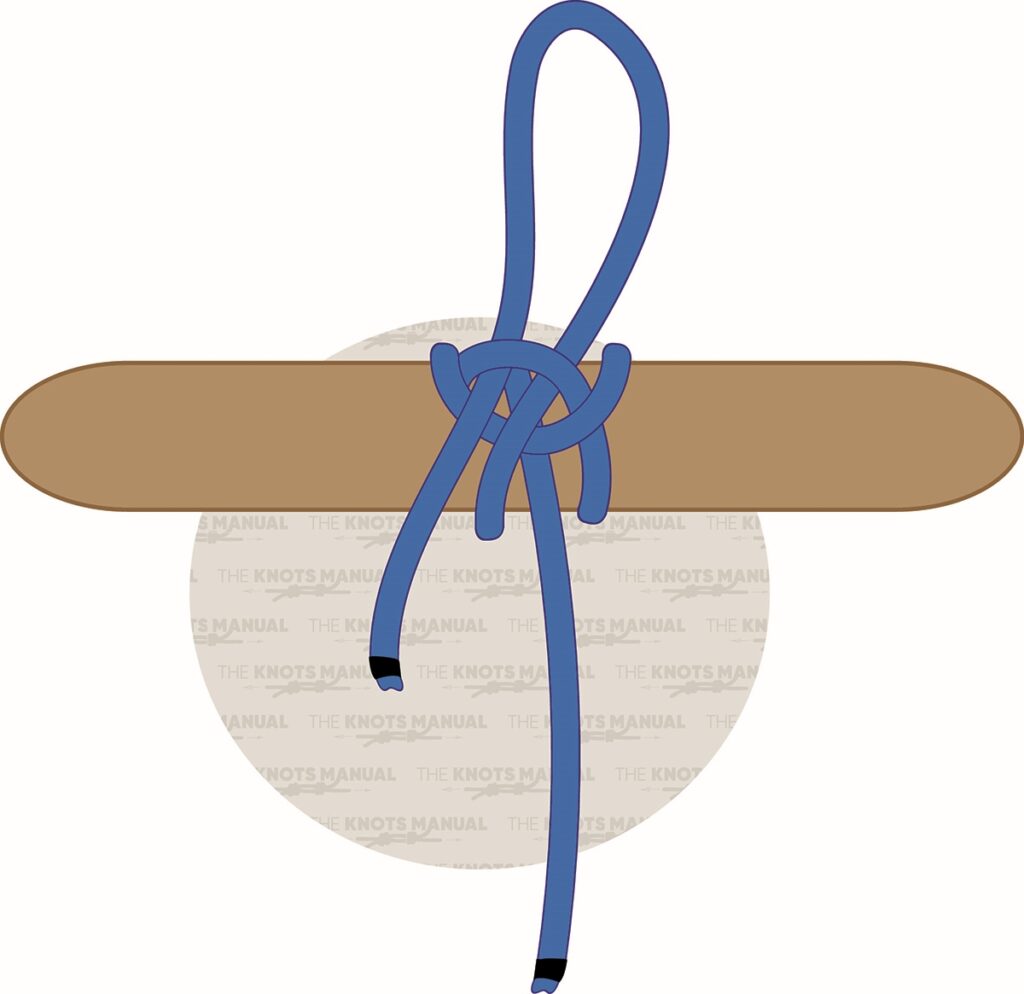
41. Tumble Hitch
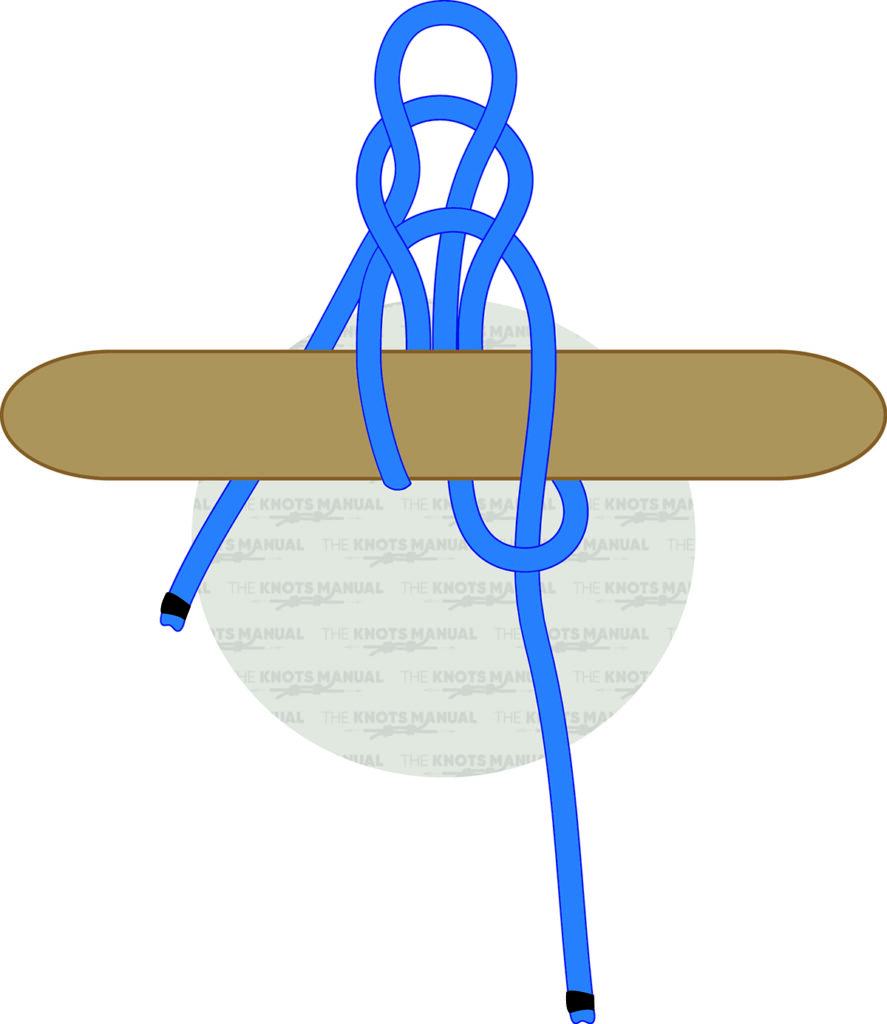
The Tumble Hitch is a reliable quick-release knot designed for securing loads that may need rapid untying. While it holds securely under tension, a simple pull on the working end causes it to release instantly. Because of this feature, it is especially useful in camping, boating, and theatrical rigging.
When tying a Tumble Hitch knot, begin by making a bight in the rope and placing it against a pole. Next, make another bight on the working end of the rope and wrap it around the backside of the pole and up through the first bight created. Then pass the working end behind and over the standing end. Create another bight with the working end and pass it through the second loop. Pull the standing end while holding the final bight to tighten. To quickly untie the knot, pull the working end.
42. Farrimond Friction Hitch
An adjustable loop knot that grips tightly under load but can slide when slackened, the Farrimond Friction Hitch provides an easy way to tension a line. With its ability to grip and release smoothly, it is favored for setting up shelters or securing gear. Even when wet, it maintains its holding power, making it dependable in outdoor conditions.
To tie a Farrimond Friction Hitch, free up a medium-length working end of a rope and pass the end around a tree or branch. Form a loop in front of the standing end and make a bight in the loop. Then wrap the bight around the standing end two times, or three or four times for a more secure knot. Next, make a bight on the working end of the rope and pass it through the previously formed bight. Tighten the knot by pulling on the rope, loop, and bight separately. To release the knot, make sure there is no weight or tension and firmly pull on the loose end of the hitch.
43. Basket Hitch
The Basket Hitch is a strong and stable knot used for lifting heavy objects by creating a secure cradle with a loop of rope or webbing. It distributes weight evenly across multiple points and minimizes stress on the rope and object being lifted. This knot is commonly used in rigging, industrial lifting, and rescue operations. When paired with proper lifting techniques, it ensures both safety and efficiency.
A Basket Hitch is tied by positioning a webbing sling above an anchor point, such as a tree limb, and making sure the beer knot is centered right on top of the support to reduce the loss of strength. Then wrap the two ends of the sling down each side of the anchor point and bring them together. Hook a carabiner into the loops to take the load. When weighted, the hitch tightens securely around the anchor.
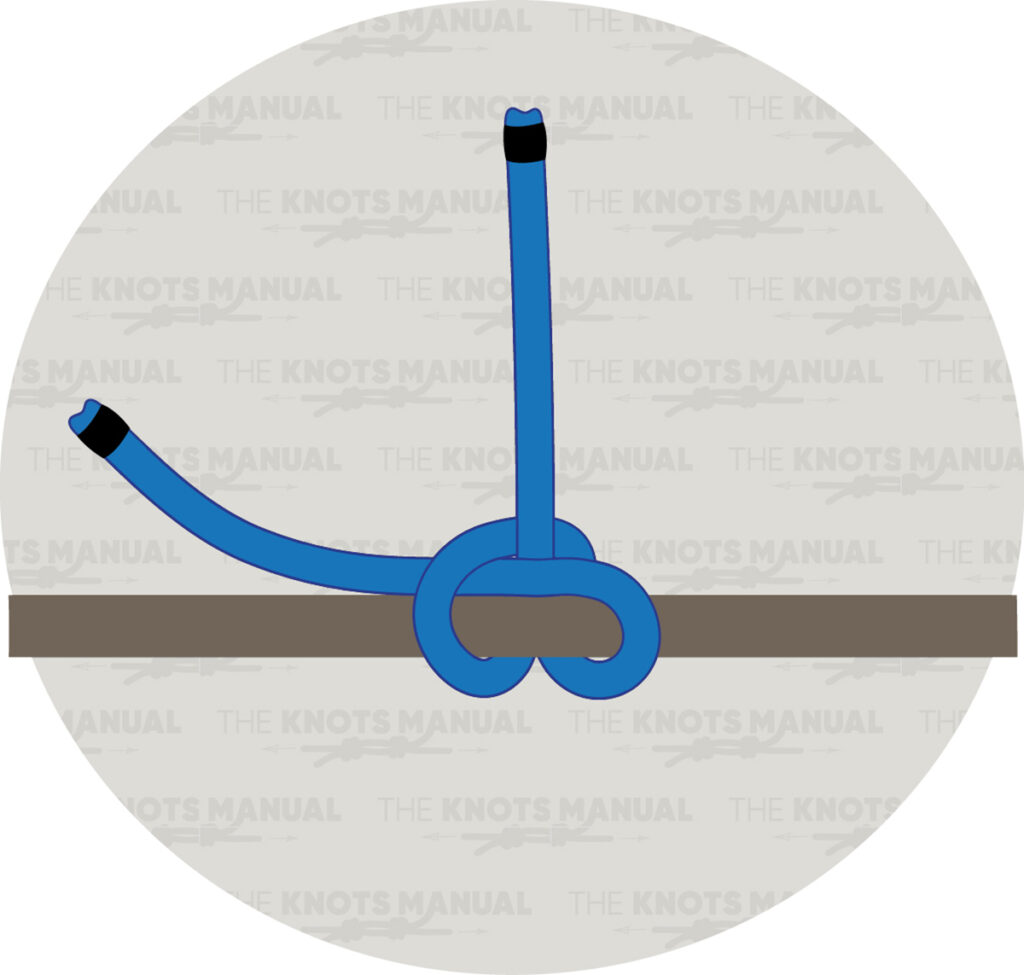
44. Pile Hitch
The Pile Hitch is a fast and efficient way to attach a rope to a post or pole. Its design allows it to be tied quickly with a simple wrap-and-tuck method, and even when loaded, it remains relatively easy to untie when adjustments are needed. Because of its ease of use and reliable hold, it is popular for securing boats, tarps, or temporary structures.
To tie a Pile Hitch knot, create a bight in the middle of a rope and wrap it around the post, near the free end. Cross over the standing lines, and then slide the open end of the bight loop over the top of the post. Pull to tighten.