Securing knots are designed to hold something firmly in place and are considered reliable for attaching ropes to objects or securing loads. They are essential tools for fastening, binding, and stabilizing objects across various applications. From boating and climbing to everyday utility, they each have their own unique functions and advantages. Knowing how to tie and use these knots correctly will help to ensure safety, efficiency, and reliability.
1. Midshipman’s Hitch
The Midshipman’s Hitch provides a firm grip while allowing smooth tension adjustments. This knot is particularly useful in situations where the load may shift, requiring periodic tightening or loosening. Commonly employed in sailing and climbing, it ensures that the rope maintains its hold without constant retightening. Its adjustable nature makes it versatile for various binding needs.
To tie a Midshipman’s Hitch Knot, start by wrapping the working end of the rope around the object. Pass it through the loop created by the wrap and around the standing line, forming the first Half Hitch. Next, bring it around again, working back away from the object and toward the standing line, and pull tight to form an Awning Hitch. Then, going in the same direction and outside of the loop around the standing line, make a Half Hitch. Pull both ends to tighten the knot so that it is able to slide on the standing line and hold tight when holding a load.
2. Heaving Line Knot

Adding weight to a rope’s end, the Heaving Line Knot facilitates easier throwing and passing. This feature is especially beneficial in marine environments where lines need to be cast over distances. The knot’s bulk ensures it catches hold, making retrieval straightforward. It’s an essential knot for tasks requiring accurate rope deployment.
A Heaving Line knot is tied by making two bights next to each other in an S-shape near the end of a rope, at the desired knot size of the finished knot, being sure to leave plenty of rope in the working end to make the wraps needed. Next, pass the working end through the loop of the top bight and wrap it around both strands of that bight only. Continue making wraps, but now encircling all three strands, working down the rope until you reach the end. Finally, pass the working end through the bottom loop. Pull the top loop until it secures the working end, and then pull the standing end to tighten the knot completely.
3. Buntline Hitch
A strong, compact knot, the Buntline Hitch secures a rope to a fixed object effectively. Its simplicity and reliability make it a favorite among sailors for attaching halyards to sails. Once tightened, it resists slipping, ensuring a steadfast connection. Its straightforward tying process adds to its practicality in various applications.
Tying a Buntline Hitch begins by passing the working end of a rope under the support and bringing it around and over the standing end to create a figure eight. Then take the working end and push it through the loop formed. Pull the standing end to tighten and complete the knot.
4. Marlinspike Hitch
The Marlinspike Hitch is utilized to tighten heavy ropes with the aid of a marlinspike or similar tool. This knot allows for the application of greater tension than pulling by hand alone. It’s particularly useful in rigging and situations requiring significant force. The hitch is temporary, facilitating quick adjustments or releases as needed.
To tie a Marlinspike Hitch, create a loop with the working end displaced to the right. Pull the loop to the right across the vertical line created by the rope. Bring the middle line to the left and over the loop. Pass a cylindrical support through the loop formed and pull on the working and standing ends of the rope to tighten the knot.
5. Square Knot
Commonly used for binding two ends of a rope together, the Square Knot is simple yet effective. However, it’s not suitable for heavy loads, as it can slip under significant tension. This knot is ideal for securing bandages or packages where moderate security is sufficient. Its ease of tying and untying adds to its practicality.
When tying a Square Knot, cross one rope’s working end over another rope’s working end. Next, pass the working end of the first rope through the loop created by the second rope. Then, pull the working ends and standing ends of both ropes simultaneously to tighten the knot. Untie the knot by pushing the two loops toward each other to release the tension.
6. Sheepshank
The Sheepshank temporarily shortens a rope without cutting it, providing an adjustable length. This knot is particularly useful when dealing with excess rope that needs managing. It’s commonly used in situations where rope length adjustments are necessary without permanent alteration. However, it should be used with caution, as it can slip if not properly secured.
In order to tie a Sheepshank knot with a slipknot, create two identical underhanded loops from the slack in the rope, and then pass the bight through the loop on the left and the remaining bight through the loop on the right. To ensure the knot is easily released, instead of pulling the free ends of the rope in opposite directions to complete the Sheepshank knot, insert a slipknot, or a loop of the rope, into each end loop. That way, simply tugging the free ends will instantly collapse the knot.
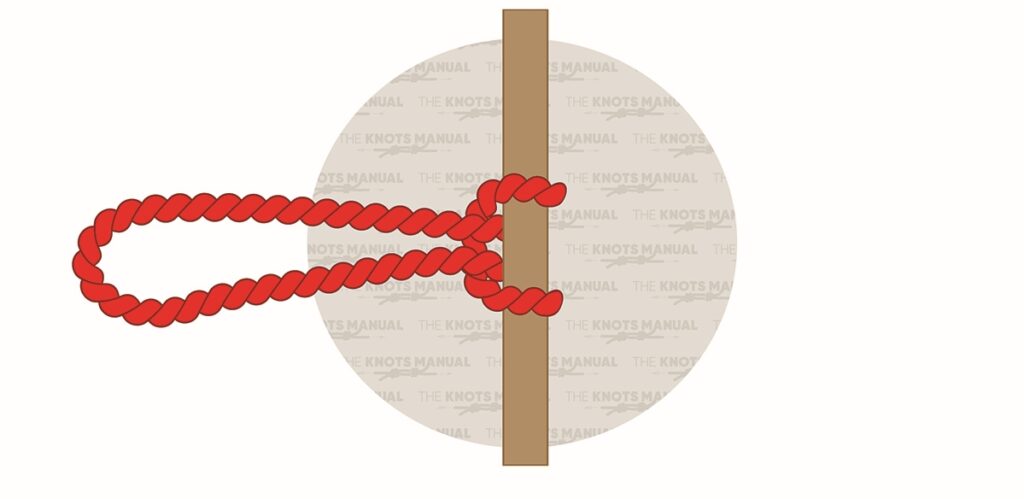
7. Timber Hitch
Used for securing logs or large objects, the Timber Hitch tightens under tension, ensuring a firm hold. This knot is particularly effective in hauling or dragging operations. It’s easy to tie and untie, even after heavy loading, making it practical for temporary bindings. Its simplicity and reliability make it a staple in forestry and hauling tasks.
When tying a Timber Hitch knot, wrap the rope’s working end around the support and then pass the working end around the rope’s standing part. Pull the working end to the left from the formed loop, passing it under the standing part. Pass the working end under the standing part two more times, and then pull both the working end and standing end simultaneously to complete the knot. The knot will come undone instantly by unwinding the running loop from around the rope.
8. Alpine Butterfly Bend
The Alpine Butterfly Bend is a secure knot used for joining two ropes of similar diameter, making it ideal for climbing, rescue operations, and rigging. It maintains high strength and stability under load, distributing tension evenly to prevent slippage or failure. Unlike some bends, it remains easy to untie after heavy stress, ensuring practicality in dynamic environments. This knot is particularly useful in high-stakes situations where reliability and load-bearing efficiency are crucial.
An Alpine Butterfly Bend is tied by placing the working ends of both ropes next to each other and then joining them together with tape or holding them with your hand. Wrap the first rope around your palm clockwise one full turn. Then, wrap the other rope around your palm in the same direction. Next, take the working ends of both ropes in your hand and pass them over and then underneath the two bottom strands. Remove your hand, and the result of the knot should look like a butterfly. Release the temporary join and tighten the knot by pulling the ends.
9. Water Knot
Primarily used for binding webbing or flat materials securely, the Water Knot is essential in climbing and rescue scenarios. This knot maintains its integrity under tension, ensuring safety. It’s commonly used to create slings or loops from webbing. However, regular inspection is necessary, as it can loosen over time.
To tie a Water Knot, start by tying a simple Overhand Knot by making a loop with the first rope, and passing the end through the loop. Then, with the other rope, retrace the steps but in the other direction by passing it through the knot of the first rope, with both ends exiting in opposite directions.
10. Prusik Knot
A friction hitch, the Prusik Knot is commonly used for climbing and load-bearing applications. This knot allows for ascending or descending a rope safely. It’s versatile, functioning as a self-locking mechanism under load but sliding when tension is released. Its reliability makes it indispensable in rescue operations and arboriculture.
Tying a Prusik Knot begins by wrapping a smaller rope around a larger rope three times, making sure the loops lay neatly side by side. Then, thread the working end back through the loops and pull tight to secure the knot. When weighted, it grips the main rope, but it can slide when released.
11. Farrimond Friction Hitch
A quick-release adjustable knot, the Farrimond Friction Hitch provides a secure hold under tension while allowing for easy adjustments. It is commonly used in tarp rigging, tent guy lines, and load-securing applications where frequent tightening or loosening is needed. The knot grips firmly when pulled but can be released instantly with a single pull of the working end. This balance of security and quick adjustability makes it highly useful in survival, camping, and utility work.
When tying a Farrimond Friction Hitch, free up a medium-length working end of a rope and pass the end around a tree or branch. Form a loop in front of the standing end and make a bight in the loop. Then wrap the bight around the standing end two times, or three or four times for a more secure knot. Next, make a bight on the working end of the rope and pass it through the previously formed bight. Tighten the knot by pulling on the rope, loop, and bight separately. To release the knot, make sure there is no weight or tension and firmly pull on the loose end of the hitch.
12. Boom Hitch
The Boom Hitch is a reliable knot used to secure a rope to a cylindrical object, such as a boom or pole, providing a firm grip under tension. It is commonly used in sailing and rigging to hold loads steady while allowing for controlled adjustments. The knot tightens when pulled but remains easy to untie after use, making it practical for temporary bindings. Its ability to maintain friction and prevent slipping ensures stability in dynamic load situations.
A Boom Hitch knot is tied by first freeing up a long section near the end of the rope because the knot requires many turns. Bring the working end of the rope over the top of the boom or post and wrap it behind and then cross over the standing end in the front. Next, wrap across the post in the opposite diagonal, front to back and between the two existing knot parts. Cross the working end over the front of the standing line again and wrap diagonally over the post, this time moving right to left. To finish the knot, bring the working end to the front, cross the post, and feed the working end through the prior wrap at the top of the knot. Tighten the knot by working all the wraps close together, and pull the working end and standing line.
13. Icicle Hitch
The Icicle Hitch holds firmly on smooth, cylindrical surfaces, even under extreme tension. This knot is particularly useful when dealing with poles or pipes where other knots might slip. It’s reliable in both linear and axial pulls, making it versatile for various applications. Its secure grip ensures stability in demanding conditions.
To tie an Icicle Hitch knot, wrap the working end of a rope around the post four times, ensuring that you’re wrapping away from the end. Next, take the working line and pass it behind the wraps and standing line. Then bring it back over the post to create a hanging loop under the wrapped section. Take the hanging loop by the longest part and pull it past the standing line on the front side and over the end of the pole. Tighten the knot by pulling down on both wraps. The wraps will spread when pressure is applied to the load.
14. Girth Hitch
A simple and quick way to attach a loop of rope or webbing to an object, the Girth Hitch is widely used in climbing and rigging. This knot distributes load evenly, reducing stress on any single point. It’s commonly used to connect slings to harnesses or anchors. However, it should be used with caution, as it can slip under certain conditions.
In order to tie a Girth Hitch knot, start by wrapping the pre-tied sling around the support. Pass the bigger loop through the smaller one and take the right loop to the left side. Then pull the bigger loop so that the smaller loop tightens against the support to finish the knot.
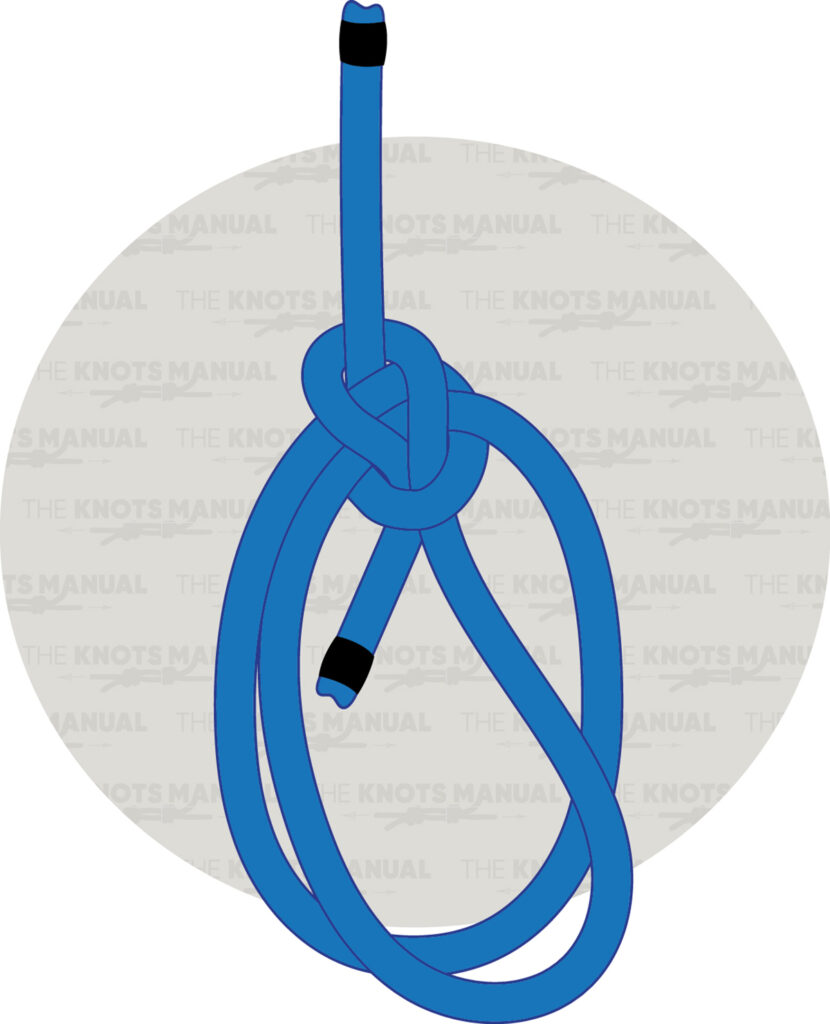
15. Bowline Knot
The Bowline Knot creates a stable, non-slip loop at the end of a rope, making it invaluable for lifting and securing loads. Even under tension, it remains easy to untie, which makes it a favorite in sailing, rescue operations, and general utility. This knot is highly dependable for creating a fixed loop that won’t tighten further under load.
To tie a Bowline knot, start by forming a small loop, being sure to leave enough rope for the desired loop size. Next, pass the end of the rope through the loop, and then bring it around the standing end, and then back down through the small loop in the other direction. Pull the working end opposite the fixed loop to tighten the knot.
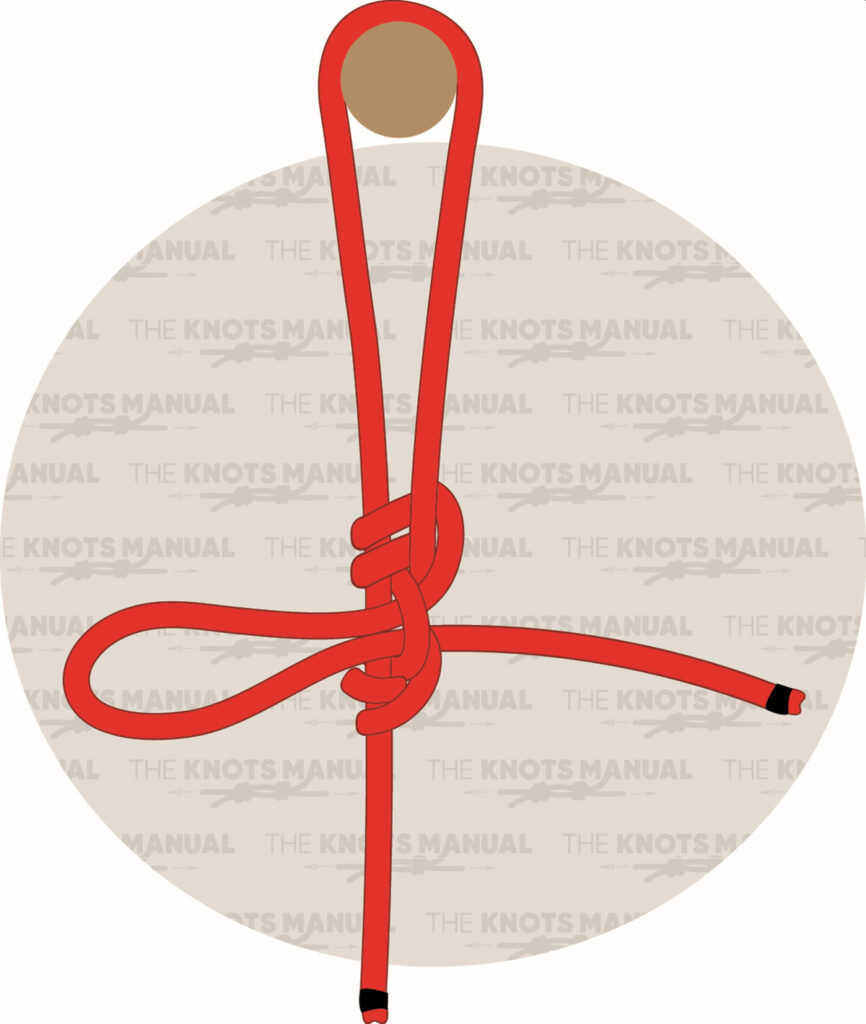
16. Trucker’s Hitch
The Trucker’s Hitch is used to secure heavy loads by creating a pulley-like mechanical advantage for tightening ropes. This makes it especially useful for securing cargo on vehicles, tying down equipment, or tensioning tarps. Once tied, the knot allows for precise control over tension before securing it in place.
When tying a Trucker’s Hitch knot, form a bight in the standing end of the rope. Pass the bight behind the standing end and cross the working end over the bottom loop. Next, bring the bight in front of the standing end and do another half-turn with the bight, and then pass it through the bottom loop, from the back side. Thread the working end through the hook or carabiner and bring it back through the bottom loop. Tighten the newly-formed loop slightly, and pass the working end behind the bottom loop, completing the two half hitches below the loop. After one turn, pass the working end under itself, forming a half hitch in the process, and then go behind the bottom loop once again to create a second half hitch and complete the knot.
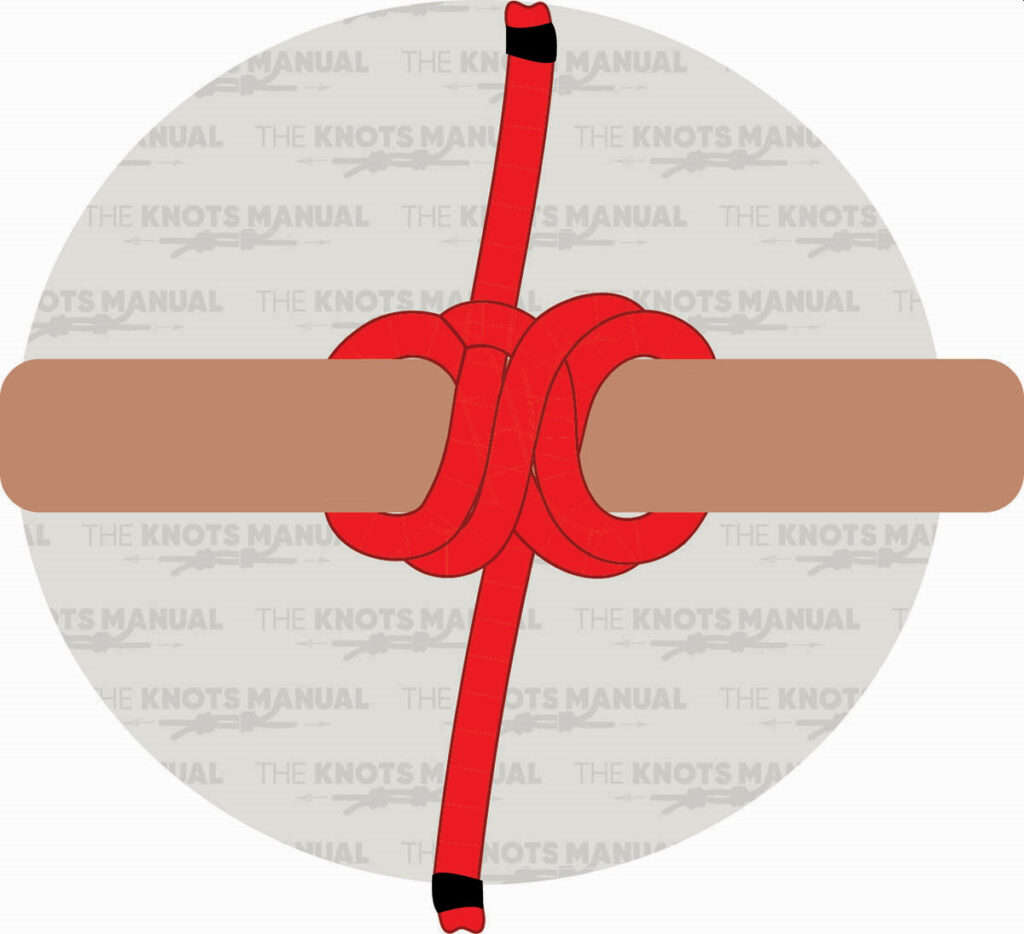
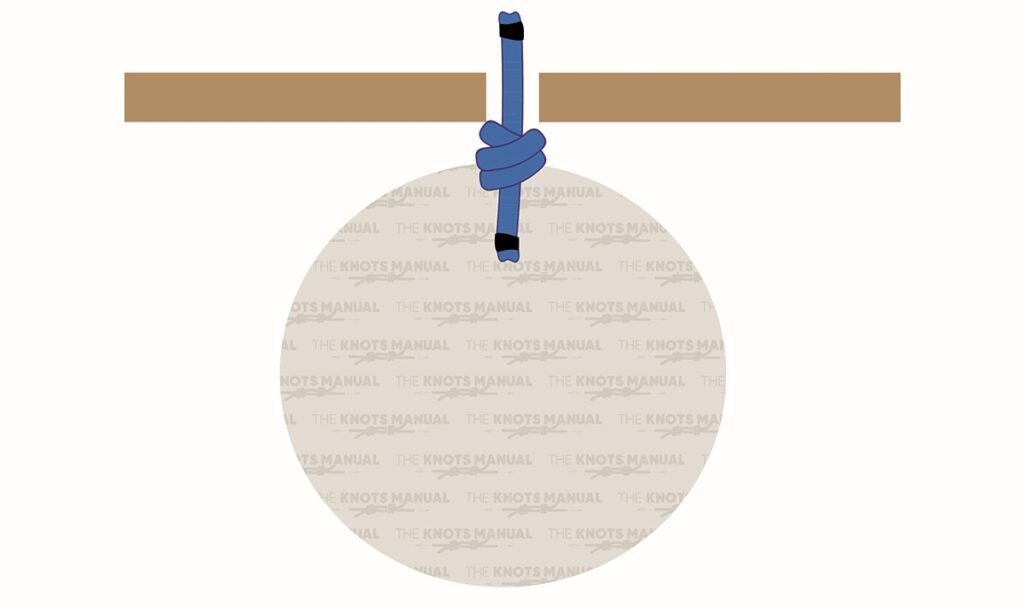
17. Clove Hitch
The Clove Hitch is a simple and quick knot used to attach a rope to a post, pole, or railing. While easy to tie and adjust, it can slip if not properly secured or under intermittent tension. This knot is best used for temporary holds where frequent readjustment is necessary.
Tying a Clove Hitch knot begins by hanging a rope from a support object and looping the rope around the support with the end. Pass the end of the rope under itself and pull tight to secure the knot.
18. Figure Eight Knot
The Figure Eight Knot is commonly used as a stopper knot to prevent a rope from slipping through a pulley or harness. Because of its secure structure, it’s widely used in climbing, sailing, and rigging. It’s easy to inspect for correctness, making it a preferred safety knot.
To tie a Figure Eight knot, make a loose “8” shape with the rope and wrap the end around the support. Follow the figure eight back in the other direction, threading the end through both loops. Continue following the figure eight and bring the end behind the bigger loop. Next, keep following the rope, wrapping it around the support loop and going through the bigger loop again. Finally, pass the end through the smaller loop, along with the rest of the rope, and pull each rope separately from both ends to tighten the knot.
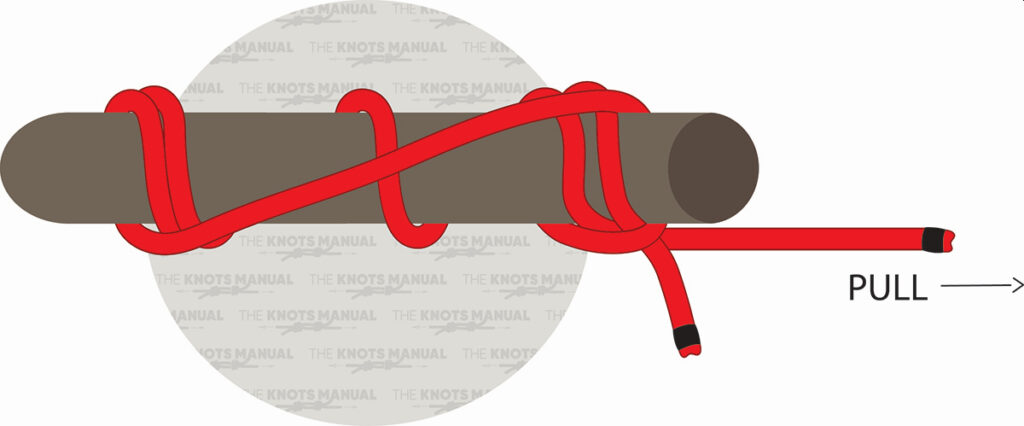
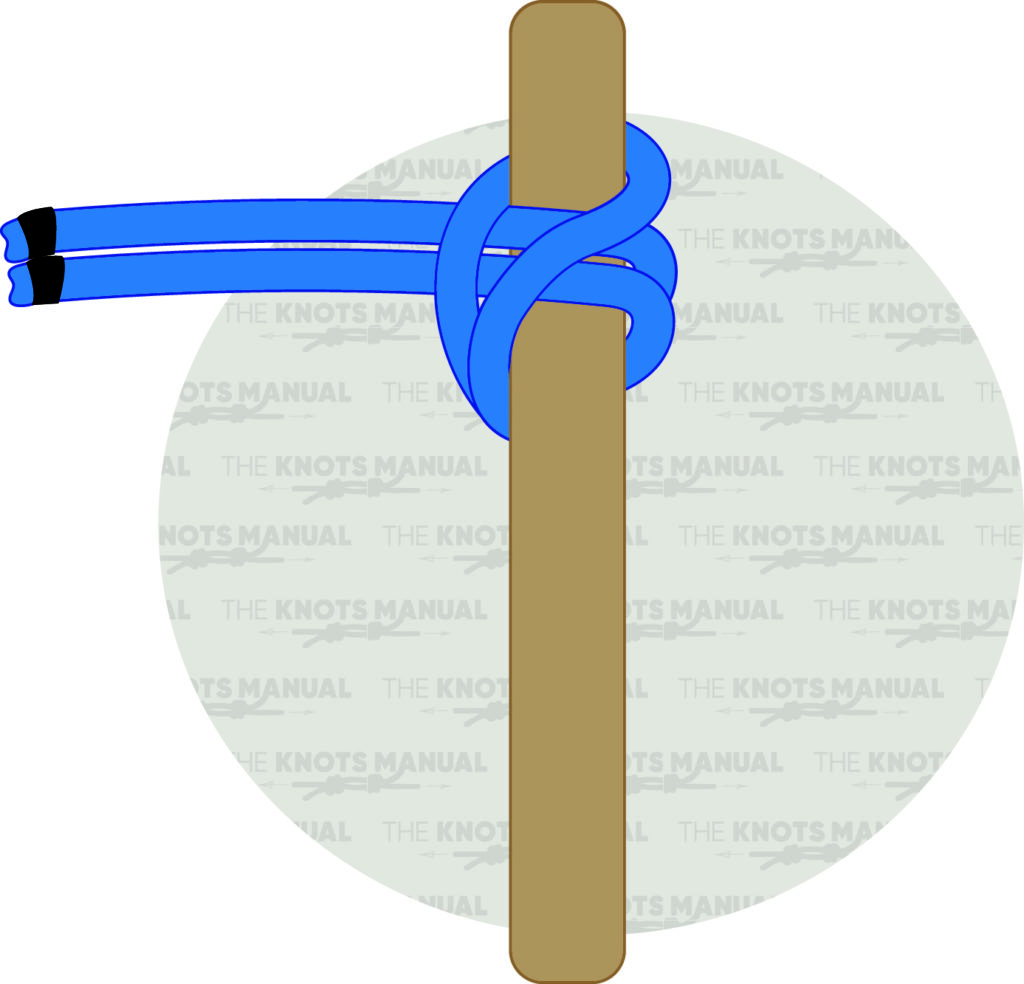
19. Rolling Hitch
The Rolling Hitch allows a rope to grip another rope or pole under tension, enabling gradual load adjustments. This feature makes it ideal for securing lines on boats or for hauling heavy objects with controlled movement. It holds firm under steady force but can be released easily when needed.
A Rolling Hitch knot is tied by looping the working end of the rope around a post, and then bringing it down from behind the post. Bring the working end back up and wrap it around the post. Then, pass the working end under the post and underneath the first wrap, pulling it upwards from between the two wraps. To tighten and secure the knot, pull the working end and standing end simultaneously.
20. Round Turn and Two Half Hitches
The Round Turn and Two Half Hitches is a strong and reliable knot for securing a rope to a fixed object like a post, dock, or tree. It starts with a round turn to reduce strain, followed by two half hitches to lock it in place. This combination makes it a dependable choice for tying down loads or securing boats.
In order to tie a Round Turn and Two Half Hitches knot, place a rope over the support and feed it around. Bring the rope around the support again to complete the loop. Then, wrap the end of the rope around the main rope. Form the first half hitch by tucking the end of the rope through, and then wrap the end of the rope around the main rope again in the same direction. Tuck the end of the rope through to create the second half hitch, and pull the main end of the rope to tighten the knot.
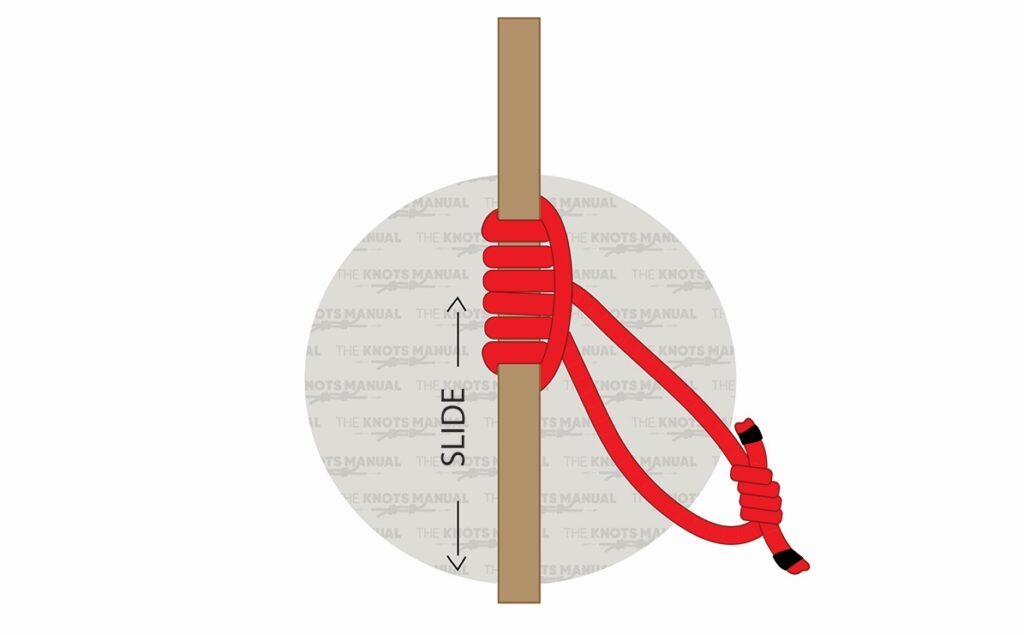
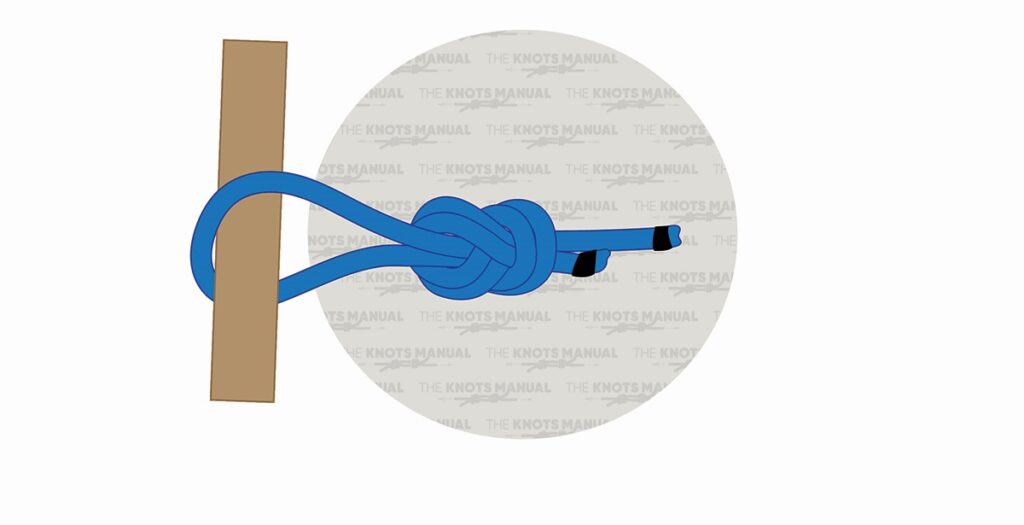
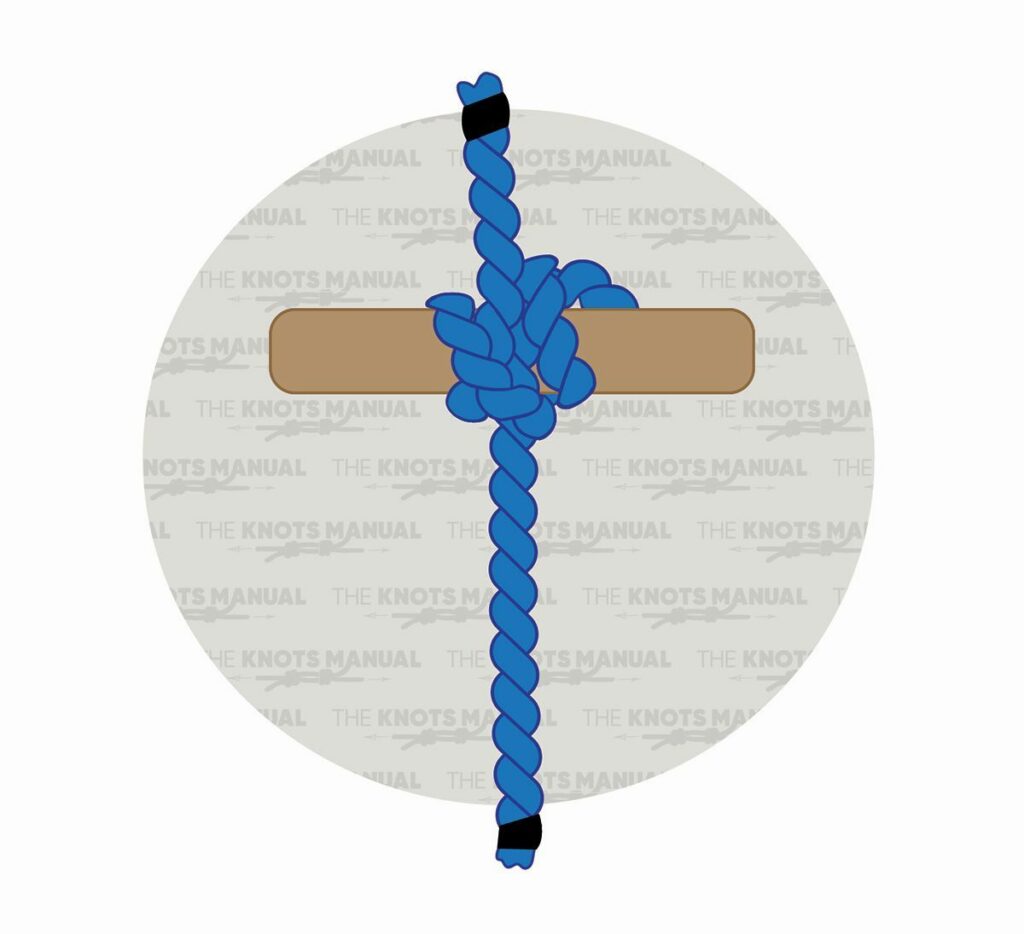
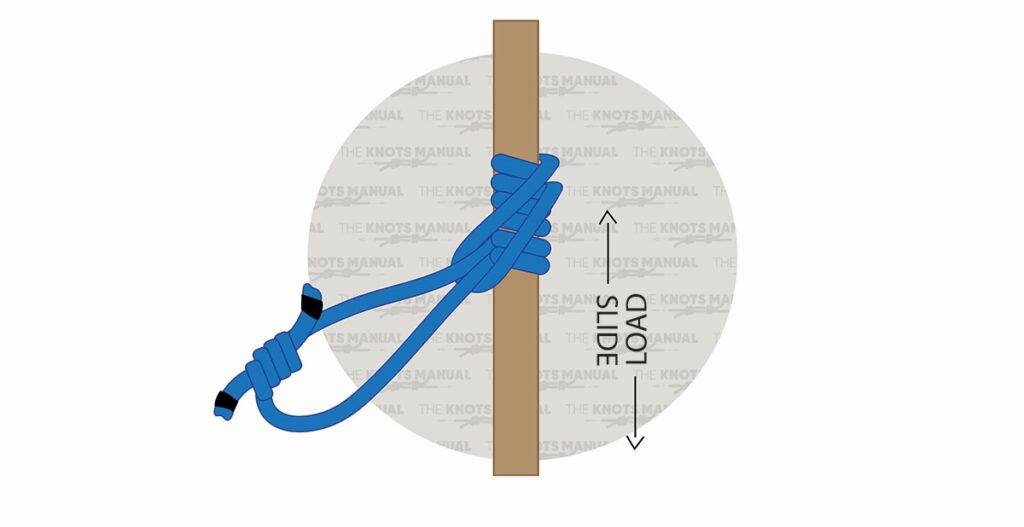
21. Taut-Line Hitch
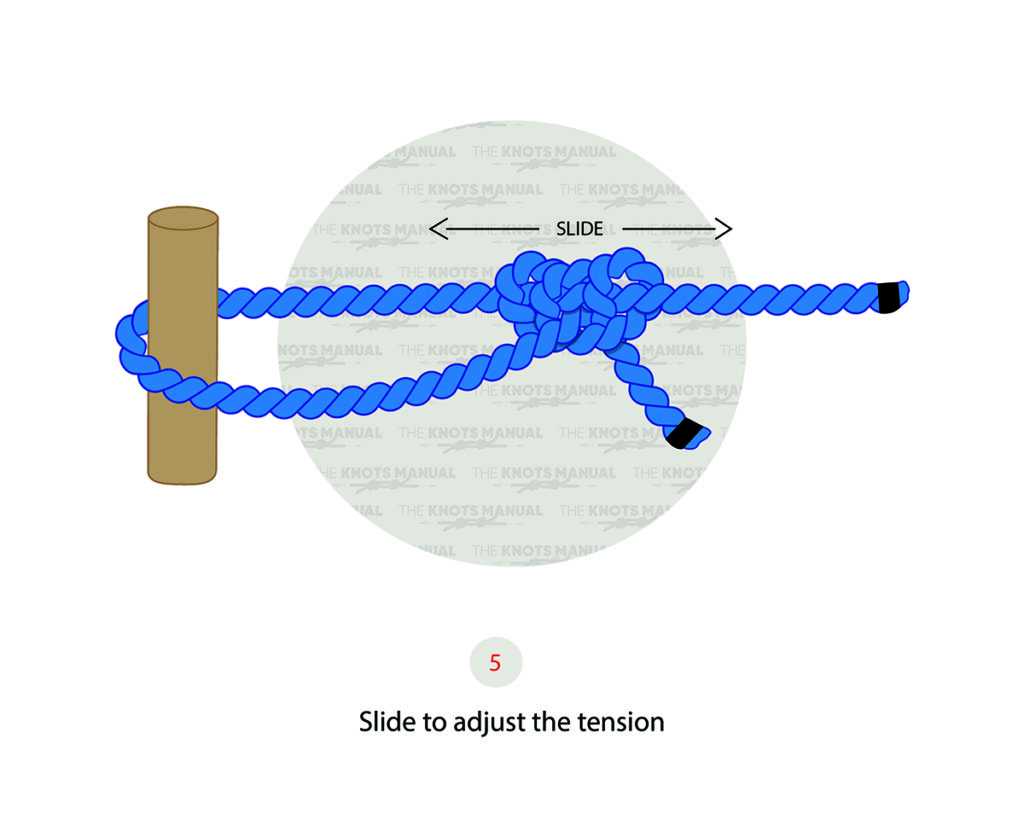
The Taut-Line Hitch is an adjustable knot that maintains tension, making it popular for tent guy lines and tarp rigging. It allows for easy tightening or loosening without untying the knot, making it highly practical for securing objects under varying conditions.
When tying a Taut-Line Hitch knot, wrap the working end around the support and then around the rope’s standing part. Next, take the working end and wrap it around the standing end again, starting inside the loop. Then, pull the end of the rope upwards so that it’s outside the loop. Wrap the working end around the standing end again, outside the original loop. Tighten and complete the knot by holding the standing part on either side of the support with one hand and pulling both ends of the rope with the other hand. Slide the knot across the rope to adjust the tension.
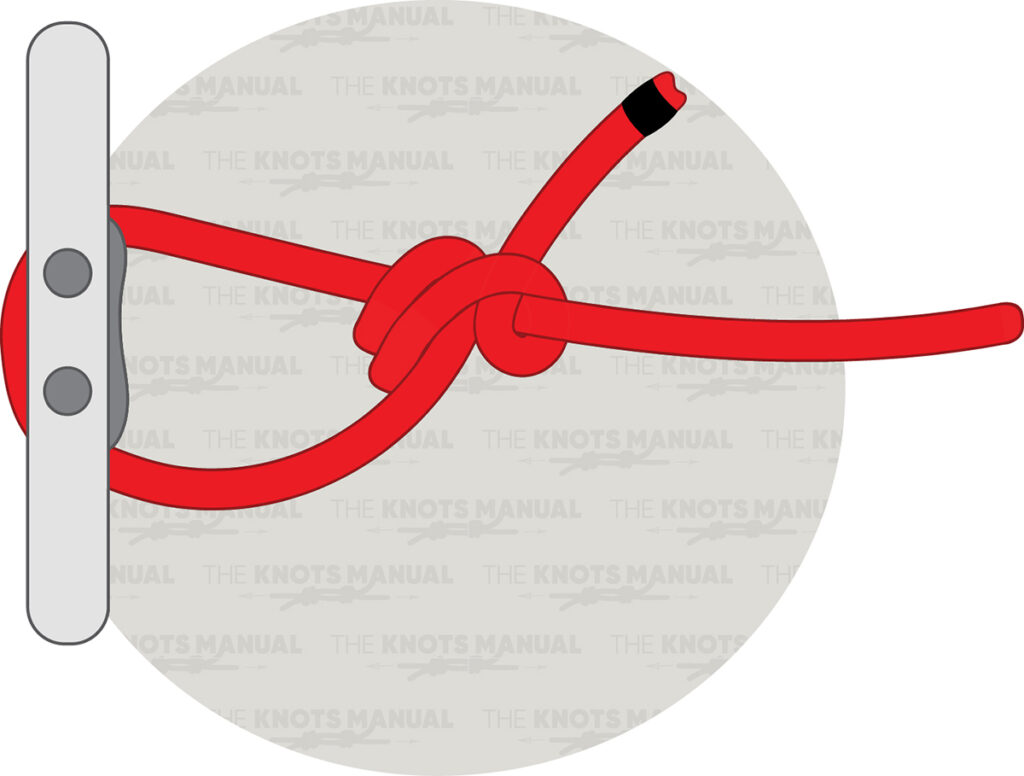
22. Anchor Hitch
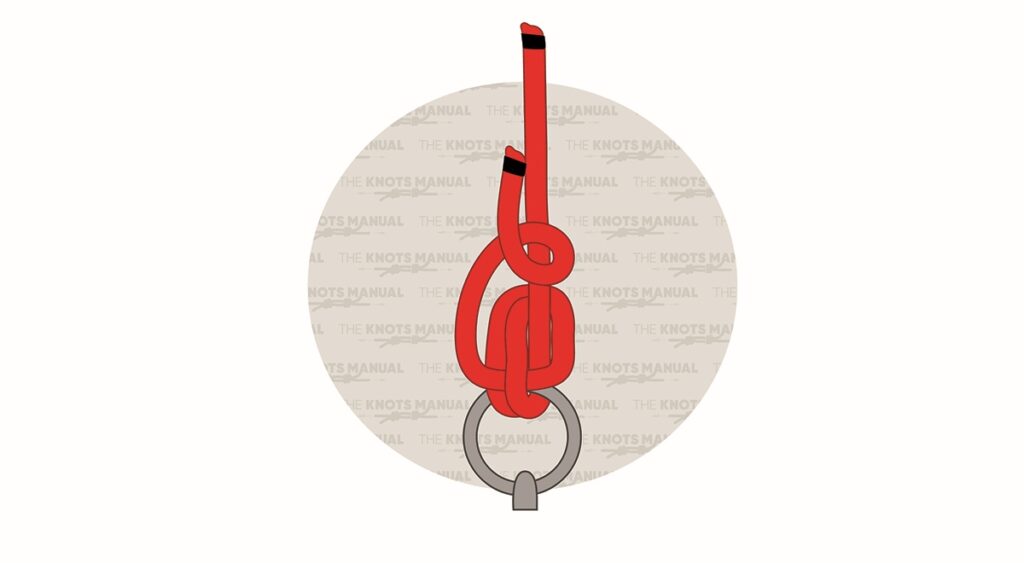
The Anchor Hitch is a highly secure knot for attaching a rope to an anchor, ring, or fixed object. Designed to tighten under load, it provides a firm and slip-resistant hold, making it particularly useful in marine settings.
To tie an Anchor Hitch knot, start by wrapping the working end of a rope around the shackle or swivel two times. Next, pass the working end through the loops created and pull to tighten. Then, wrap the working end around the rope’s standing part. Holding the shackle with one hand and pulling up on the working end with the other will complete the knot.
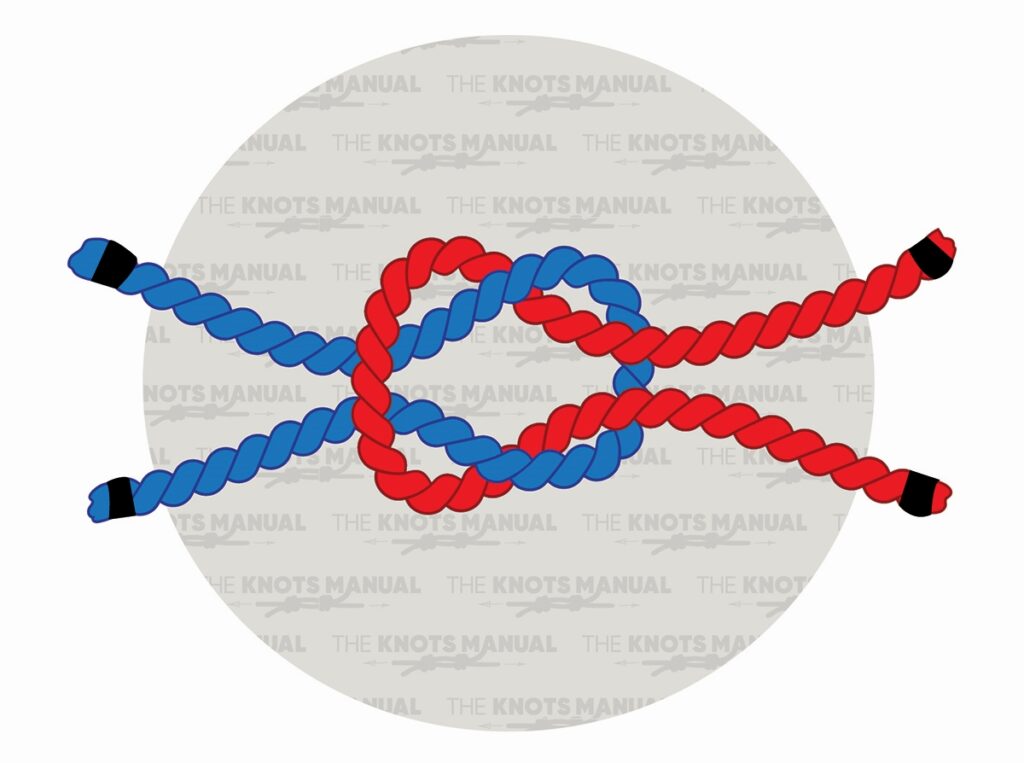
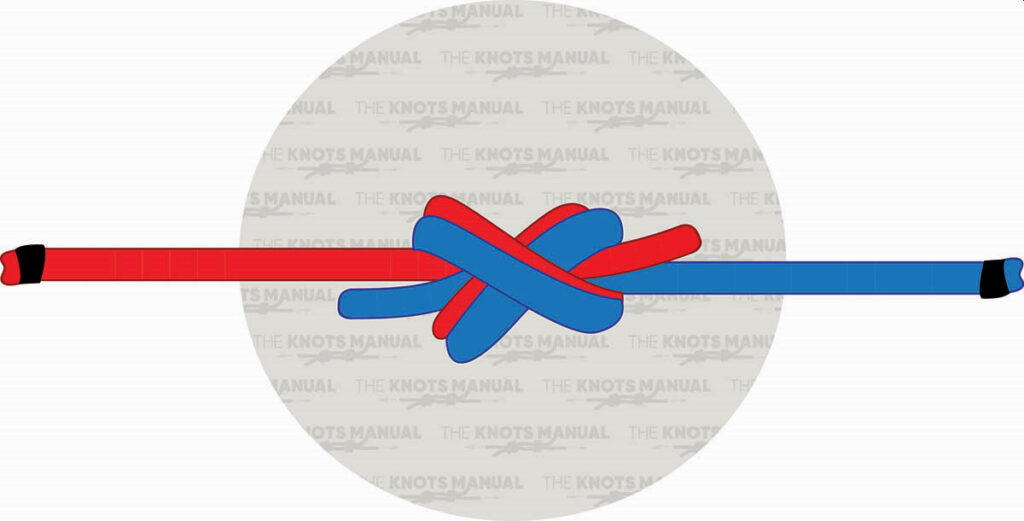
23. Zeppelin Bend
A strong and stable knot for joining two ropes together, the Zeppelin Bend ensures they remain secure under strain. It resists jamming under tension, ensuring that it remains easy to untie even after bearing significant weight. This knot maintains its strength and reliability, making it a preferred choice for securing ropes in climbing, boating, and rescue scenarios. Its symmetrical structure distributes strain evenly, preventing slippage and enhancing its overall holding power.
A Zeppelin Bend knot is tied by interlinking two symmetric Overhand knots. Start by placing one loop over another loop and pass one of the ends through the loops. Then pass the end of the other rope through the loops. Simultaneously pull on the working ends and two standing ends to tighten the knot.
24. Double Fisherman’s Knot
The Double Fisherman’s Knot is a highly secure binding knot used to join two ropes together, especially in climbing and rescue operations. It tightens under tension, creating a strong and nearly unbreakable bond that can withstand heavy loads. This knot is particularly useful for securing critical connections where safety is a priority. However, once tightened, it can be difficult to untie, reinforcing its reliability for permanent or semi-permanent bindings.
In order to tie a Double Fisherman’s Knot, begin by placing the working ends of both ropes or lines next to each other. Wrap the first rope around the second one two times, starting from the furthest end and going closer. Then, bring the working end through these two loops and tighten the knot. Create an identical knot in the other direction with the other line. Pull the standing ends of both ropes to tighten the knot.
25. Cleat Hitch
For fastening a rope to a cleat securely, the Cleat Hitch is a go-to knot, especially in boating and docking. Even under tension, it holds firm while still allowing for quick release when necessary. With its simple yet effective wrapping technique, this knot prevents slippage and ensures stability. Whether securing a vessel or tying down equipment, the Cleat Hitch provides a reliable binding solution.
Tying a Cleat Hitch knot begins by wrapping a rope around the boat’s far horn. Next, wrap the rope’s working end around the near horn and pass it around the back and then around the front of the horn. Create a loop in the working end of the rope, and slide the loop over the near horn. Tighten the knot by pulling on the working end.
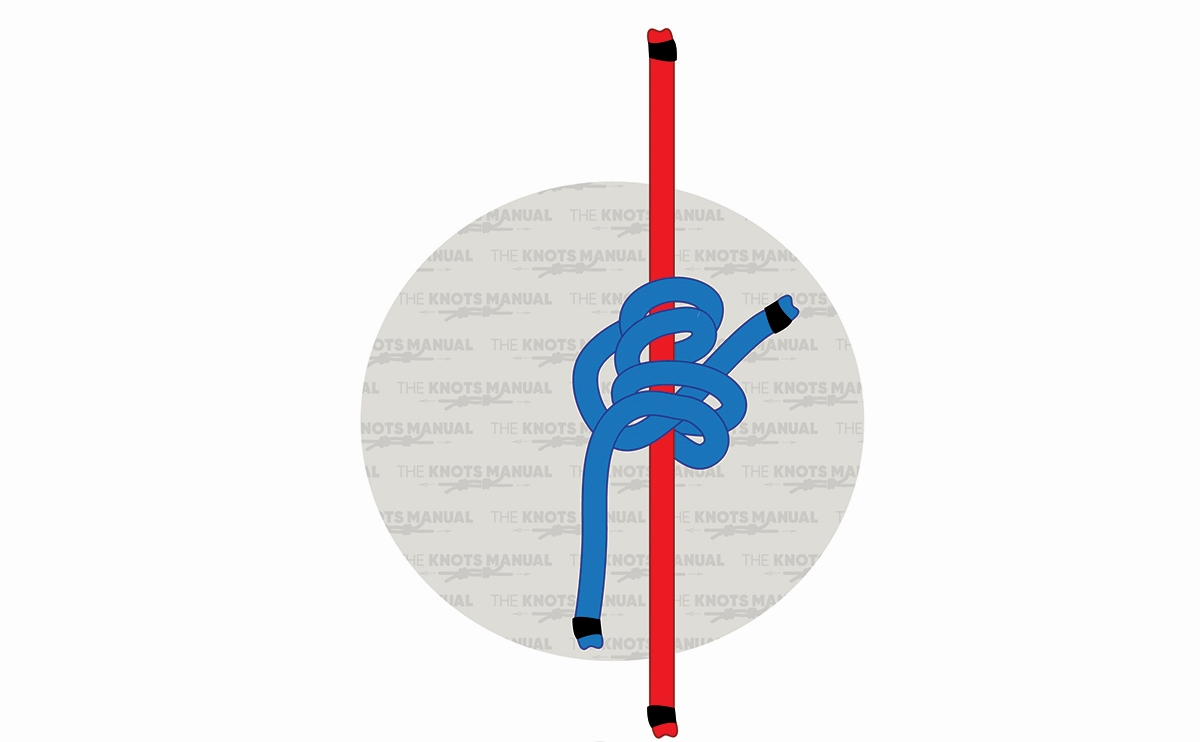
26. Blake’s Hitch

The Blake’s Hitch is a knot commonly used in tree climbing and is a reliable knot for ascending a rope. It tightens under load, gripping securely while still allowing for controlled movement when adjusted. Because of its ability to hold firm yet slide when needed, it’s ideal for situations requiring both security and flexibility. Whether for climbing or rigging, this knot ensures a strong and stable hold.
To tie a Blake’s Hitch, wrap the rope four times around the standing line a little loosely. Then bring the working end back down and around itself. Next, tuck the working end under the last two wraps so that it comes out of the middle of the four wraps. Tighten the knot by pulling both ends to secure it in place.
27. Klemheist Knot
The Klemheist Knot is a versatile friction hitch that grips tightly under load but slides easily when released. Often used in climbing and rescue, it allows for secure attachment to a rope while enabling controlled movement. Its design ensures a firm hold in one direction, making it ideal for ascending or hauling. Reliable and easy to tie, this knot is essential for situations requiring both strength and adjustability.
When tying a Klemheist Knot, place a fixed loop right next to a pole or another larger rope. Wrap the loop around the main rope/pole, starting from the bottom upwards. Repeat the wrapping two to three more turns and pass the bottom part of the fixed loop (with the knot) through the upper loop. Complete the knot by taking the bottom loop back down and pulling hard. To keep the knot from sliding down, only attach the load from the bottom direction, and it can be adjusted once the load has been taken off.
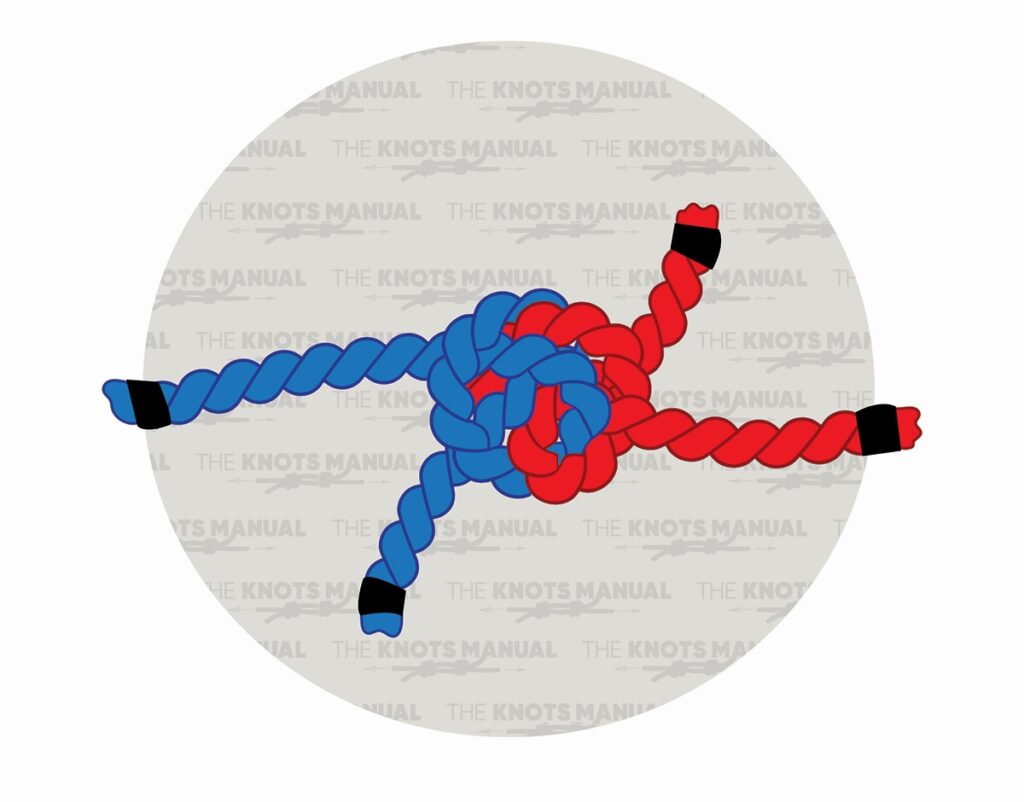
28. Hunter’s Bend

Designed for strength and reliability, the Hunter’s Bend knot securely joins two ropes under heavy tension. It holds firm even when subjected to significant strain, making it ideal for climbing, sailing, and rescue operations. Unlike some bends, this knot resists slipping and remains easy to untie after loading. When a secure and durable connection is needed, the Hunter’s Bend is a dependable choice.
A Hunter’s Bend Knot is tied by starting with two ropes and then forming a bight in each rope. Interlock the two bights and pass each end over itself and the other rope, creating interlocking loops. Next, thread each rope through the middle, under both ropes and then above itself. Finish the bend by pulling to tighten evenly, and secure the knot.
29. Double Overhand Stopper Knot
The Double Overhand Stopper Knot provides extra security by tightening firmly under tension. Commonly used in climbing and fishing, it adds friction to prevent slipping. Its compact design ensures a firm hold, even under heavy loads. While highly secure, untying it after significant strain can be difficult.
To tie the Double Overhand Stopper Knot, begin by forming a loop with the working end. Pass the working end through the loop to create an Overhand Knot. Then wrap the rope around another time and tighten it by pulling both ends.
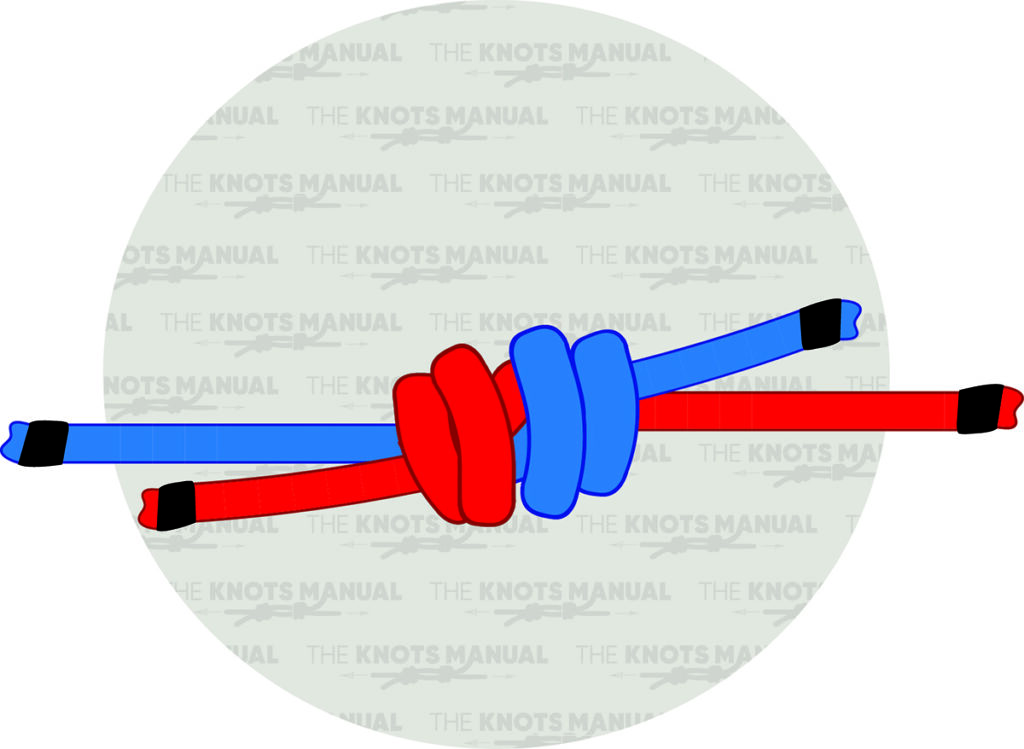
30. Surgeon’s Knot
The Surgeon’s Knot is a strong binding knot that provides extra security through its double-wrapped first turn. Frequently used in medical sutures and fishing, it prevents slippage when joining two lines or securing materials. Its structure enhances friction, making it reliable for holding tension under load. Easy to tie yet difficult to unravel unintentionally, this knot is ideal for applications requiring a firm and lasting hold.
Tying Surgeon’s Knot begins by placing both fishing lines or ropes next to each other, with the ends overlapping in opposite directions. The shortest line (leader or tippet) should be placed on the right side. Make a loop with both lines, and pass the shortest end through the loop two times. Lubricate and pull the ends to tighten the finished knot.
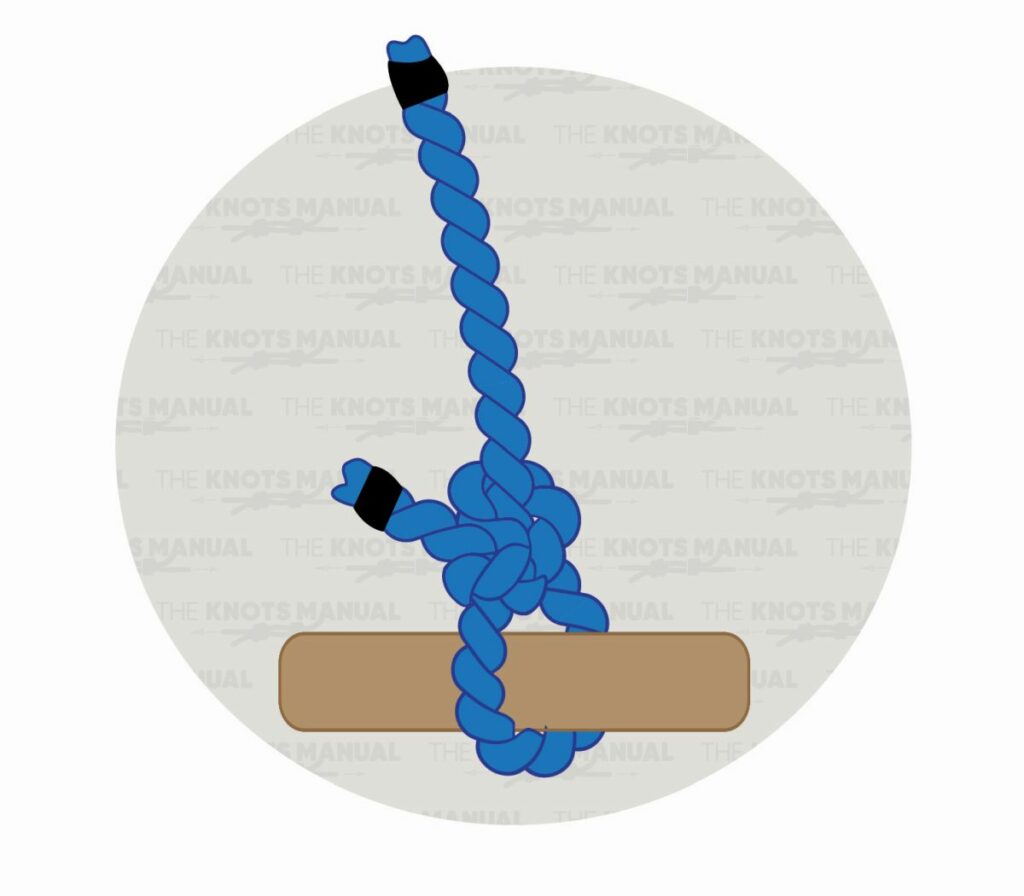
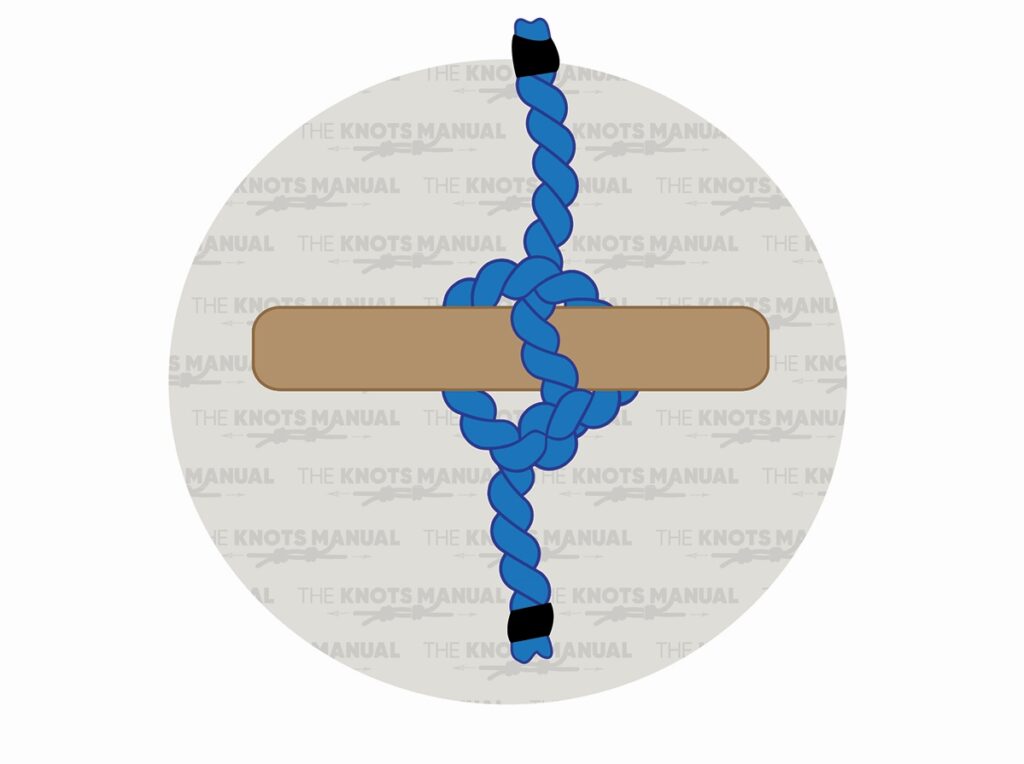
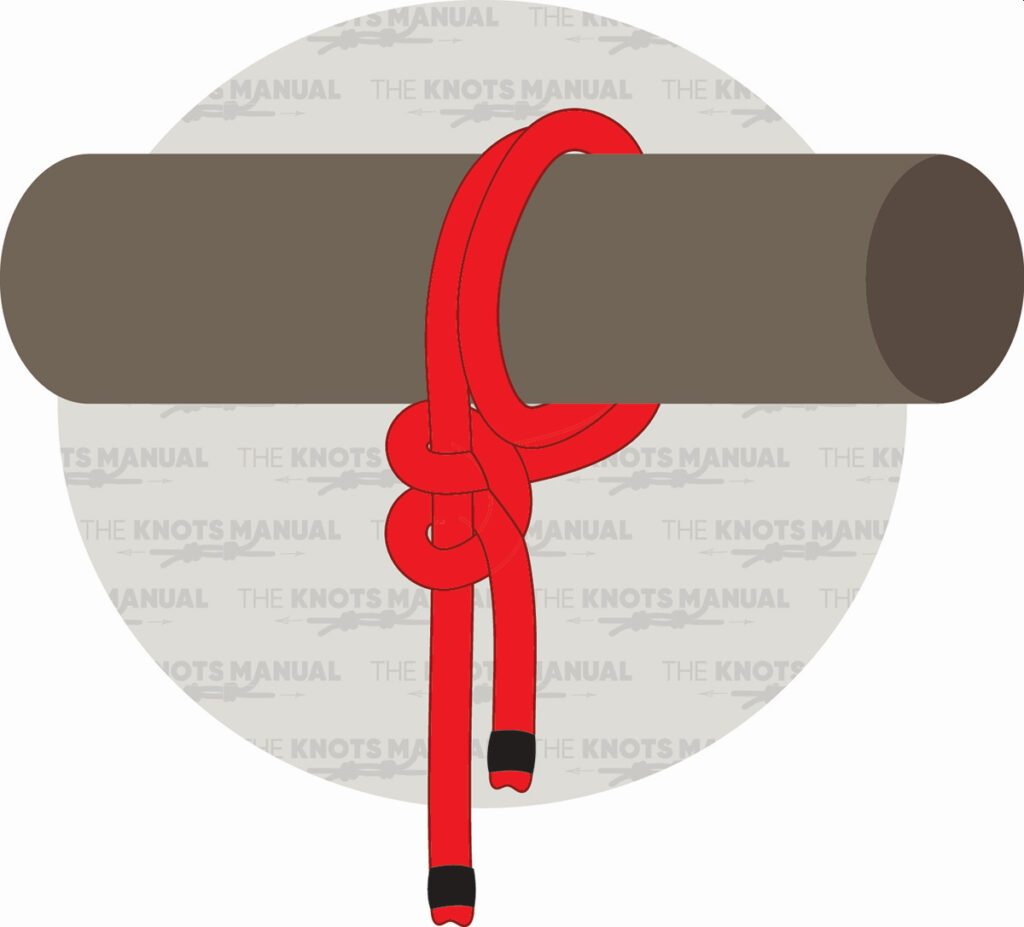
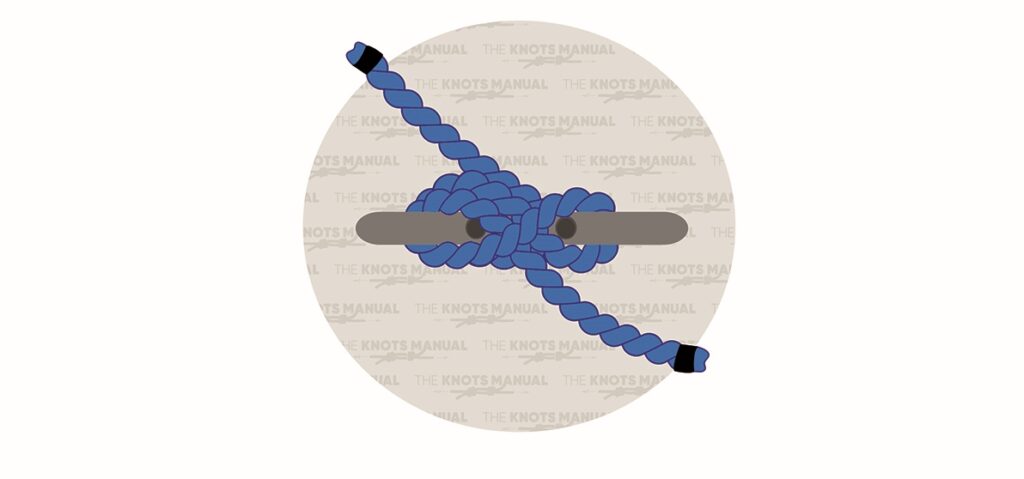
31. Pile Hitch
The Pile Hitch is an effective way to tie a rope around a post or pole. Often used in maritime and utility work, it holds firmly under load while remaining easy to untie. Its simple design allows for rapid tying, making it ideal for temporary fastening. With strong grip and versatility, this knot is a practical choice for securing boats, equipment, or cargo.
To tie a Pile Hitch knot, create a bight in the middle of a rope and wrap it around the post, near the free end. Cross over the standing lines, and then slide the open end of the bight loop over the top of the post. Pull to tighten.
32. Snell Knot

Designed to maintain strength under tension, the Snell Knot is a dependable fishing knot that firmly secures a hook to the fishing line. It ensures a direct pull from the line to the hook for optimal performance. Commonly used by anglers, this knot prevents slippage and enhances hook-setting power. Its tightly wrapped coils create a strong, reliable hold, making it an essential choice for securing baited hooks.
When tying a Snell Knot, run the end of a fishing line through the hook eye and then down the shank of the hook, forming a loop below the hook with the line. Wrap the tag end of the line around the hook shank and through the loop four to six times. On the final turn, make sure to pass the tag end through the bottom loop. Work the coils down the shank to the eye and pull the tag end and standing line to tighten the knot. Complete the knot by lubricating it and cutting off the tag end.
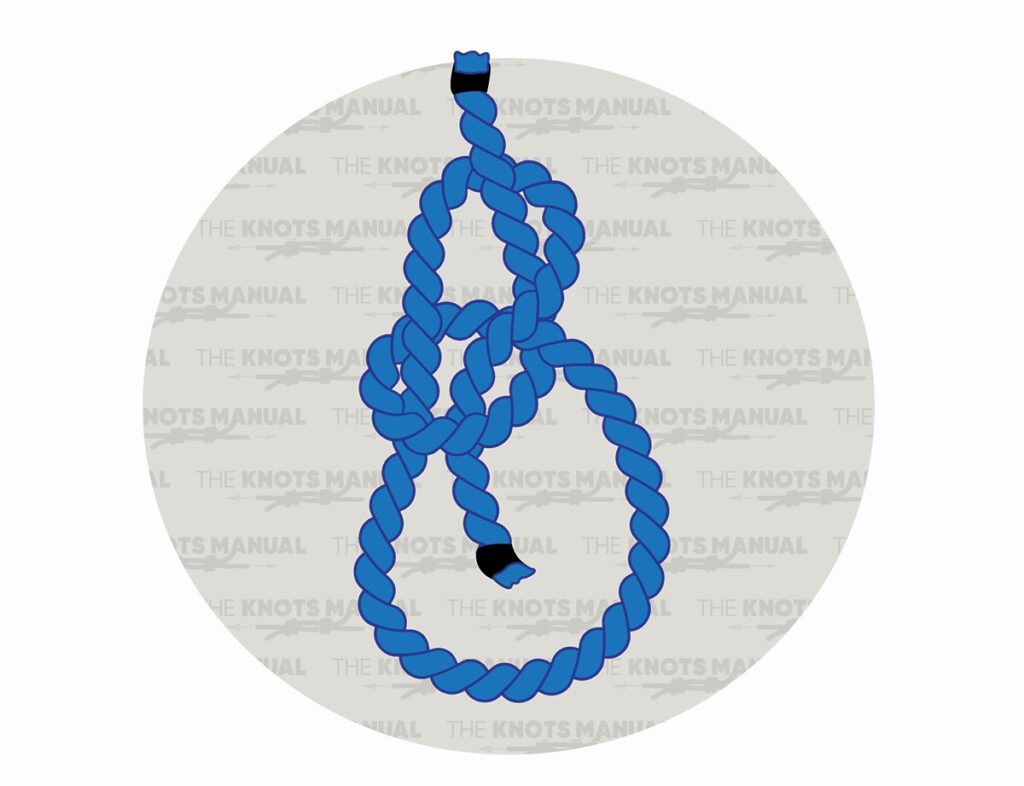
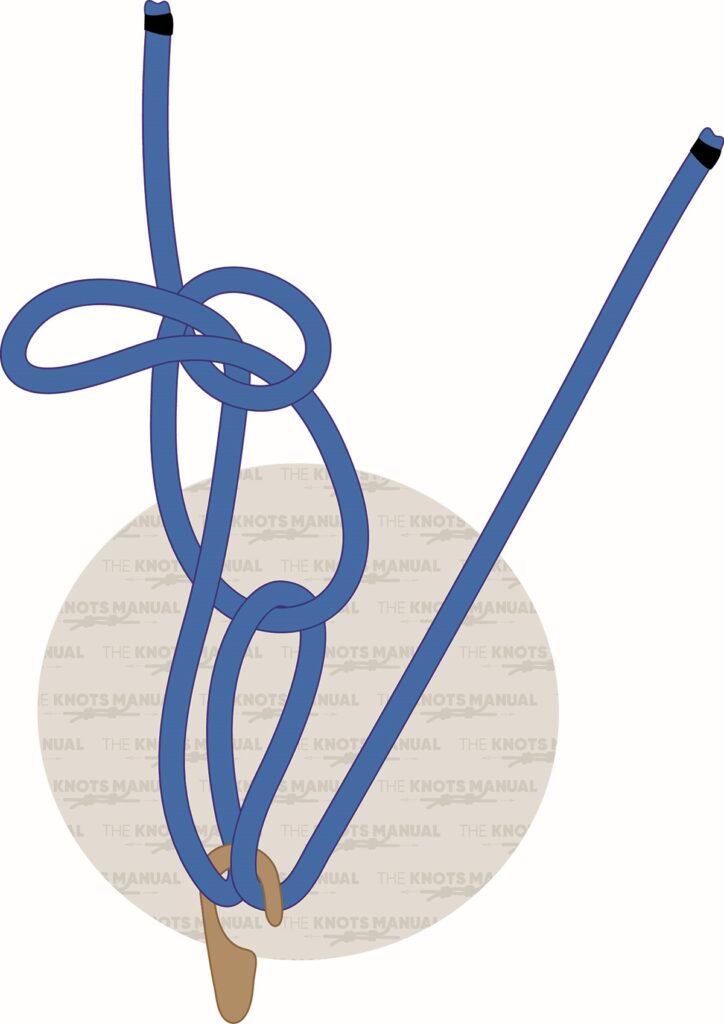
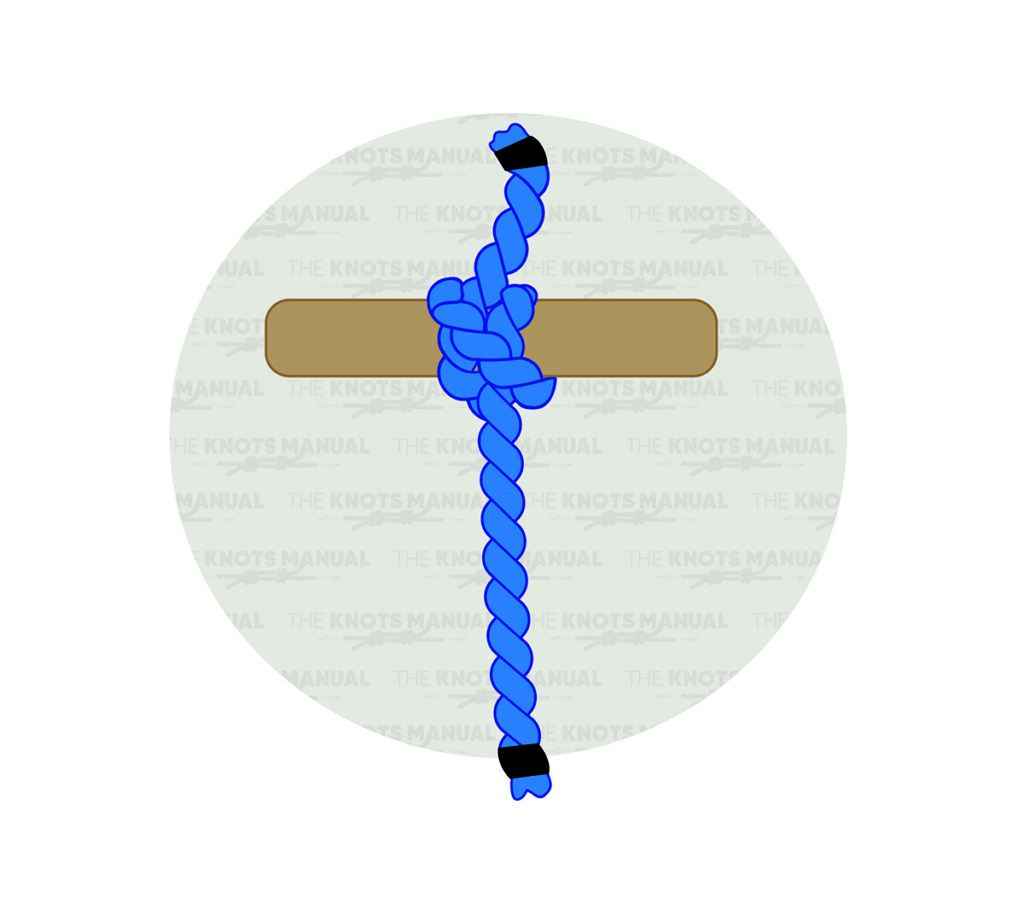
33. Portuguese Bowline
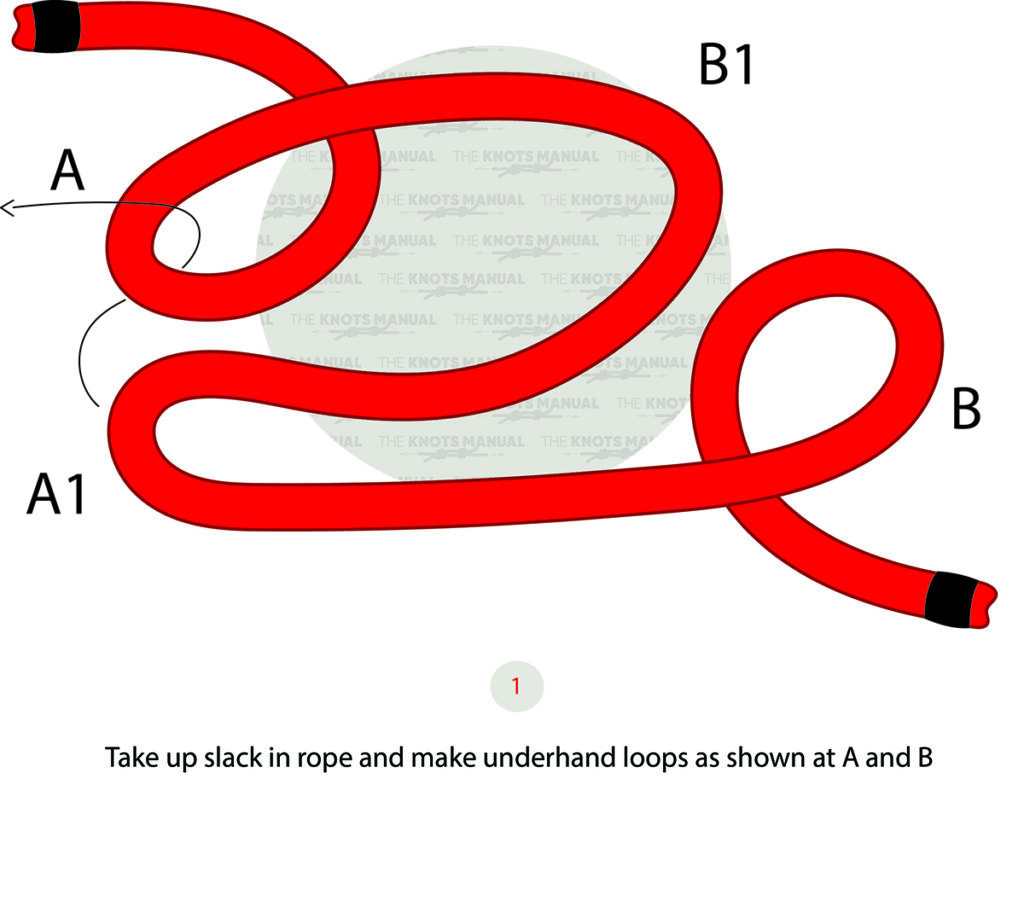
The Portuguese Bowline creates two adjustable loops for balanced weight distribution and securing a load more effectively. Frequently used in rescue operations and sailing, this knot provides a strong and reliable hold while remaining easy to untie. Its double-loop design allows for added stability when securing loads or creating harnesses. Even under tension, this knot maintains its shape, making it a valuable tool in demanding situations.
A Portuguese Bowline knot is tied by forming a loop in the rope and crossing the working end over the standing end to create a small overhand loop. Next, pinch to hold the lines together and make a large loop. Cross the working end over the small loop and pinch to hold it in place. Then, moving in the same direction, bring the working end around to make a second loop. Feed it through the small loop from behind, and then pass it around the backside of the standing line and then back down into the small loop. Tighten the knot by pulling the standing line and working end at the same time, making sure the loops remain evenly sized and secure.