Boating knots play a crucial role in securing lines, fastening gear, and ensuring safety on the water. Whether you’re docking, anchoring, or handling sails, having the right knot for the job can make all the difference. Some knots are designed for quick release, while others provide a secure hold under tension. Understanding these knots will improve your boating skills and help you handle any situation at sea.
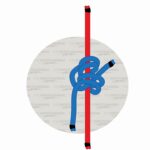
1. Bowline Knot
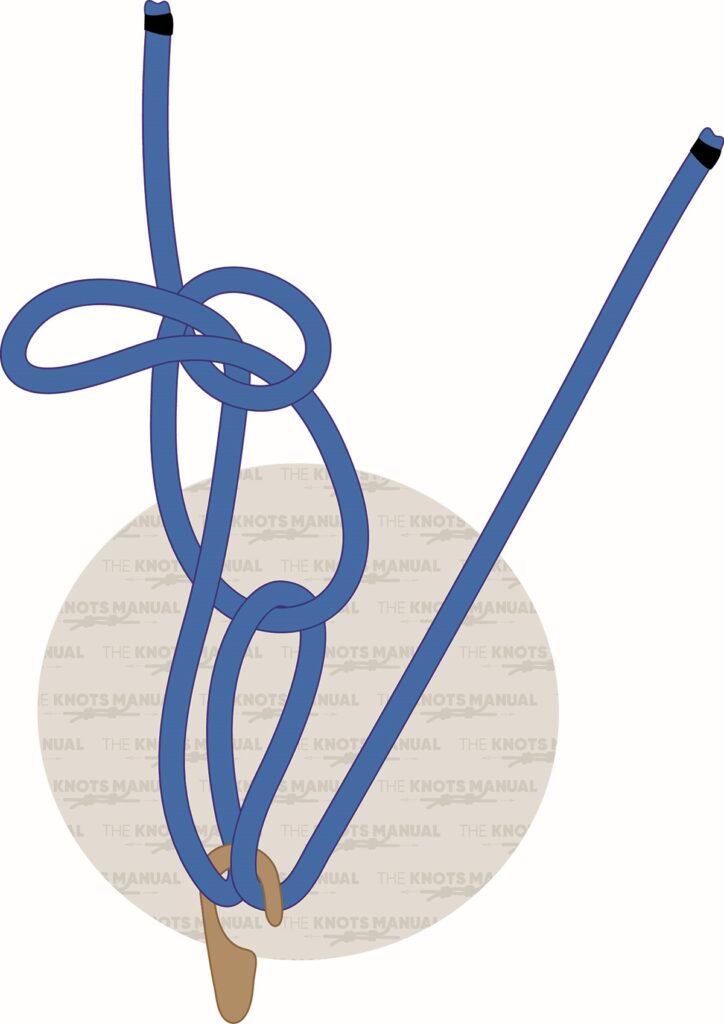
The Bowline Knot creates a strong, secure loop that won’t slip under tension. This makes it one of the most trusted knots for boating. It is commonly used when securing a line to a post, another rope, or even around objects that need to be hoisted. The knot is easy to untie even after being subjected to heavy loads, making it highly versatile in various marine applications. Sailors often use it for tying lines to sails or rescue operations.
To tie a Bowline knot, start by forming a small loop, being sure to leave enough rope for the desired loop size. Next, pass the end of the rope through the loop, and then bring it around the standing end, and then back down through the small loop in the other direction. Pull the working end opposite the fixed loop to tighten the knot.
2. Clove Hitch
A Clove Hitch is a practical choice when temporarily securing a rope to a post or rail. It’s quick to tie and untie, making it ideal for docking a boat, but it can slip under a heavy load, so it’s best for non-critical uses. Many boaters reinforce it with additional knots when needed for added security.
Tying a Clove Hitch knot begins by hanging a rope from a support object and looping the rope around the support with the end. Pass the end of the rope under itself and pull tight to secure the knot.
3. Cleat Hitch

The Cleat Hitch provides a simple yet effective way to secure a rope to a cleat. By wrapping the line around the cleat in a figure-eight pattern and finishing with a locking loop, the knot holds firm. This is a go-to knot for docking and securing boats at anchor. Its ease of tying and untangling makes it a favorite among sailors.
In order to tie a Cleat Hitch knot, wrap a rope around the boat’s far horn. Next, wrap the rope’s working end around the near horn and pass it around the back and then around the front of the horn. Create a loop in the working end of the rope, and slide the loop over the near horn. Tighten the knot by pulling on the working end.
4. Figure Eight Knot
A Figure Eight Knot prevents the end of a rope from slipping through pulleys or blocks. It’s commonly used as a stopper knot to avoid accidental line slippage. Simple yet effective, it is easy to untie even after being loaded. Many sailors use it in rigging and sail control applications.
When tying a Figure Eight knot, make a loose “8” shape with the rope and wrap the end around the support. Follow the figure eight back in the other direction, threading the end through both loops. Continue following the figure eight and bring the end behind the bigger loop. Next, keep following the rope, wrapping it around the support loop and going through the bigger loop again. Finally, pass the end through the smaller loop, along with the rest of the rope, and pull each rope separately from both ends to tighten the knot.
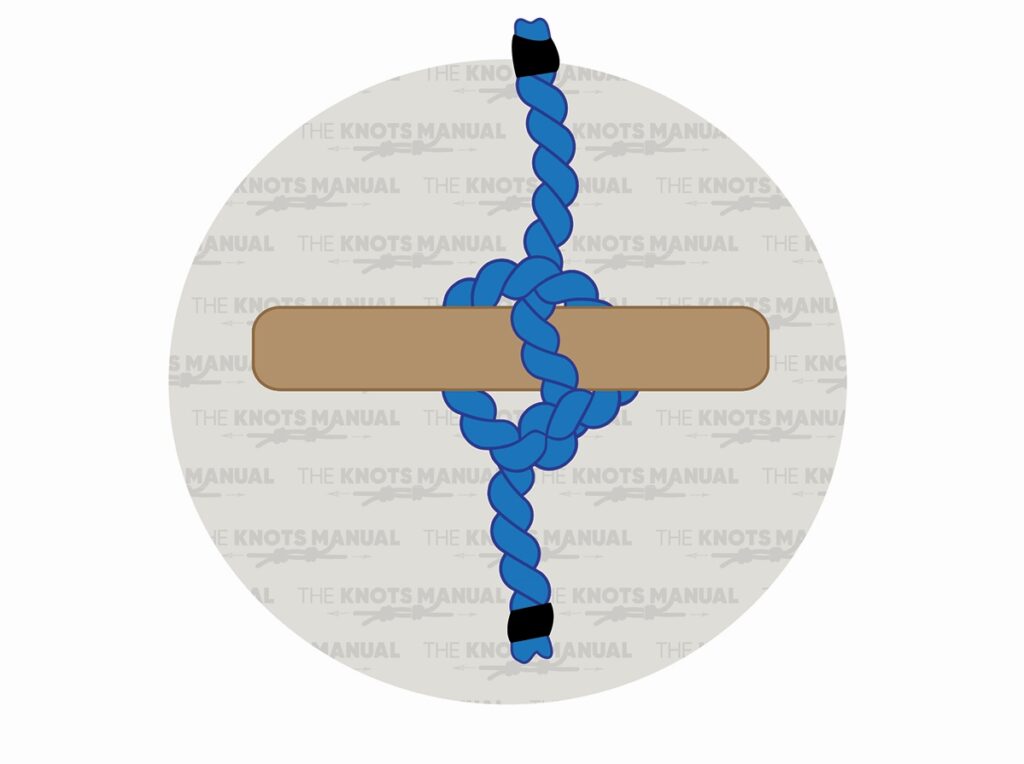
5. Rolling Hitch
The Rolling Hitch is perfect for attaching a rope to another rope or pole under tension. It grips tightly and prevents slippage, making it useful for adjusting lines or distributing loads. Sailors often rely on this knot when securing secondary lines or handling winches. It holds firm yet remains easy to untie when needed.
To tie a Rolling Hitch knot, loop the working end of the rope around a post, bringing it down from behind the post. Bring the working end back up and wrap it around the post. Then, pass the working end under the post and underneath the first wrap, pulling it upwards from between the two wraps. To tighten and secure the knot, pull the working end and standing end simultaneously.
6. Anchor Hitch
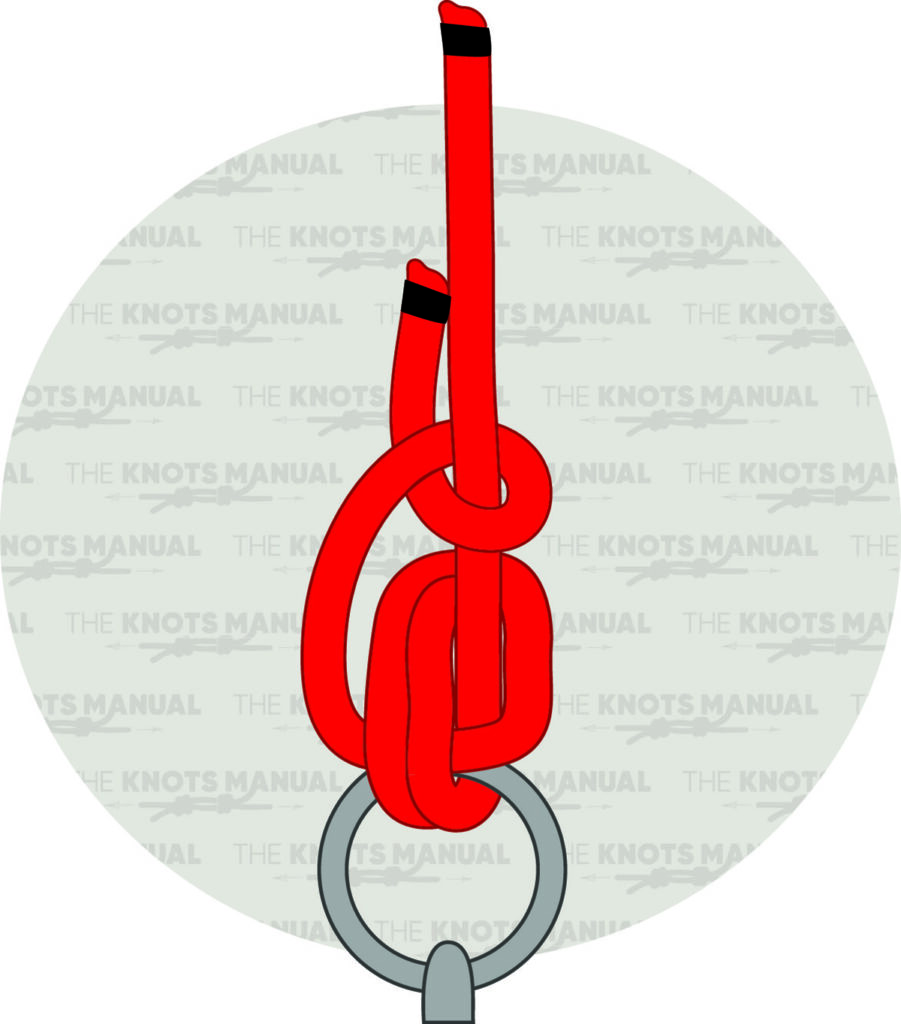
An Anchor Hitch is the go-to knot for securing a rope to an anchor or ring. This knot holds exceptionally well under strain, making it ideal for anchoring a boat in strong currents. Even under heavy load, it remains firm and reliable, reducing the risk of slipping. Many boaters also use it when tying to mooring buoys for long-term security.
Tying an Anchor Hitch knot starts by wrapping the working end of a rope around the shackle or swivel two times. Next, pass the working end through the loops created and pull to tighten. Then, wrap the working end around the rope’s standing part. Holding the shackle with one hand and pulling up on the working end with the other will complete the knot.
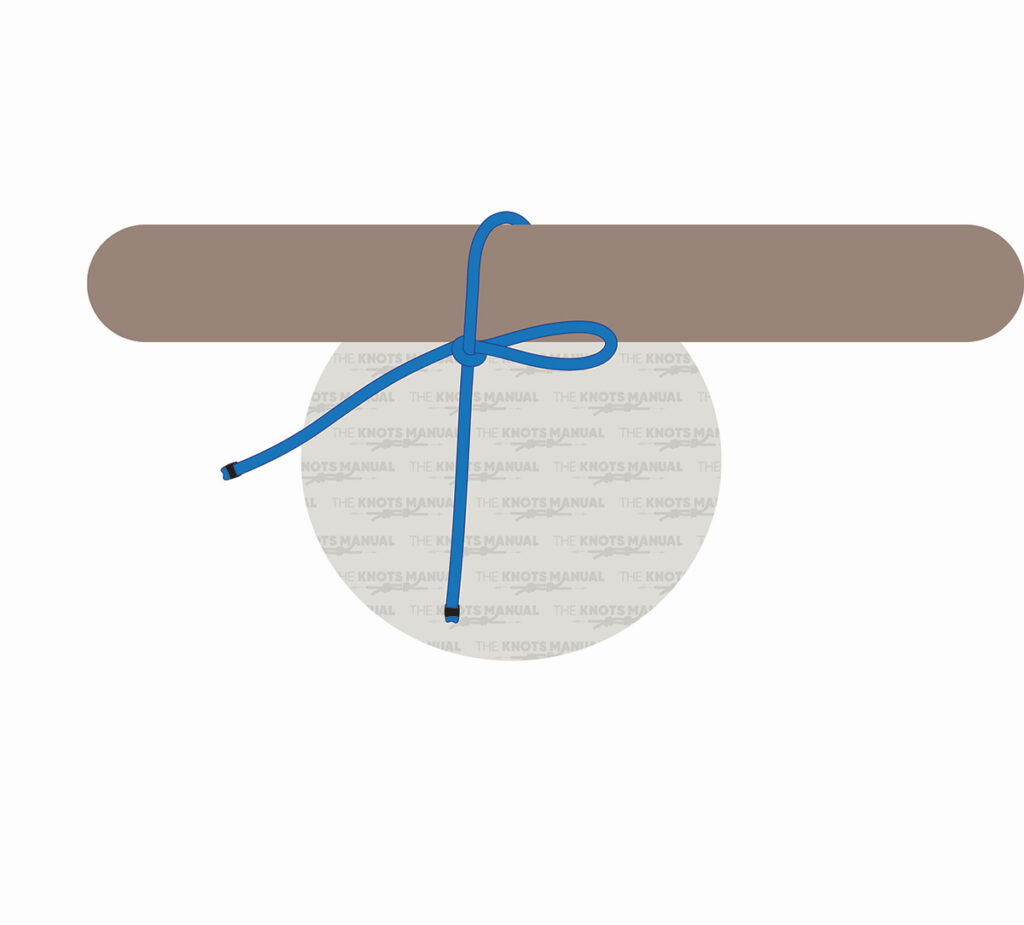
7. Round Turn and Two Half Hitches
Using a Round Turn and Two Half Hitches is a simple yet strong way to secure a line to a post or dock. The full turn around the post helps distribute tension, preventing the rope from slipping. It is commonly employed when docking or tying off lines that experience consistent strain. This knot is easy to untie, even after bearing significant weight.
In order to tie a Round Turn and Two Half Hitches knot, place a rope over the support and feed it around. Bring the rope around the support again to complete the loop. Then, wrap the end of the rope around the main rope. Form the first half hitch by tucking the end of the rope through, and then wrap the end of the rope around the main rope again in the same direction. Tuck the end of the rope through to create the second half hitch, and pull the main end of the rope to tighten the knot.
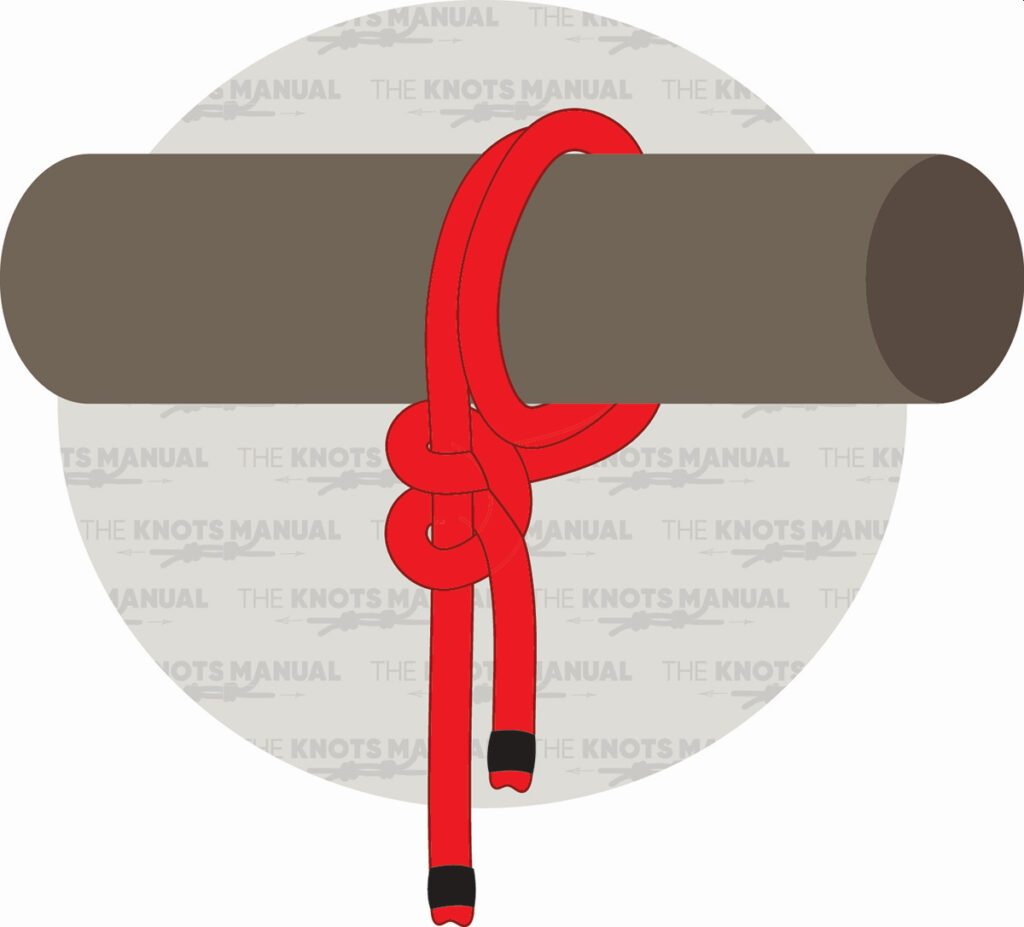
8. Taut-Line Hitch
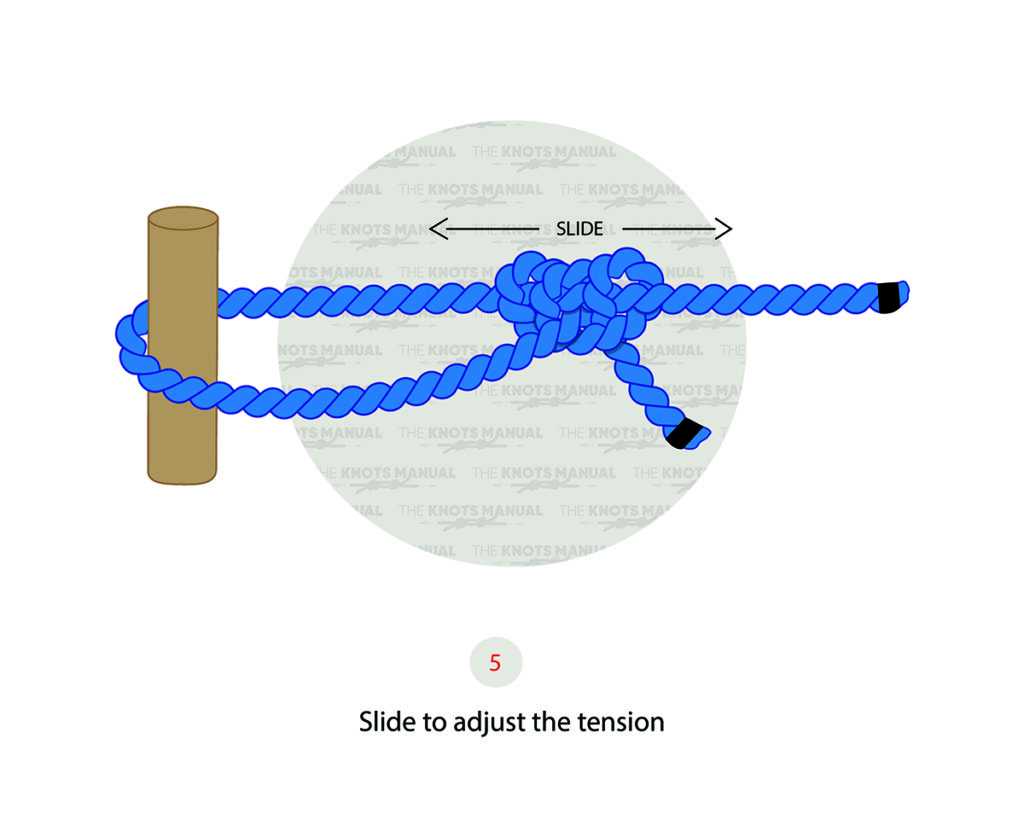
An adjustable Taut-Line Hitch allows for maintaining tension on a rope. This makes it useful for securing tent lines, tying down sails, or adjusting dock lines. It grips firmly under pressure but can be easily adjusted when needed. The sliding loop feature makes it a versatile choice for boating applications.
When tying a Taut-Line Hitch knot, wrap the working end around the support and then around the rope’s standing part. Next, take the working end and wrap it around the standing end again, starting inside the loop. Then, pull the end of the rope upwards so that it’s outside the loop. Wrap the working end around the standing end again, outside the original loop. Tighten and complete the knot by holding the standing part on either side of the support with one hand and pulling both ends of the rope with the other hand. Slide the knot across the rope to adjust the tension.
9. Carrick Bend
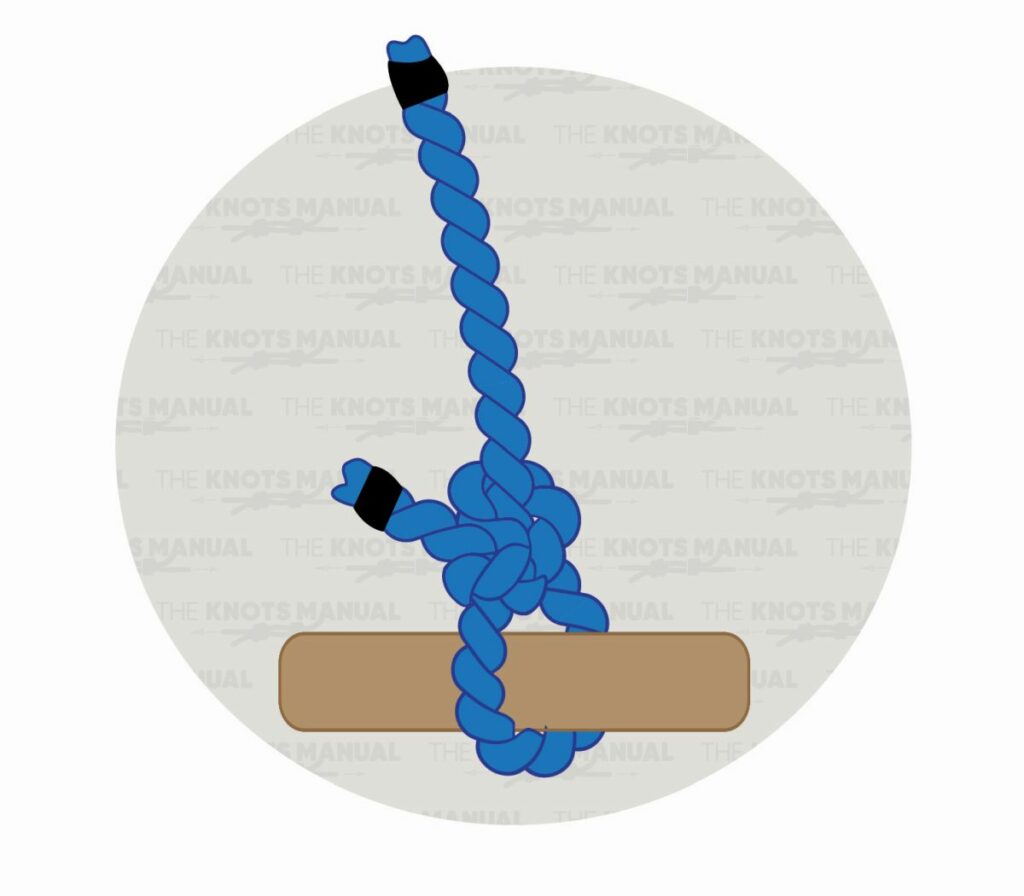
The Carrick Bend is a strong and secure knot used for joining two heavy ropes, especially in maritime applications. This knot maintains its strength under load while remaining relatively easy to untie after tension is released. It’s commonly used in boating for connecting mooring lines, tow ropes, or large hawsers. Because of its symmetrical structure, the Carrick Bend distributes tension evenly, reducing the risk of slippage.
To tie a Carrick Bend knot, create a bight near the end of a rope and cross the standing end of the rope over it. Cross it over again and place the rope so that the standing end is ready to enter the knot from the left side. Next, pass the working end over, under, over, and then under the knot to create the main structure. Continue tying the knot, with the standing end entering the knot right next to the working end on the outer edge. Keep following the path until all sections of the knot consist of two parallel ropes. Complete the knot by tucking the standing end next to the working end, and secure it by tying the working end and standing end together.
10. Midshipman’s Hitch
The Midshipman’s Hitch is useful for adjusting the tension on a line while maintaining a sliding loop. It provides grip without slipping, making it a practical knot for securing sails or adjusting rigging. Its ability to maintain tension while allowing for adjustments makes it valuable for controlling various boat lines. This knot is also commonly used in climbing and rescue applications.
Tying a Midshipman’s Hitch knot starts by wrapping the working end of a rope around the object. Pass it through the loop and around the standing line, forming the first half hitch. Next, bring the working end around again, working back away from the object and toward the standing line. Then pull tight to form an Awning Hitch that can take the load while the next step is tied. Make a half hitch in the same direction and outside of the loop around the standing line, and pull both ends to tighten the knot so that it can slide on the standing line and hold tight when holding a load.
11. Trucker’s Hitch
The Trucker’s Hitch offers mechanical advantage when tightening lines, making it ideal for securing heavy loads on boats. By creating a loop in the middle of the rope and using it as a pulley system, this knot increases tension efficiently. Many boaters use it for securing cargo, tying down sails, or making other load adjustments. Its ability to hold tension makes it an excellent knot for securing heavy loads and is crucial for stability at sea.
In order to tie a Trucker’s Hitch knot, form a bight in the standing end of the rope. Pass the bight behind the standing end and cross the working end over the bottom loop. Next, bring the bight in front of the standing end and do another half-turn with the bight, and then pass it through the bottom loop, from the back side. Thread the working end through the hook or carabiner and bring it back through the bottom loop. Tighten the newly-formed loop slightly, and pass the working end behind the bottom loop, completing the two half hitches below the loop. After one turn, pass the working end under itself, forming a half hitch in the process, and then go behind the bottom loop once again to create a second half hitch and complete the knot.
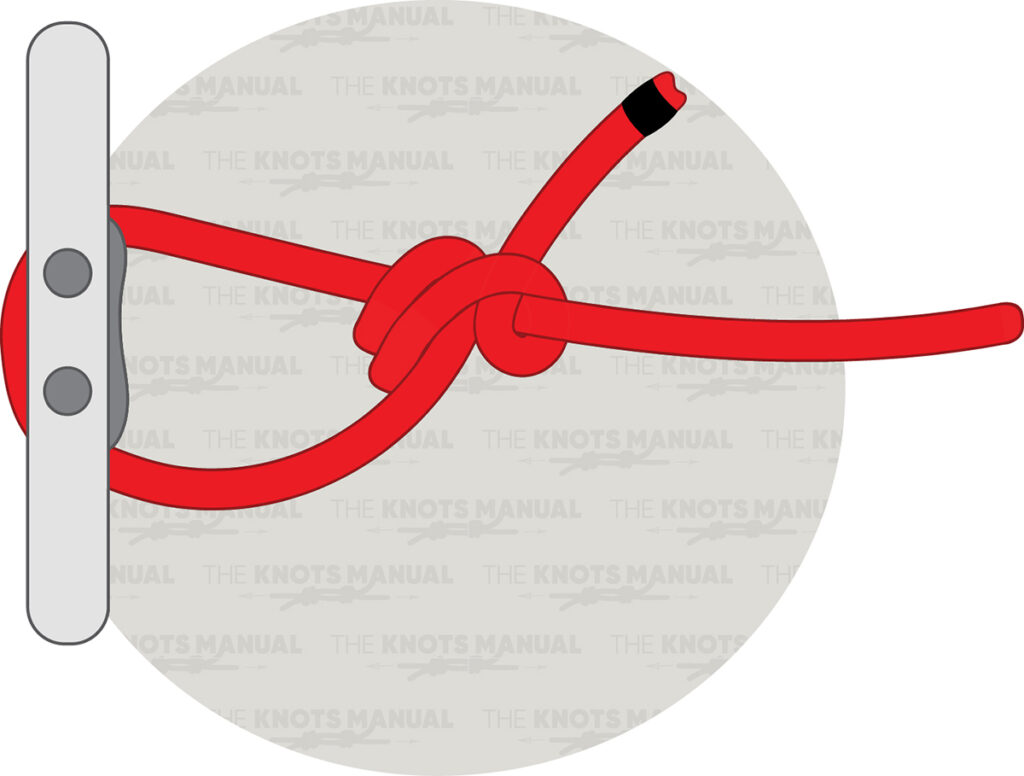
12. Halyard Hitch

Securing a rope to a shackle or sail is best done with a Halyard Hitch. This knot prevents slippage and is commonly used in sailboats to attach halyards to sails. The knot holds firm even under strong winds and shifting conditions. It is a reliable choice for securing vital rigging components.
When tying a Halyard Hitch knot, pass the working end of a rope through a shackle and wrap it around the standing end of the line. Make a second turn around the standing end and pass the working end back up to the top of the knot and feed it through both loops, with the working end coming out next to the standing end. Pull the working end to tighten the knot and the standing end to push the knot against the shackle.
13. Icicle Hitch
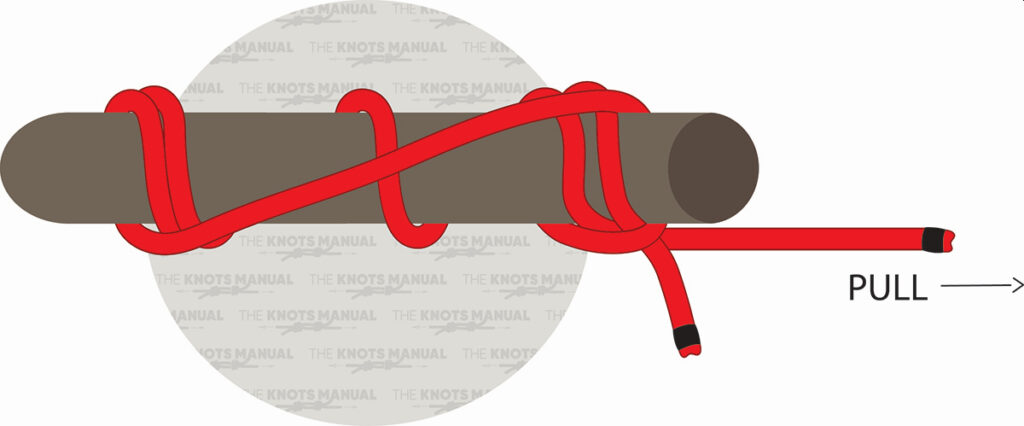
Even on smooth surfaces, the Icicle Hitch provides an exceptionally tight grip. This makes it particularly useful when securing lines to poles or smooth anchor points. Boaters prefer it for securing fenders or making temporary attachments that need to hold under load. The knot remains stable even under heavy tension, preventing slippage.
To tie an Icicle Hitch knot, wrap the working end of a rope around the post four times, ensuring that you’re wrapping away from the end. Next, take the working line and pass it behind the wraps and standing line. Then bring it back over the post to create a hanging loop under the wrapped section. Take the hanging loop by the longest part and pull it past the standing line on the front side and over the end of the pole. Tighten the knot by pulling down on both wraps. The wraps will spread when pressure is applied to the load.
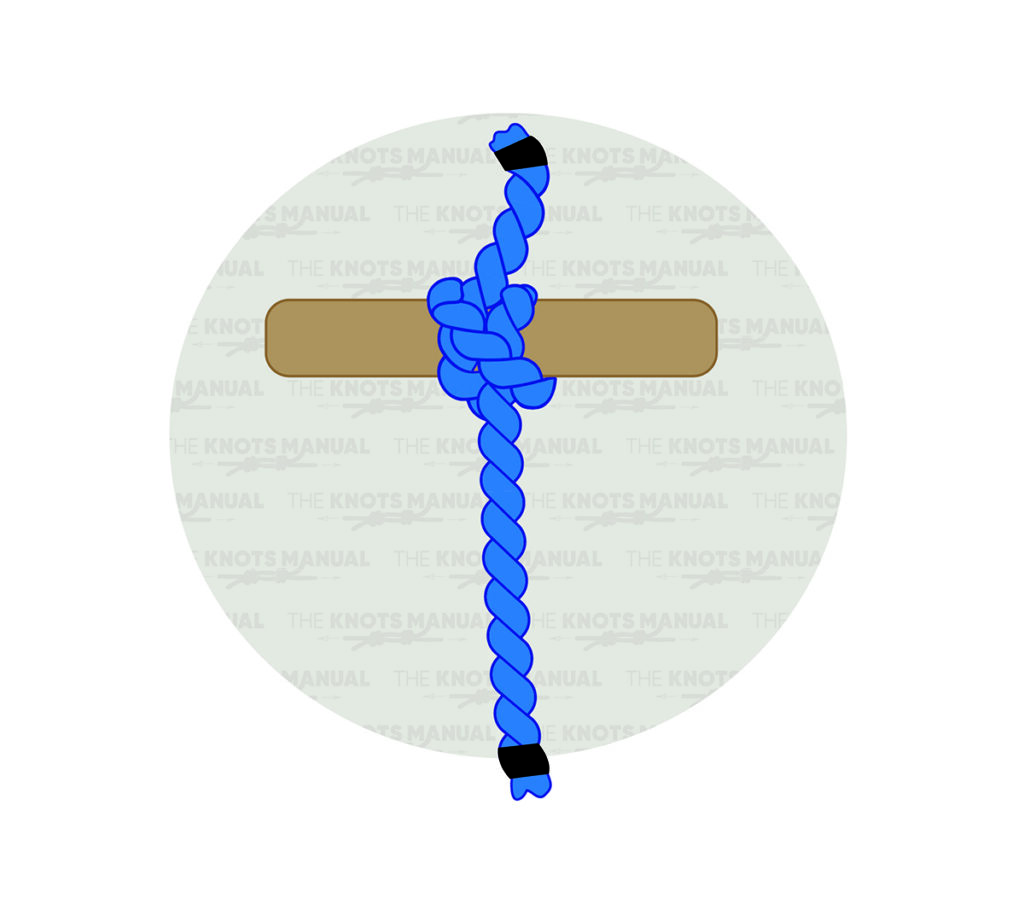
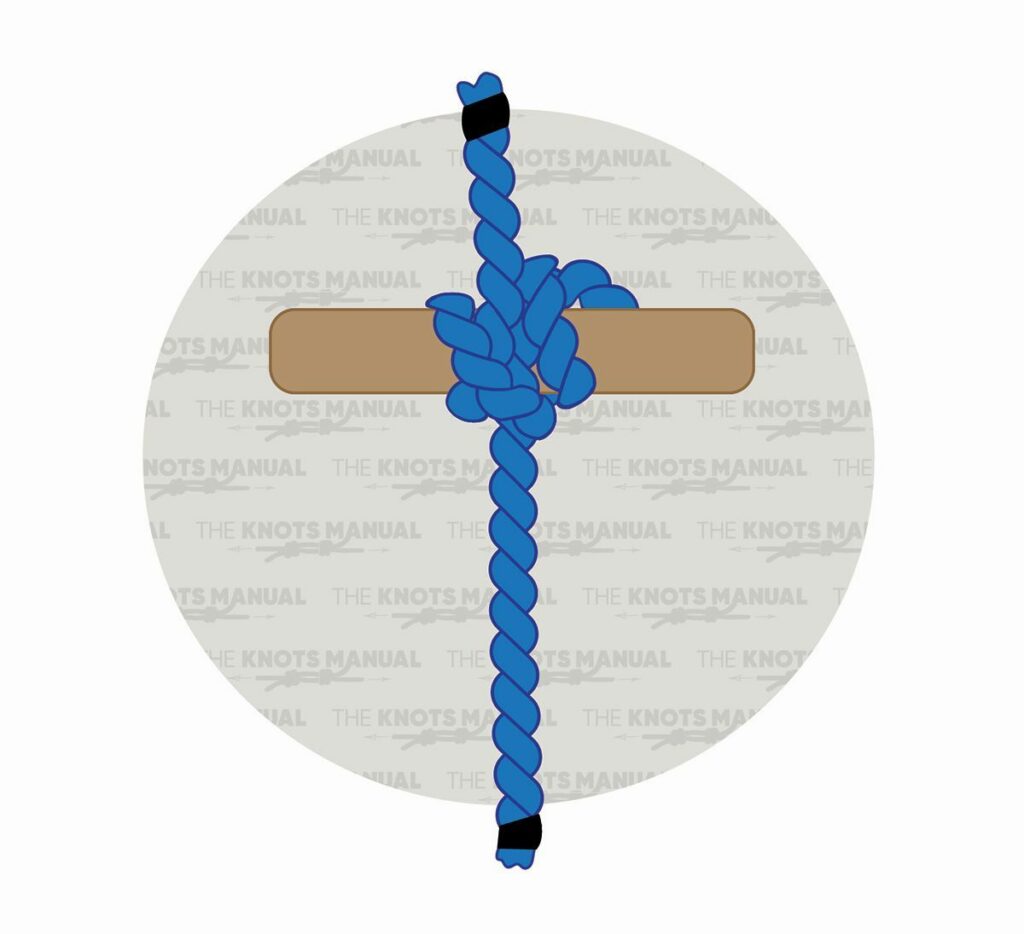
14. Buntline Hitch
A Buntline Hitch is a compact and secure knot that attaches a rope to a fixed object, such as a post or ring. This knot is commonly used in sailing for securing halyards, stays, and other rigging. The simplicity of its design makes it easy to tie quickly, yet it remains strong under tension. Its reliability ensures that it stays in place without loosening over time.
Tying a Buntline Hitch begins by passing the working end of a rope under the support and bringing it around and over the standing end to create a figure eight. Then take the working end and push it through the loop formed. Pull the standing end to tighten and complete the knot.
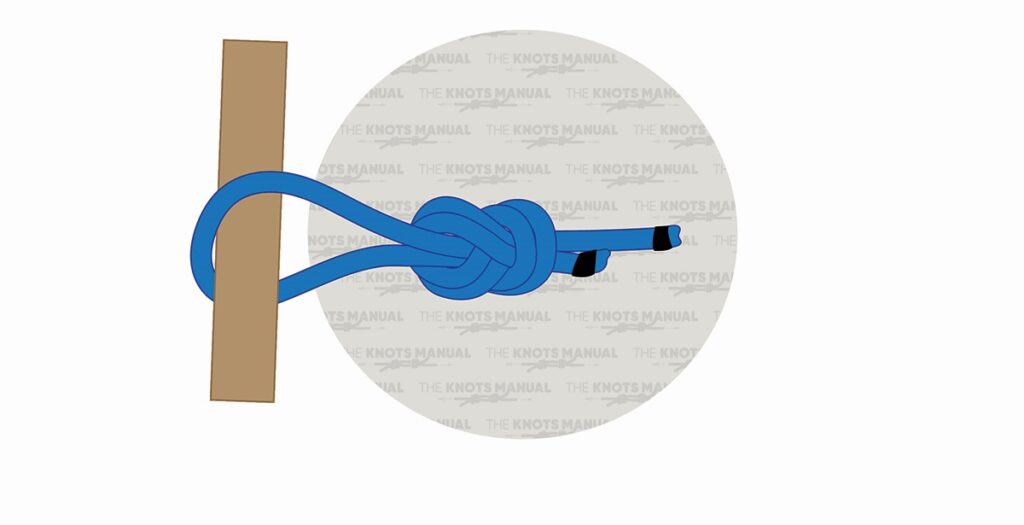
15. Girth Hitch
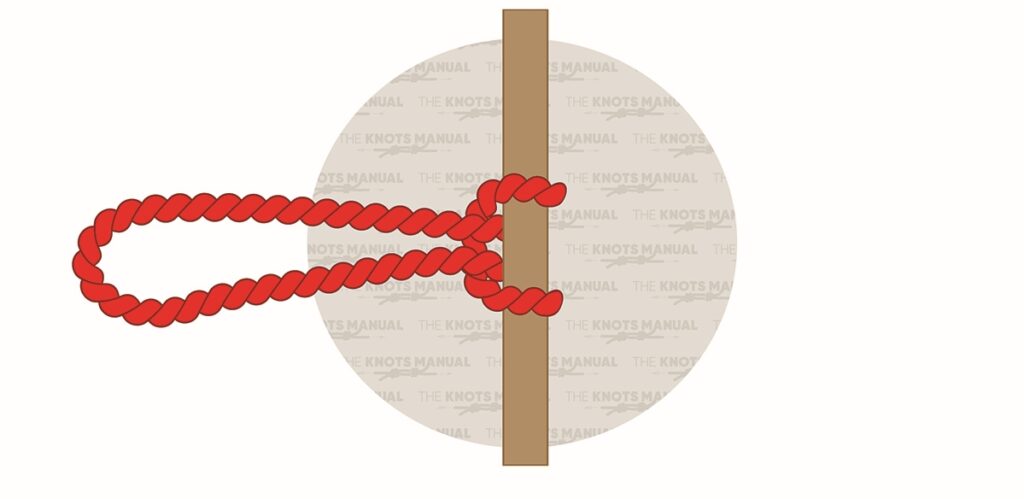
The Girth Hitch is often used for securing gear or lines to a fixed point. Its ability to distribute load evenly makes it ideal for attaching fenders or gear to railings. This knot is simple to tie and untie, making it a practical option for temporary attachments. Sailors appreciate its versatility when securing various objects on board.
In order to tie a Girth Hitch knot, start by wrapping the pre-tied sling around the support. Pass the bigger loop through the smaller one and take the right loop to the left side. Then pull the bigger loop so that the smaller loop tightens against the support to finish the knot.
16. Heaving Line Knot

Throwing a rope over a distance is easier with a Heaving Line Knot. The added weight at the end of the rope ensures it travels farther and lands accurately. Boaters use this knot when passing lines to docks or other boats. Its weighted end prevents the line from tangling in midair.
When tying a Heaving Line knot, make two bights next to each other in an S-shape near the end of a rope, at the desired knot size of the finished knot, and be sure to leave plenty of rope in the working end to make the wraps needed. Next, pass the working end through the loop of the top bight and wrap it around both strands of that bight only. Continue making wraps, but now encircling all three strands, working down the rope until you reach the end. Finally, pass the working end through the bottom loop. Pull the top loop until it secures the working end, and then pull the standing end to tighten the knot completely.
17. Marlinspike Hitch
When tightening a rope with a marlinspike or similar tool, the Marlinspike Hitch is invaluable. It provides extra leverage, allowing sailors to apply more force when pulling on a line. This knot is particularly useful for splicing or tightening rigging. Once the spike is removed, the knot is released easily.
To tie a Marlinspike Hitch, create a loop with the working end displaced to the right. Pull the loop to the right across the vertical line created by the rope. Bring the middle line to the left and over the loop. Pass a cylindrical support through the loop formed and pull on the working and standing ends of the rope to tighten the knot.
18. Slippery Half Hitch
A Slippery Half Hitch is a quick-release knot that remains secure under tension yet can be undone effortlessly. Boaters use it when they need a strong hold but also require fast untying capabilities. It is often employed in mooring or securing lines temporarily. This knot is practical for situations requiring quick adjustments.
Tying a Slippery Half Hitch knot begins by wrapping the rope or line around the object you’re tying to, leaving a short tail end. Form a loop with the tail end by the crossing lines and pass a bight through the created loop. Pull the standing end of the line to secure the knot, and a tug of the tail end will quickly release the knot.
19. Ashley Stopper
The Ashley Stopper Knot is an excellent choice for preventing a rope from slipping. It forms a bulky end that provides a firm grip, making it particularly useful for securing lines on a boat. This knot is also effective for keeping ropes from fraying when no whipping or seizing is available. Boaters frequently use it as a reliable stopper when dealing with halyards, sheets, or other essential rigging.
In order to tie an Ashley Stopper knot, make a long, wide bight close to the end of the rope. Fold the bight down to form two loops. The loop closer to the working end of the rope should be smaller compared to the loop next to the standing end. Pass the larger loop through the smaller one, and then pass the working end of the rope through the loop formed. Tightening the knot must be done in three steps. First, tighten the half knot on the left side. Then pull the standing end of the rope to tighten the larger loop around the working end until it’s snug. Complete the knot by pulling the working end. There should be three separate lobes observed from the underside of the knot.
20. Timber Hitch
When towing logs or securing a rope to a cylindrical object, the Timber Hitch is highly effective. This knot tightens under strain and releases easily once the load is removed. Boaters use it for securing cargo or fastening lines around poles. Its ability to grip firmly makes it a practical choice for maritime applications.
When tying a Timber Hitch knot, wrap the rope’s working end around the support and pass it around the standing part. Pull the working end toward the leftward from the loop formed, passing it under the standing part. Next, pass the working end under the standing part two more times. Then pull the working end and standing end simultaneously to tighten the knot.
21. Distel Hitch
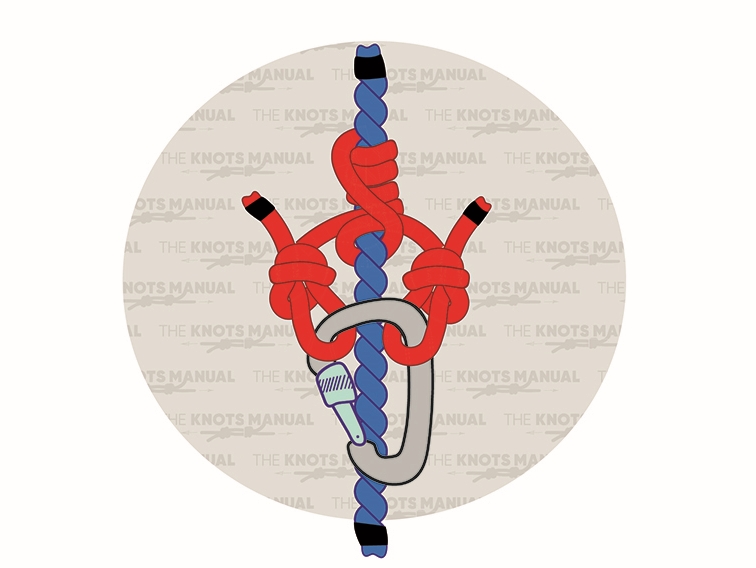
A Distel Hitch is a friction hitch commonly used for gripping another rope or pole. It’s highly effective in adjusting lines or securing a rope in high-stress situations. This knot is valued for its ability to hold firm under load while remaining adjustable. Boaters often use it for climbing or securing tensioned lines.
To tie a Distel Hitch knot, create a shorter eye-to-eye piece of rope that will go around the main rope. To tie each eye, make a bight in the end and then go around it twice with the working end. Pass the working end through both loops, and tighten by pulling the eye opposite the rope. Wrap the top eye 3-4 times around the static rope, and then go over the bottom eye and wrap it around another time. Next, go underneath the strand that was just formed and pass a carabiner through both eyes. Lock the carabiner to keep it from opening.
22. Alpine Butterfly Bend
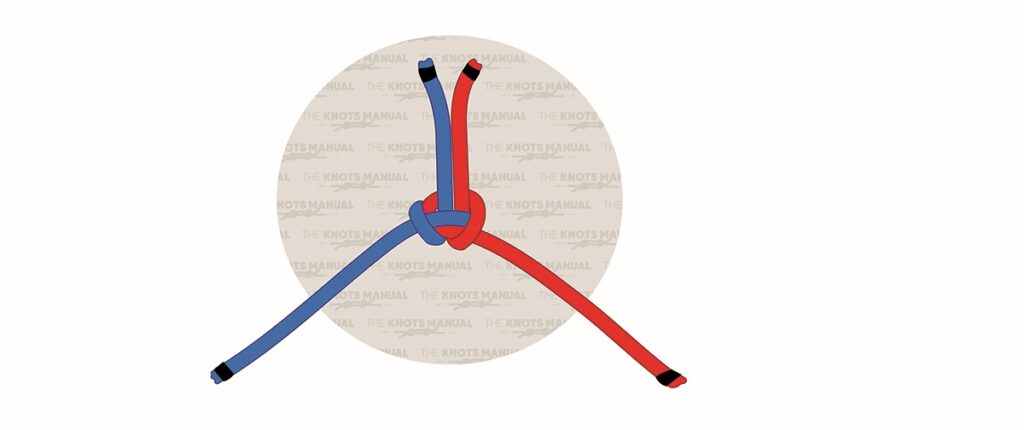
The Alpine Butterfly Bend is a strong and secure knot used for joining two ropes of similar size while maintaining flexibility and resistance to jamming. It is particularly useful in boating applications where tensioned lines need to remain adjustable yet secure. Additionally, this knot is easy to untie after being heavily loaded, making it a dependable option for various maritime tasks.
Tying an Alpine Butterfly Bend starts by placing the working ends of two ropes next to each other. Join them temporarily with tape or by holding them with your hand. Next, take the right rope and wrap it clockwise around your left palm in a full, single turn. Then wrap the left rope in the other direction one full turn around the palm. Fold the joined ends back and then up under the bottom strands. Remove your hand, and the resulting knot should look like a butterfly. Pull all the ends to tighten and complete the knot.