
Climbing knots are essential for ensuring safety, securing gear, and creating reliable anchors. Without the right knots, climbers risk unstable connections that could lead to dangerous situations.
Some knots are best for securing ropes to harnesses, while others help in rappelling or belaying. Whether you’re a beginner or an experienced climber, understanding these knots will improve your efficiency and safety on the rock.
1. Super Munter Hitch
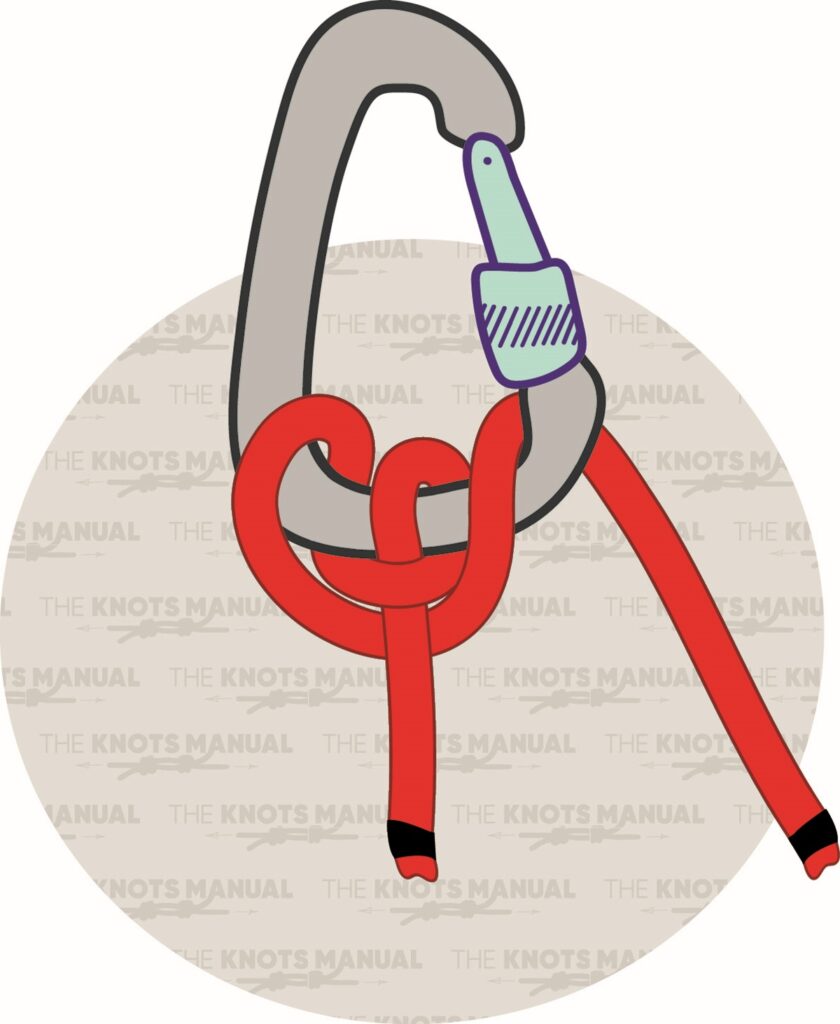
The Super Munter Hitch is a variation of the Munter Hitch that provides additional friction when belaying or lowering heavy loads. It’s particularly useful when extra control is needed on descents. Climbers rely on this knot when using a belay device isn’t an option. The added friction helps manage the rope smoothly in high-stress situations.
To tie a Super Munter Hitch knot, make a regular Munter Hitch by slipping a loop into a carabiner, and then form a second loop with the line crossing opposite the first loop and slip the second loop into the carabiner.
Next, take the standing end and pass it behind and around the working end. Take the loaded end and pass it through the carabiner and lock.
The working end should be attached to a climbing harness and the standing end will be used for lowering.
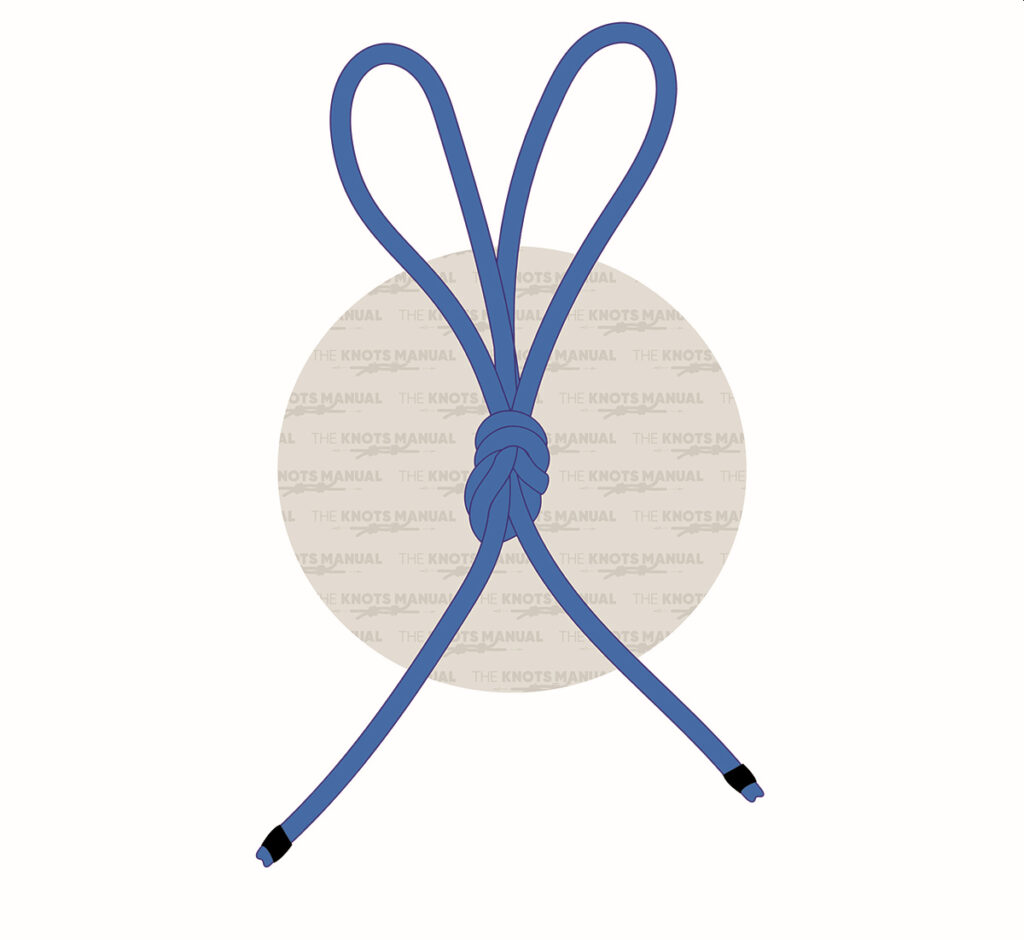
2. Alpine Butterfly Bend
The Alpine Butterfly Bend securely joins two ropes together, making it perfect for creating longer climbing lines. Unlike other bends, it resists twisting and is easy to untie even after bearing heavy loads. It’s especially useful when extending ropes or connecting two sections in rescue scenarios. Its symmetrical shape ensures strength in all directions.
When tying an Alpine Butterfly Bend, place the working ends of both ropes next to each other. Join them together with tape or hold them with your hand.
Wrap the first rope around your palm clockwise one full turn. Then, wrap the other rope around your palm in the same direction.
Next, take the working ends of both ropes in your hand and pass them over and then underneath the two bottom strands.
Remove your hand, and the result of the knot should look like a butterfly. Release the temporary join and tighten the knot by pulling the ends.
3. Double Alpine Butterfly Loop
A Double Alpine Butterfly Loop forms two secure loops in a rope, making it ideal for load distribution. This knot is often used in climbing anchors or when creating a central attachment point. It holds strong under tension and is easy to untie after being loaded. Climbers appreciate it for its versatility and reliability on multi-pitch routes.
In order to tie a Double Alpine Butterfly Loop, hold your left hand wide open and place the end of the rope in front. Then wrap the rope a full turn clockwise around your hand and continue wrapping it around and under the first full loop.
Do another full turn between the first loop and the standing end. Continue wrapping it downwards and do a third full turn.
Next, place the working end between your thumb and index finger and loosen the two loops. Insert both of them under the two turns and remove your hand to tighten and complete the knot.
4. Chain Sinnet Complete
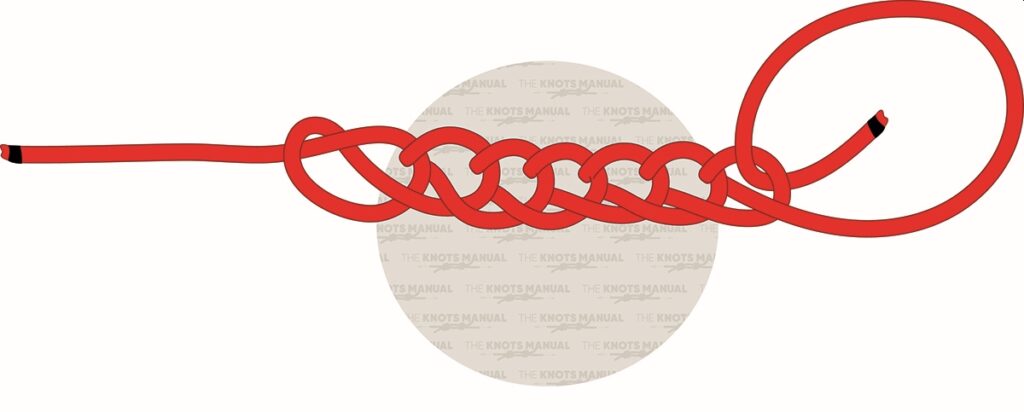
A Chain Sinnet knot is designed for creating friction and gripping a rope firmly. This knot is particularly useful when ascending a rope with prusik loops. It tightens under weight but remains adjustable when unloaded. Climbers use it when they need a secure grip without permanent binding.
Tying a Chain Sinnet knot starts by forming a loop in the middle of a rope. Then create a bight and pass it through the loop fully.
Place the loop in front of the working end of the rope, make another bend in the working end, and pass it through the last loop. Put the final loop in front of the working end, being sure to make it larger, and pass the working end through it to close the loop and finish the knot.
5. Blake’s Hitch
The Blake’s Hitch is commonly used for ascending ropes and is favored in self-belay systems. It slides smoothly when unloaded but grips tightly when weighted. This makes it a popular choice for tree climbing and situations requiring controlled movement. The simplicity of tying and adjusting it adds to its effectiveness.
To tie a Blake’s Hitch, wrap the rope four times around the standing line a little loosely. Then bring the working end back down and around itself. Next, tuck the working end under the last two wraps so that it comes out of the middle of the four wraps. Tighten the knot by pulling both ends to secure it in place.
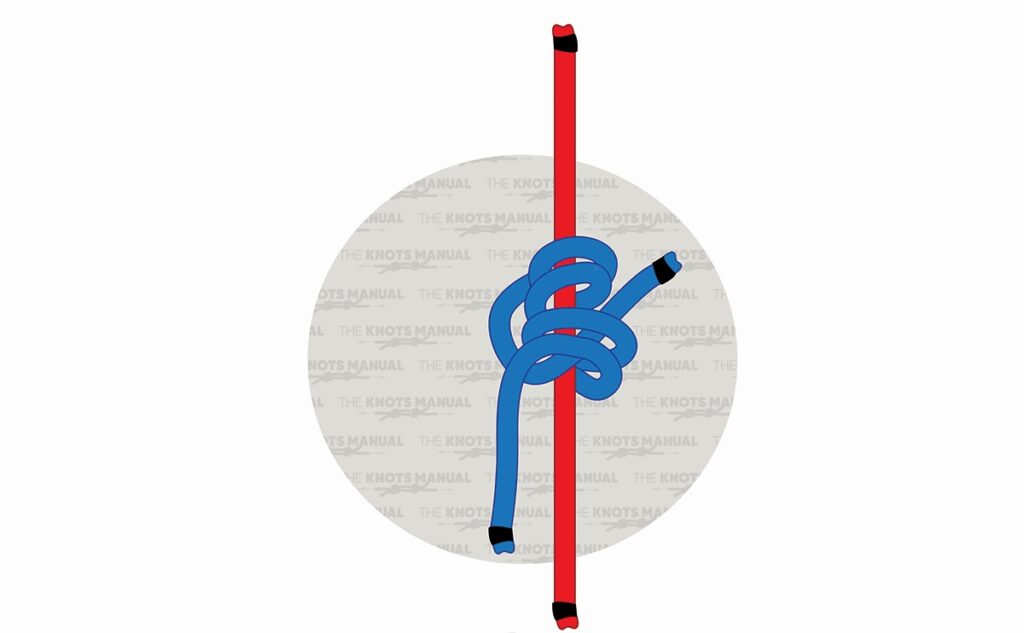
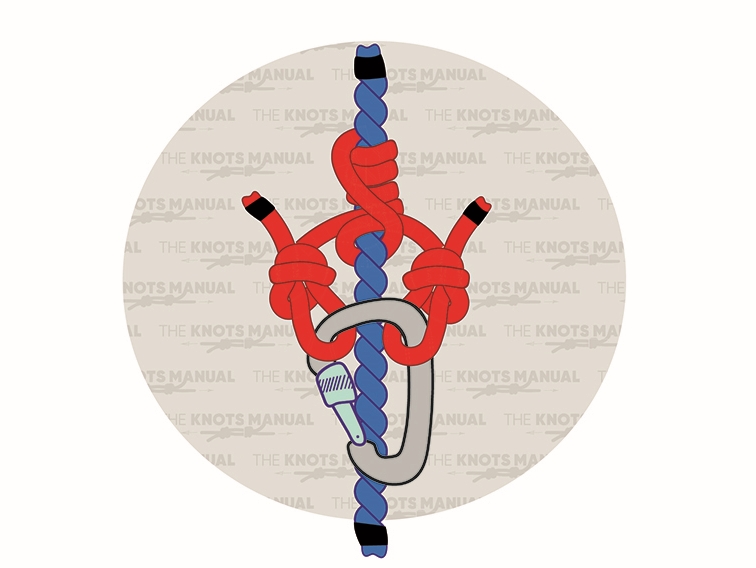
6. Distel Hitch
A Distel Hitch is a friction hitch that provides a secure grip on another rope. It’s a favorite among arborists and climbers who need a reliable ascending knot. This knot is more stable than some other hitches and doesn’t slip under heavy loads. Its ability to grip tightly while still allowing adjustments makes it highly practical.
When tying a Distel Hitch knot, create a shorter eye-to-eye piece of rope that will go around the main rope. To tie each eye, make a bight in the end and then go around it twice with the working end.
Pass the working end through both loops, and tighten by pulling the eye opposite the rope. Wrap the top eye 3-4 times around the static rope, and then go over the bottom eye and wrap it around another time.
Next, go underneath the strand that was just formed and pass a carabiner through both eyes. Lock the carabiner to keep it from opening.
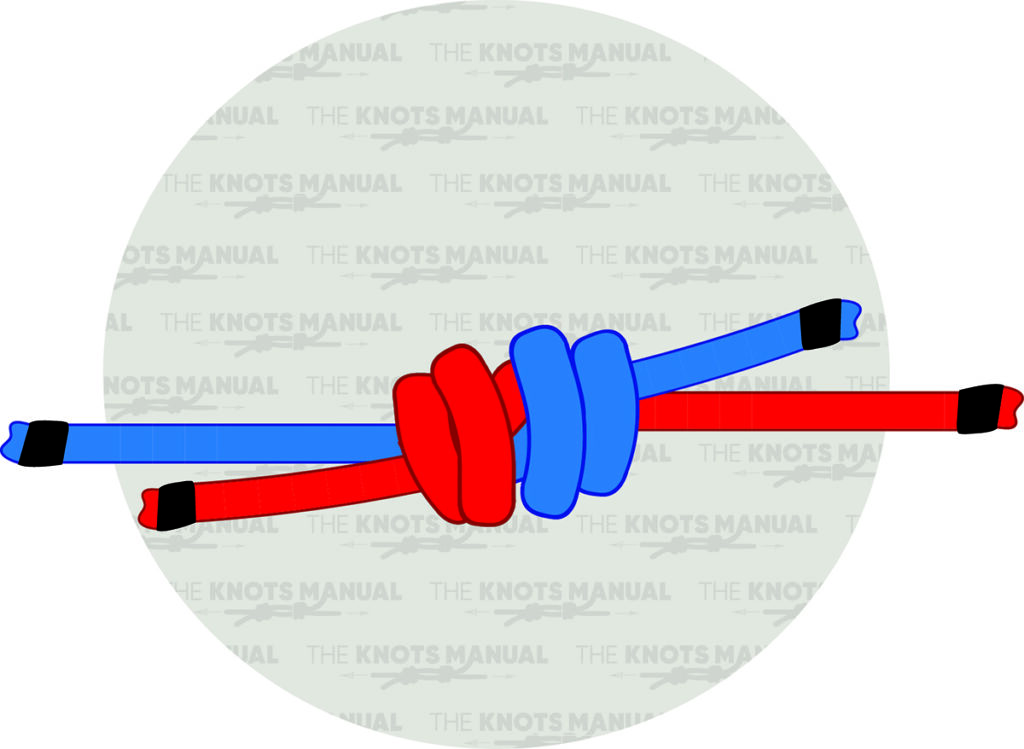
7. Double Fisherman’s
The Double Fisherman’s Knot creates a strong, adjustable loop that tightens under tension. It’s often used for making personal anchor systems or tying slings. This knot is particularly useful when a secure but flexible connection is needed. Climbers rely on it when they need an adjustable yet strong tie-in point.
In order to tie a Double Fisherman’s Knot, begin by placing the working ends of both ropes or lines next to each other. Wrap the first rope around the second one two times, starting from the furthest end and going closer.
Then, bring the working end through these two loops and tighten the knot. Create an identical knot in the other direction with the other line. Pull the standing ends of both ropes to tighten the knot.
8. Prusik Knot
A Prusik Knot is an essential climbing hitch that grips the rope when weighted but slides when unweighted. It’s frequently used for ascending ropes or self-rescue situations. The knot’s gripping power makes it ideal for backup systems. Climbers trust it for safe rope maneuvers in emergency scenarios.
Tying a Prusik Knot begins by wrapping a smaller rope around a larger rope three times, making sure the loops lay neatly side by side. Then, thread the working end back through the loops and pull tight to secure the knot. When weighted, it grips the main rope, but it can slide when released.
9. Water Knot
The Water Knot is perfect for tying two pieces of webbing together, making it useful for anchors and slings. It lies flat and holds well under load, reducing bulk in climbing setups. While secure, it requires frequent inspection to prevent loosening. This knot is widely used for constructing climbing anchors and rappelling setups.
To tie a Water Knot, start by tying a simple Overhand Knot by making a loop with the first rope, and passing the end through the loop. Then, with the other rope, retrace the steps but in the other direction by passing it through the knot of the first rope, with both ends exiting in opposite directions.
10. Klemheist Knot
The Klemheist Knot is another friction hitch that grips the rope firmly under weight. It works well with slings or loops and is often used as an alternative to the Prusik Knot. Its simplicity makes it a quick and efficient choice for emergency ascents. This knot allows easy adjustment when unloaded, making it useful for self-rescue.
When tying a Klemheist Knot, place a fixed loop right next to a pole or another larger rope. Wrap the loop around the main rope/pole, starting from the bottom upwards.
Repeat the wrapping two to three more turns and pass the bottom part of the fixed loop (with the knot) through the upper loop.
Complete the knot by taking the bottom loop back down and pulling hard. To keep the knot from sliding down, only attach the load from the bottom direction, and it can be adjusted once the load has been taken off.
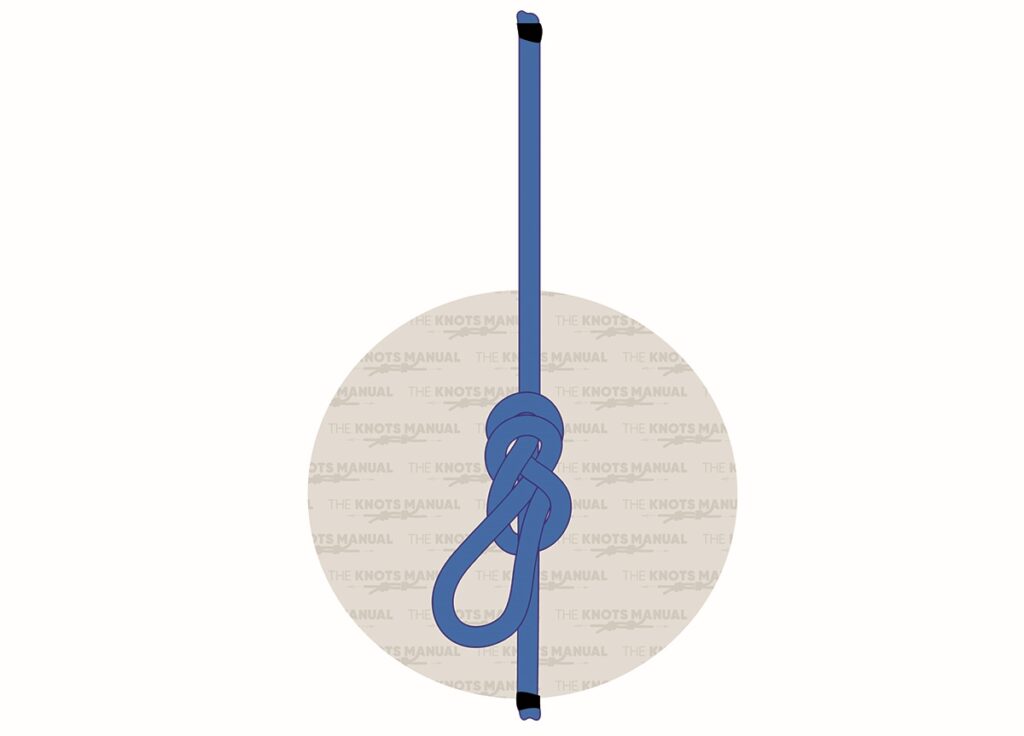
11. Bowline Knot
The Bowline Knot creates a secure loop that won’t slip under tension, making it valuable for tying into a harness. It’s easy to untie even after being loaded, making it a favorite among climbers. This knot is particularly useful for rescue situations or securing loads. Its reliability ensures safety in a variety of climbing applications.
In order to tie a Bowline knot, form a small loop near the end of a rope and pass the working end through the loop. Then, go out of this loop on the left side of the standing end and bring the working end around the standing end. Next, pass the working end through the original loop in the opposite direction. Pull the working end opposite to the fixed loop to tighten.
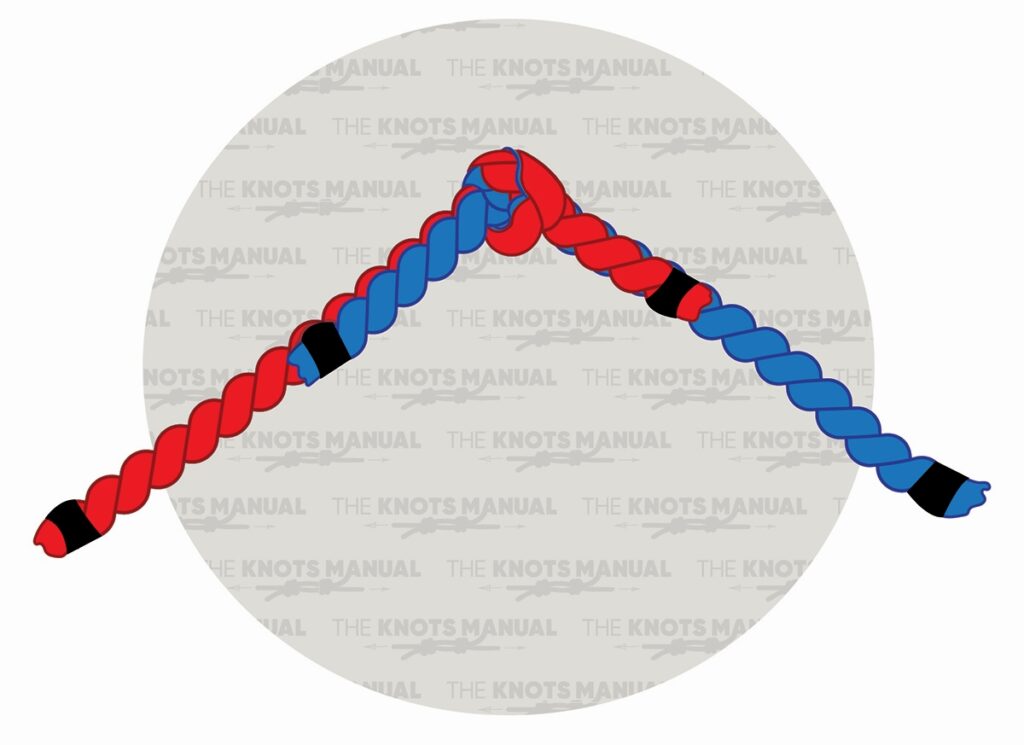
12. Figure Eight Bend
A Figure Eight Bend joins two ropes securely while maintaining strength under tension. It’s often used when extending climbing ropes or during rescue operations. This knot holds firm without slipping and is relatively easy to inspect for security. Climbers trust it for connecting ropes in demanding situations.
Tying a Figure Eight Bend knot begins with two ropes. Make an open bend with the working end of one of the ropes, and with the end of the rope, go over, under, and over the rest of the rope.
Go through the last loop with the working end, forming a loose Figure Eight knot. Take the end of the second rope and start retracing the knot made with the first rope, only from the other direction.
Start by going through the last loop made in the first rope. Continue retracing the knot, going under and over, following the loop.
Exit the end of the second rope through the final loop, and pull the ropes in opposite directions to tighten the knot.
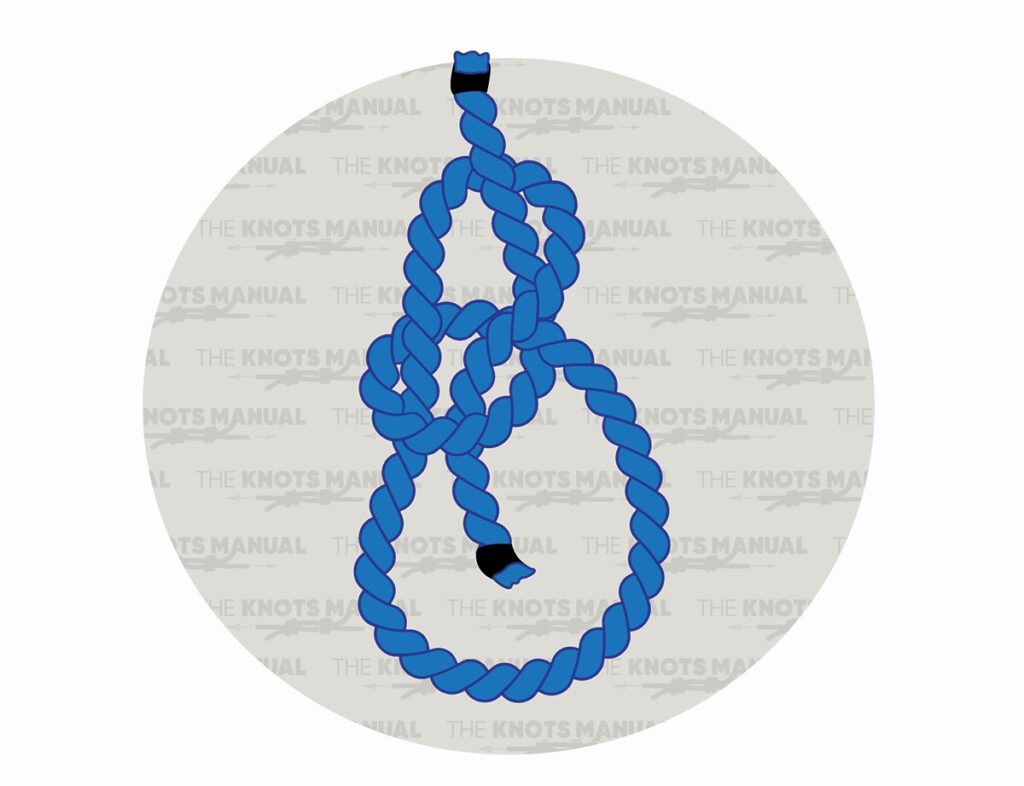
13. Double Figure Eight Loop Knot
The Double Figure Eight Loop Knot creates two secure loops, making it ideal for equalizing anchor points. It’s often used in belay setups or when setting up multi-point anchors. The redundancy of two loops provides added security and stability. Its structure ensures that loads are evenly distributed.
To tie a Double Figure Eight Loop knot, make a loop with a long bight in the middle of a rope. Take the bight under, over, and under the rope again, and then pass it through the loop formed.
Go back through the loop with the end of the bight, but not fully, forming two loops. Next, take the end of the bight and go over the whole knot to the opposite side.
Continue moving the end of the bight over the whole knot. While holding the two loops, tighten the knot.
The completed knot should have two, fixed, bunny ear-shaped loops, two parallel ropes on each side, and three parallel ones at the bottom.
14. Girth Hitch Knot
A Girth Hitch Knot is a simple and effective way to attach a loop of rope or webbing to a harness or anchor. It’s commonly used for securing slings to carabiners. While easy to tie, it can weaken under heavy loads, so climbers use it cautiously. It provides quick and efficient attachment in various situations.
When tying a Girth Hitch knot, start by wrapping the pre-tied sling around the support. Pass the bigger loop through the smaller one and take the right loop to the left side. Then pull the bigger loop so that the smaller loop tightens against the support to finish the knot.
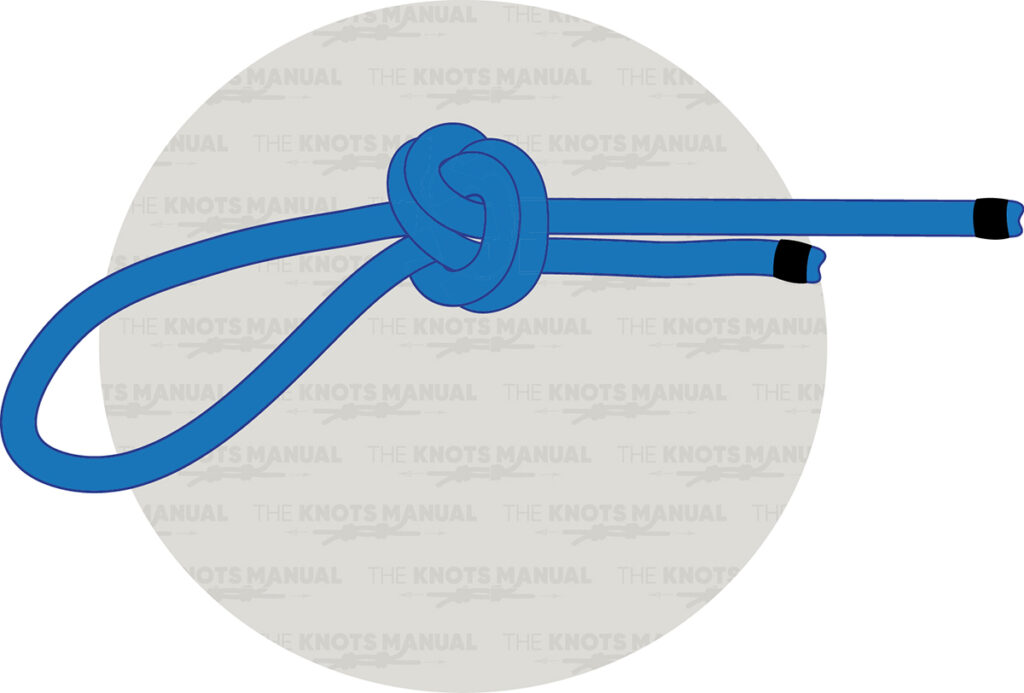
15. Zeppelin Bend Knot
The Zeppelin Bend Knot is a strong and secure way to join two ropes together. Unlike some other bends, it remains easy to untie even after carrying a heavy load. This knot is ideal for situations where a stable yet non-permanent connection is needed. Climbers value its reliability and strength in rope systems.
A Zeppelin Bend knot is tied by interlinking two symmetric Overhand knots. Start by placing one loop over another loop and pass one of the ends through the loops. Then pass the end of the other rope through the loops. Simultaneously pull on the working ends and two standing ends to tighten the knot.
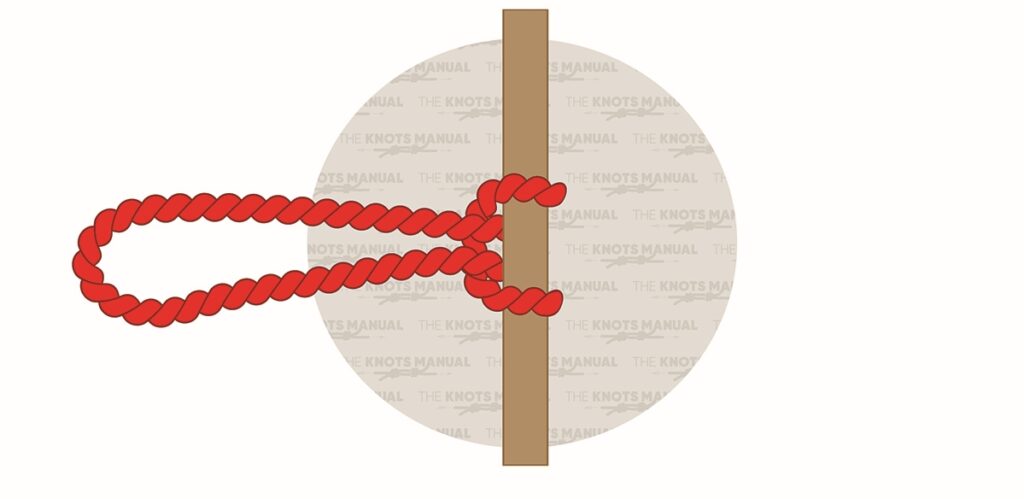
16. Clove Hitch

A Clove Hitch is a versatile knot used for securing a rope to a carabiner or post. It allows for easy adjustments, making it useful in anchor-building. This knot is commonly used for temporary holds and quick tie-ins. However, it can slip under heavy loads, so it’s often backed up with another knot.
In order to tie a Clove Hitch, start by hanging the rope from a support object, and then loop the end of the rope around the object, passing the end of the rope from behind the rope. Pull both ends of the rope to tighten the knot.
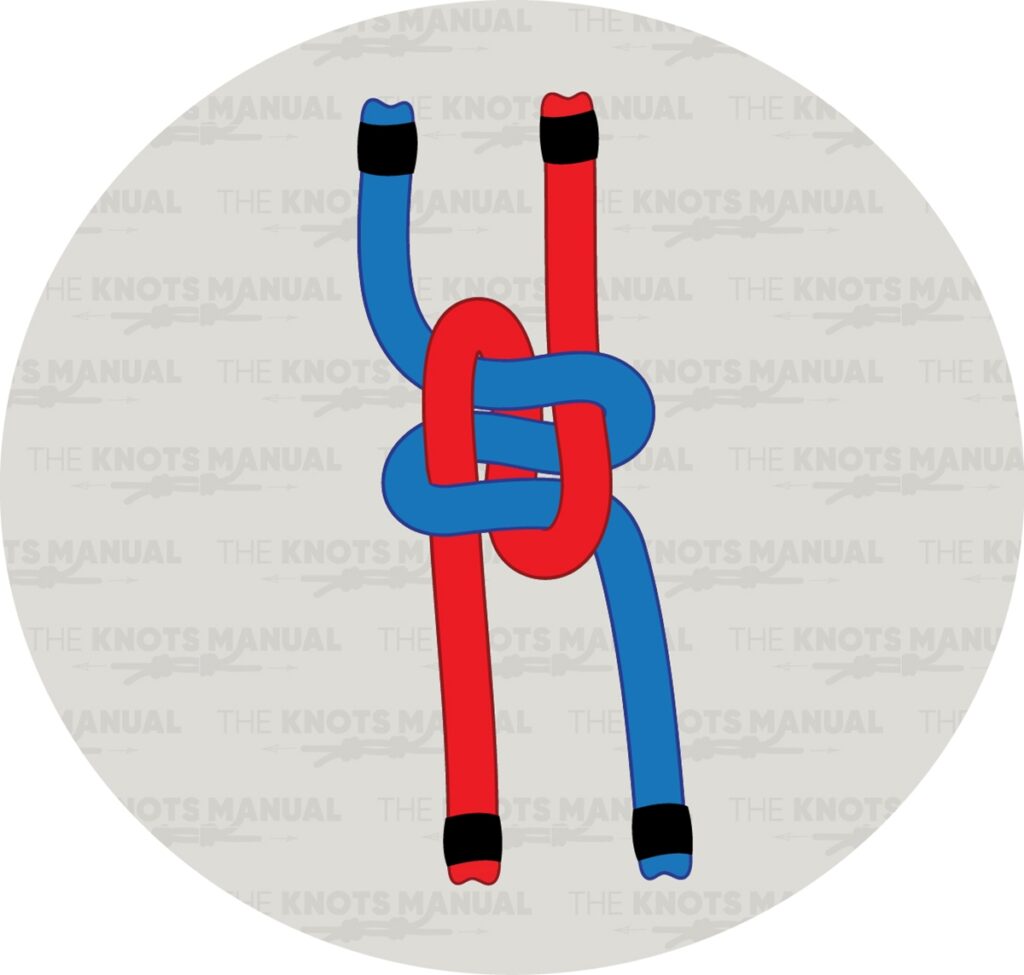
17. Munter Hitch

The Munter Hitch provides a simple way to belay or rappel without a belay device. It creates friction on a carabiner, allowing controlled descent or rope handling. Climbers use this knot in emergencies when other belay methods aren’t available. Its ease of tying and effectiveness make it a crucial skill to learn.
To tie a Munter Hitch Knot, make two loops in the middle of a rope in opposite directions. Then place a carabiner through both of them. Pull both ends to create a reliable and adjustable hitch that can be used for securing and lowering.
18. Overhand Knot
An Overhand Knot is one of the simplest knots and serves as a basic stopper or backup knot. It’s commonly used to secure rope ends and prevent slippage. Climbers often use it to back up other knots for added safety. While simple, it plays a vital role in many climbing applications.
Tying an Overhand knot begins by forming a loop. Pass the rope’s working end over the standing part, and thread it through the loop created, pulling it through completely. Pull the working and standing ends at the same time to tighten the knot.
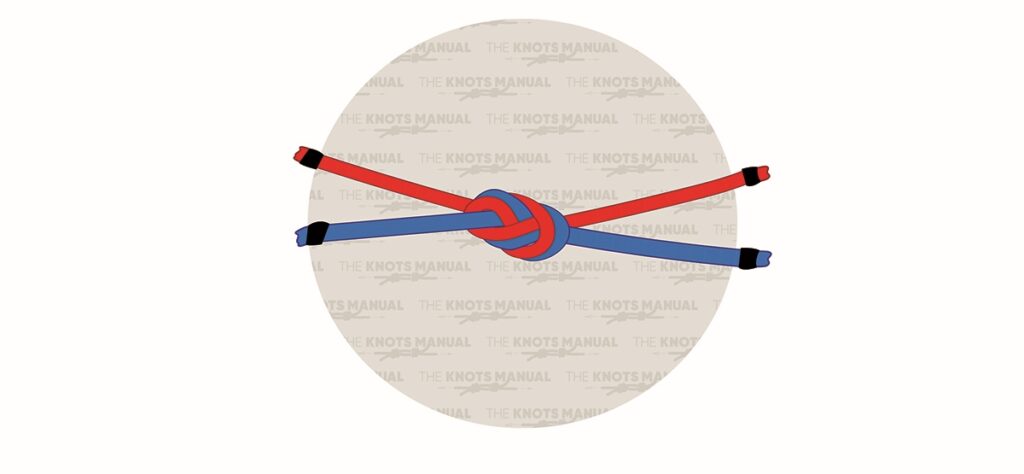
19. Square Knot
A Square Knot is frequently used to tie two ropes of equal diameter together. While not recommended for heavy loads, it’s useful for securing non-critical gear. This knot is quick to tie and untie, making it handy for temporary uses. Climbers employ it in situations where a secure but easily adjustable knot is needed.
In order to tie a Square Knot, cross one rope’s working end over another rope’s working end. Pass the working end of the first rope through the loop created by the second rope. Then, pull the working ends and standing ends of both ropes simultaneously to tighten the knot.
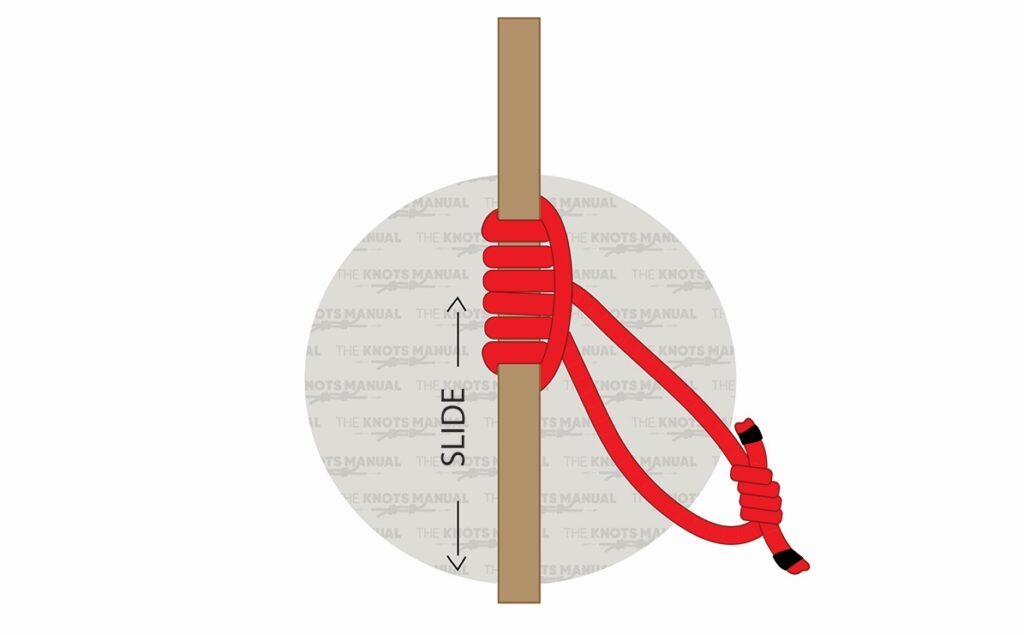
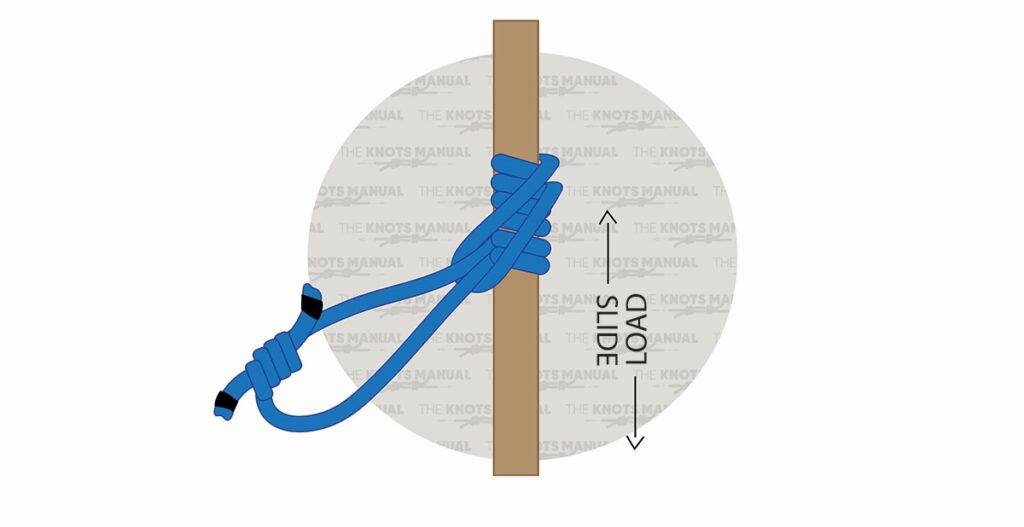
20. Taut-Line Hitch
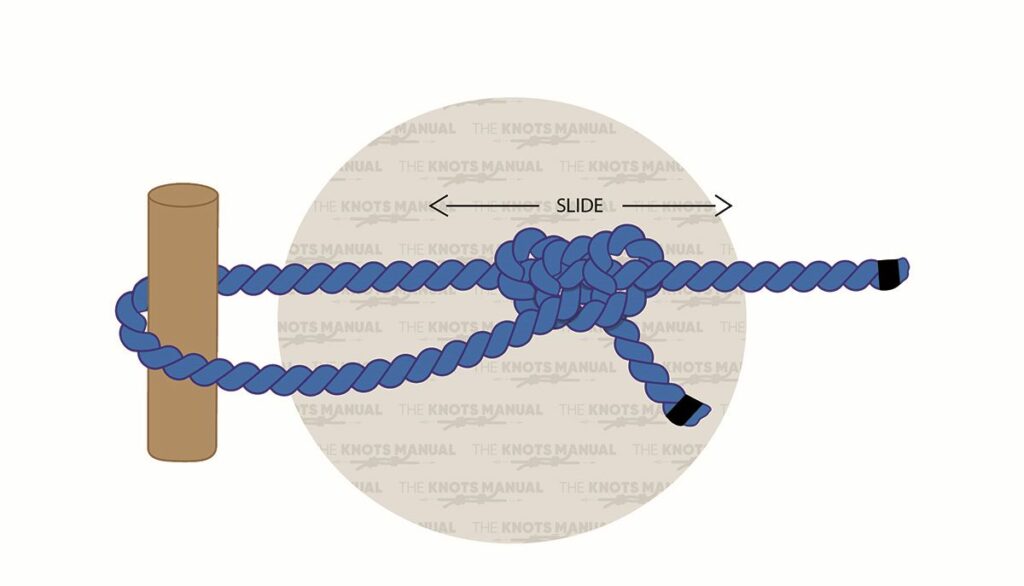
A Taut-Line Hitch is an adjustable knot that maintains tension on a rope. It’s useful for tightening guy lines or securing loads. Climbers rely on it when they need a knot that can be adjusted under load. Its ability to hold tension makes it valuable in various climbing scenarios.
When tying a Taut-Line Hitch knot, wrap the working end around the support and then around the rope’s standing part. Next, take the working end and wrap it around the standing end again, starting inside the loop.
Then, pull the end of the rope upwards so that it’s outside the loop. Wrap the working end around the standing end again, outside the original loop.
Tighten and complete the knot by holding the standing part on either side of the support with one hand and pulling both ends of the rope with the other hand.
Slide the knot across the rope to adjust the tension.